Saturday, March 31, 2012

weaving and burning

Today's ATC is woven from coloured strips of paper attached to a sticky label, then stamped.
I really need to get some tiny letter stamps, don't you think?

Today, I played with some tyvek.
Terrible picture, sorry.  The one on the left is painted with lumiere halo rose gold and the one on the right is painted with setacolour metallic green.
Here is a sample leaf cut out for each of the collages I am working on.  The background is here.
These are very nice, but I decided to play with the heat gun.
Here are the fabrics after distressing.
These two were cut out after distressing the tyvek.
These two were cut out first then heat distressed.  I liked the first set better, because it is easier to control the shape, since you cut it out after, and also, you can cut the leaf to take advantage of different textures in the distressed tyvek.  I think I will be using these for the Autumn collage most definitely and I will probably include a few in the gum leaf collage, just for continuity, since I like the suede ones for the gum leaves so far.
Mmmm, I think I might have some burnt orange suede somewhere......
I also made this sheet of fabric paper for the orange collage
But I think another layer of tissue and watercolour is in order first.

Happy stitching.


Friday, March 30, 2012

orange and green

Today's ATC is made from some fabric I got in the swap package I showed yesterday
I free machined over a few of the leaves in the pattern, then added some leaf sequins which I had coloured with nail polish.

Today's leaf is one that is a sample for the fabric part of the gum/Eucalyptus collage base I showed yesterday.
This one was free machined on synthetic suede, just took a few minutes, since the shape is so familiar to me.  My husband's comment was that it had a hole in it.  A lot of gum leaves do have these little holes and I think it makes them look real if you include it.  I have simply cut it out about 1-2mm from the stitching line.  Because it was suede, I really didn't need to actually outline it at all, just cut it out, but if you  look very closely at a gum leaf, you will see that there is a tiny vein line all around the edge.
Of course, I will have to make a lot of these if I use them and I'm not sure how much of this colour I still have.  And I have other ideas to try as well.


Thursday, March 29, 2012

No ATC, but a very big leaf

No ATC today, I have been out at ART group all afternoon.
But I have a very big leaf!
This is about eight or so inches long and is a dimensional element on a collage I am working on.
The frame is about 24 inches square, so it's quite large.  I made these leaves with a stencil and tile adhesive.  The technique is just the same as for stencilling with modelling paste, here, (I learnt it from a beryl taylor video here ) except of course I would need a lot of modelling paste, so I used something I had lots of.
This one is one of a pair (I had thought of four for four seasons, but we shall see)
This one is a little further along.  Basically, they are both collage backgrounds for small fabric collages which will go on top and be the focal points.
I am still in the thinking stage about construction of the collages, or corsages, I suppose they will be.

Oh, and here is a fabric page I recieved from a friend in Holland yesterday.  The theme was, of course leaves.
This is 8 inches square with gorgeous fabrics and so much hand stitching.  I am very pleased to recieve it!


Wednesday, March 28, 2012

tree and leaf

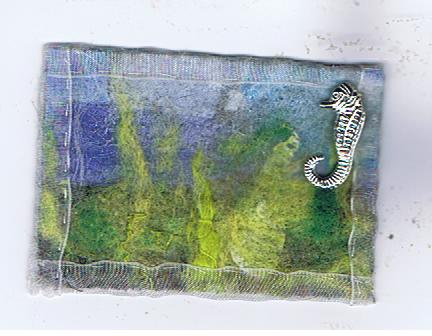
This ATC was hand needlefelted (background) on a piece of batting.  It took a bit of cogitation, but then I decided it needed a tree, so I stitched one. I finished with a very untidy blanket stitch,lol.

Since I was playing with the hand felting tool, I decided to make a leaf, but instead of batting or felt or anything solid, I felted it onto tulle.
Here it is.  You can just see the netting, which I can cut off or use a soldering iron to cut., but wait, there's more.
When I turned it over...

It had this really cool fur-like texture on the back where the fibers had been pushed through.  It reminds me of a possum's fur and is really soft.  Now I know this will come in handy.... when inspiration strikes.

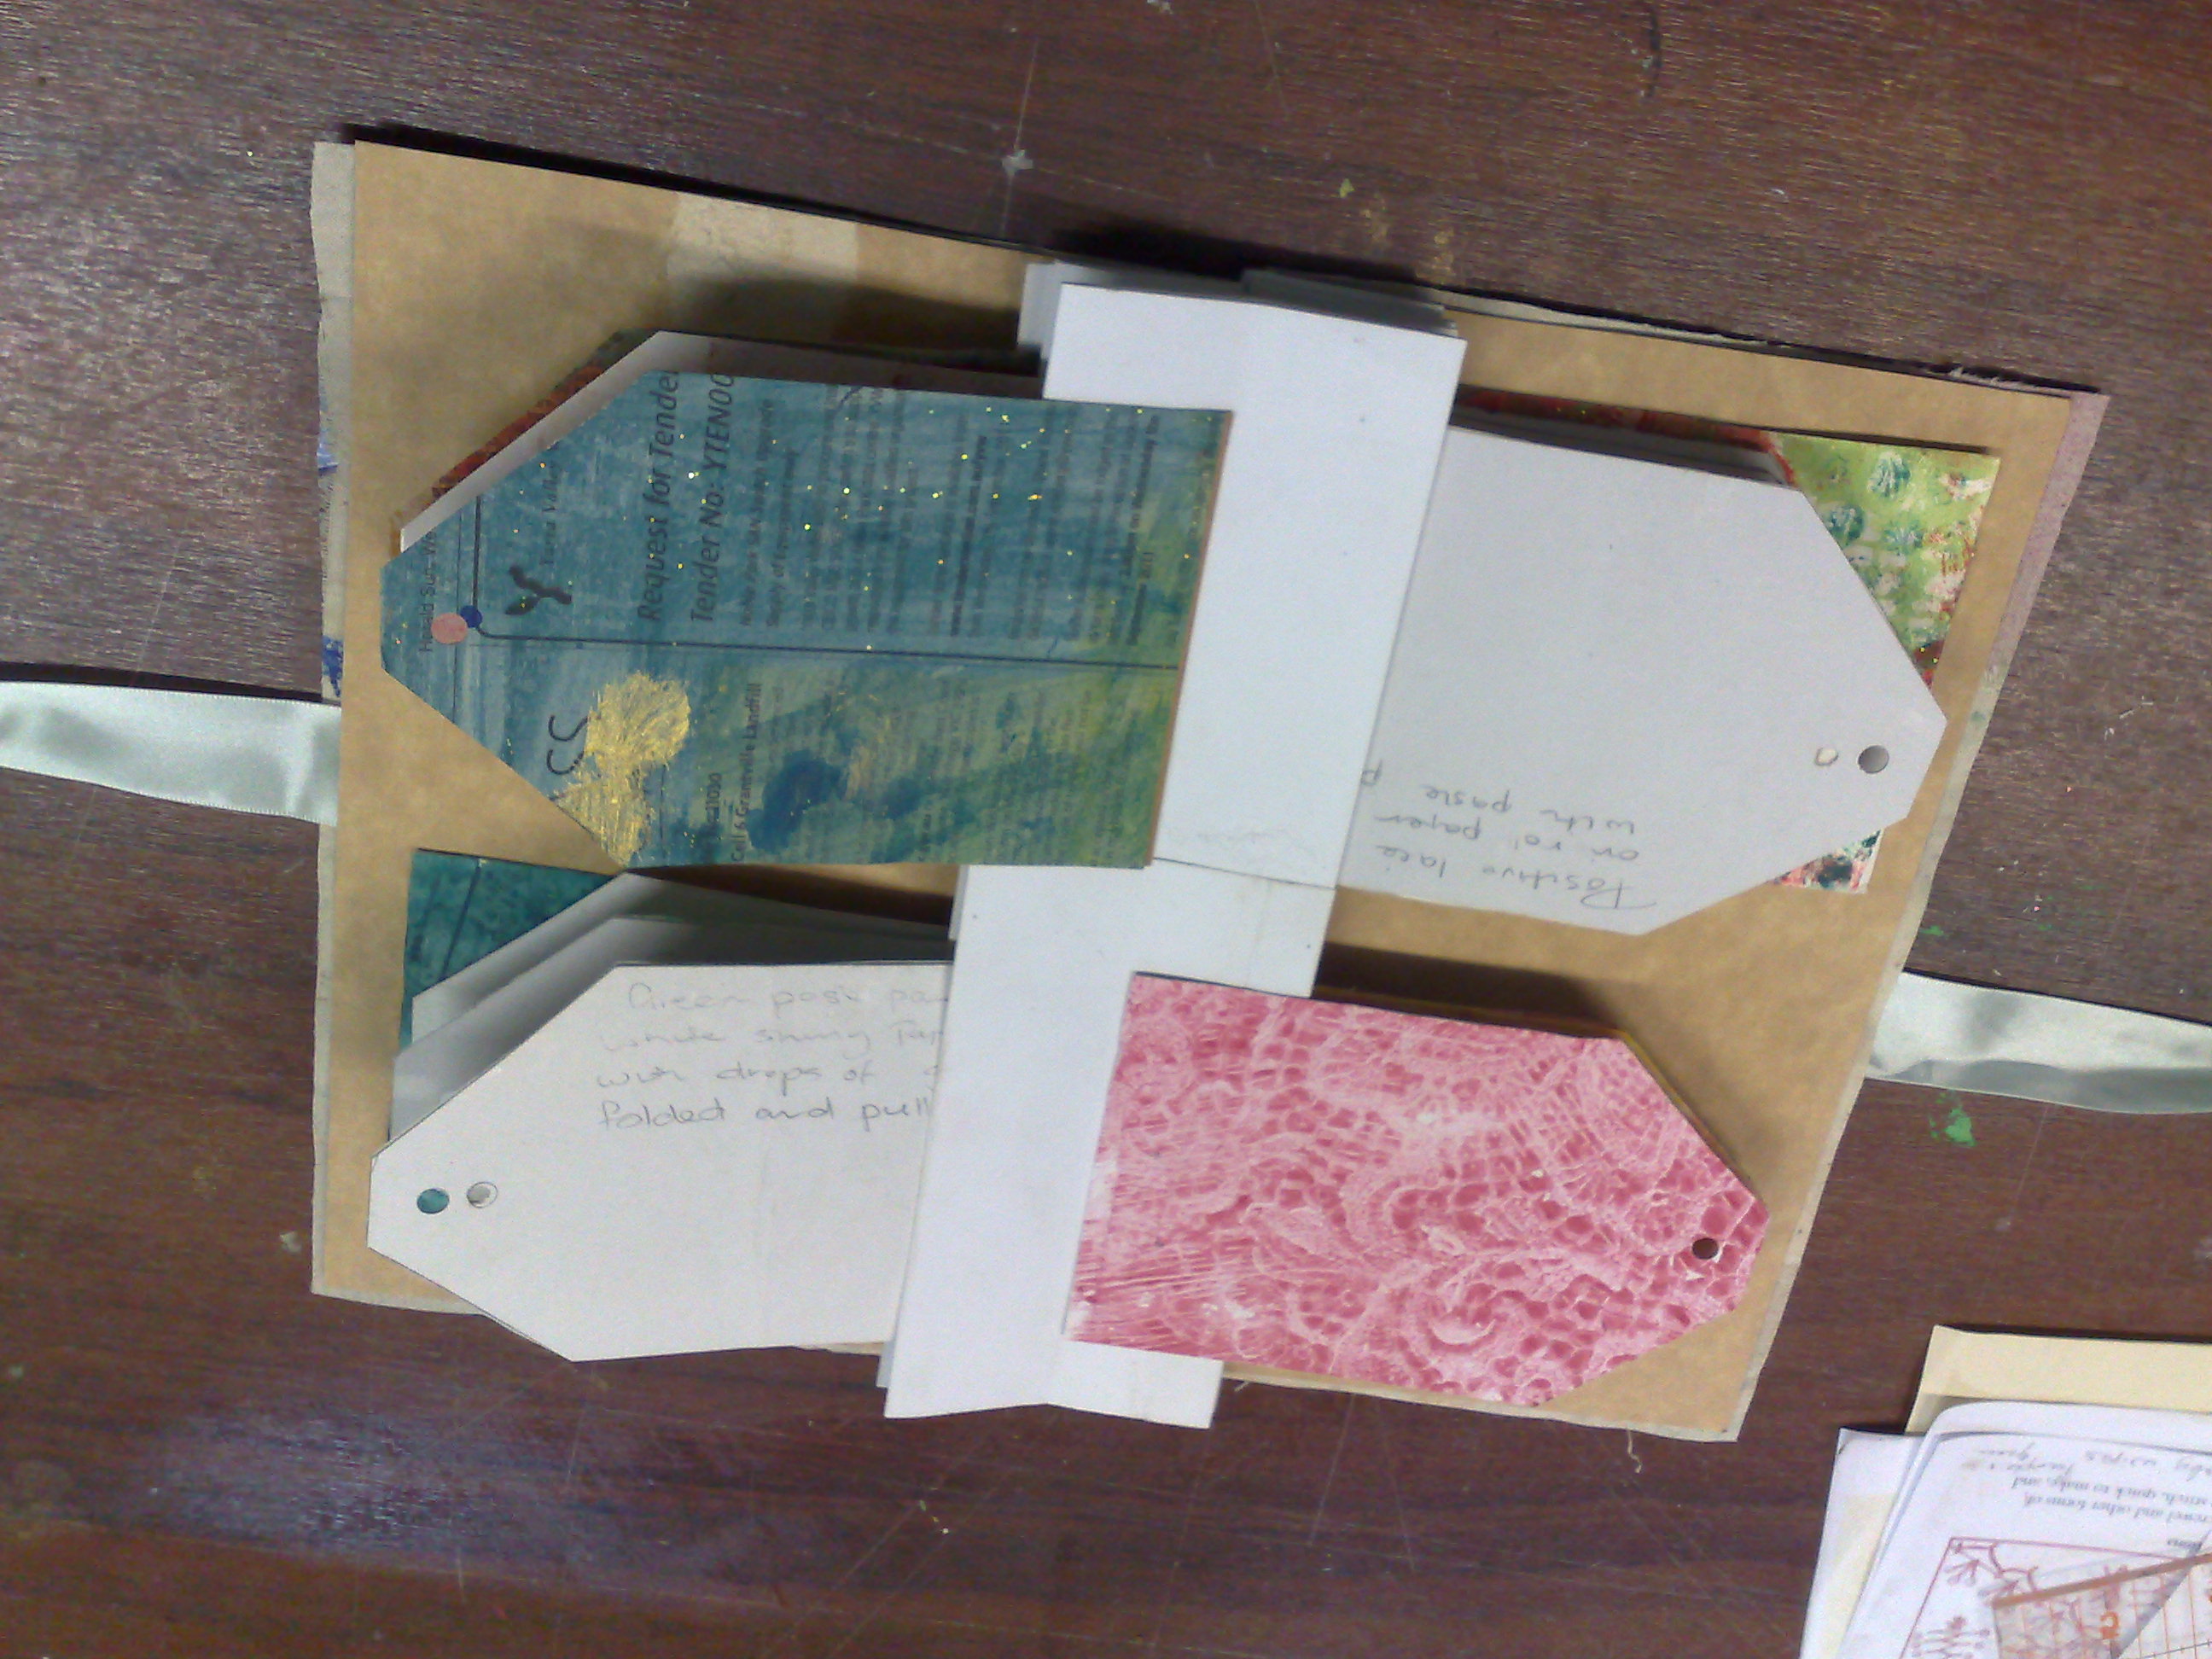
something else I did a few days ago was to recover my journal.
Usually, I start with White glue and acrylic paint mixed together to both seal and cover the surface at the same time.  This time, I started with white paint and glue, but remembered an experiment I did a few weeks ago.
I had been reading about the different texture mediums being marketed and I thought "What if I just" so I mixed a few things with white glue and added them to my practice journal to see what would happen. 
From top left, clockwise they are - seed beads, herbal tea mixture, sawdust and glitter. 
I wasn't reall impressed with the beads, but perhaps even tinier ones might work?  The Tea mix was interesting and I liked the green tinge in the glue.  The sawdust was really great, and of course having a woodturner for a spouse means we have tons of that, lol.  The glitter was very transparent, but made a beautiful suface, so might be useful over something else.

So, back to the experiment at hand - I had painted my page with a white acrylic/PVA mixture, but decided it was a bit boring for a cover and just grabbed the leftovers from the above experiment at random.  They were unlabeled and in opaque tubs.

It turned out to be the herb tea mix, and I dabbed it all over the wet white paint/glue.  I liked it, but wondered whether the texture would be durable enough for a book cover.
In a moment of inspiration, I grabbed some tissue paper and covered over the pain, glue and tea. 
You can see above a close up of the texture, which reminds me of those expensive japanese papers.
The tissue folded in places and became almost translucent and it made a beautiful cover for the book.
 I was concerned that it would not be durable, but it is pretty solid now that it is totally dry.  I may just seal it with some PVA to make sure, but I haven't made up my mind yet whether I want to add some colour.  I have in mind some lovely watercolour dribbles that blend together.  I will just have to try that out in my practice book.  But I am very pleased with this old textbook which I use as a personal journal.

A bit to get through today!


Tuesday, March 27, 2012

100 pretties

Although I think this is day 97, this is my 100th ATC, because I made four extras one day here.
This one has a fabric paper base, some painted face wipe, a lolly/candy wrapper and some flowers from a bit of braid.  This one highlights the difficulties of free motion stitching an item that is only 2.5 by 3.5 inches.   I knew there was a reason why I should have cut it out AFTER I had done the stitching.  I had nothing to hold on to.

Because this is my 100th ATC, I am going to broaden things a bit and start making leaves as well.  I am a leafaholic as many know and this morning I made this one on water soluble in a hoop.
I had green in the top and black in the bobbin and just decided, that since I did, I would turn it over halfway and continue.
Here it is after the stabiliser is washed off.  I like it.
Since the Tangled Textiles Challenge this round is green, leaves should fit in nicely, although not all leaves are green, lol especially over here.  I saw a gorgeous burgundy one today!  Fodder for Tomorrow?


Monday, March 26, 2012

Black and white and a hint of red

This was made from a napkin, laminated on card, then some pearly beady things from the dollar bin at Spotlight, which I attached freemotion with a bit of red thread.  Simple.

Here are a couple of pieces that I am working on.
This is silk paper on black felt with a little bit of freemotion embroidery.  To me, it looks like snowgum bark, but still needs a lot of thinking and stitching.
This one is also silk paper, overlayed this time with black tulle and with some gold leaf in it.  It doesn't actually look like anything, except perhaps mossy bark and I have only emphasised the freen bits a tiny bit.  More cogitating.needed.

This one is my mantra, I think.


Sunday, March 25, 2012

seaweed and flags


This is a tiny needlefelted ATC, that seemed to be of the ocean floor, so I added a little seahorse.
Except for the charm, everything was from my scrap box - So technically, this is green.  See more green here.

On to other things.  Someone asked me what I did with all my samples.  Sometimes I play with them and make new things.
This is one of those times.

OK, a book, but the covers were cut from an old fabric paper and molding paste.collage.

Inside are more samples.  These are painting effect samples that I made into tags.  But wait, there's more!

When you pull the covers apart, one set of tags goes one way and the other set goes the other way and the all (mostly) lie flat.  This is called a flag fold book.  If you look it up on youtube, you will find lots of videoes about it, but I was finally inspired to do it by Handmade Book Essentials a new workshop from Interweave.

You can see here, it is basically a fan fold with the tags added.

The trick is to make the fan tall enough for two tags, plus a bit more, and to alternate where the tag goes.  For instance here you can see the top tags all face to the back and are all placed pointing left on the top left of an open "spread".  The bottom flags all have faces to the front, pointing right on the bottom right of the open fan.  It all sounds very complicated, but it really isn't very hard and is a great effect when you open it!

I put a piece of ribbon under the back cover before I glued it on -  and this is another point.  Front and back covers are not connected - there is no spine, which is why you need to be able to tie it up.  If there were a spine, the flags would not happen.
Wow, it's so complicated to write down, when it only took ten minutes to make.


So,


Saturday, March 24, 2012

circles

This ATC uses a few of my recent samples.  The fabric is a negative print from a perpex plate monoprint using a cookie cutter (ie the print you get off the plate after you have printed the lines of the cookie cutter)
One of the Tangles, Beverly, used a circular stitching attatchment in her recent challenge quilt.
This remided me, that although my other half has promised to make me one of these attachments, and therefore I do not have one, I do have a flower stitcher foot,
 which makes 1-2 inch circles and makes interesting patterns with different stitches, so I had a play with that over the top of the circly fabric, using a few different stitches like, blanket, satin, feather, etc.  It was a bit of fun.
I decided the ATC was a bit boring, so I fremachined the word, circle on it and then satin stitched the edge.

My machine tends to chew up the corners when I do this, so what I have done, is used a piece of scrap printer paper underneath, then free machined the satin stitch, going around a few times.
Even though the paper is quite perforated by now, I still found it easier to tear it off by hoding a ruler down over the edge.  (I think if I had simply satin stitched with the feed dogs up, the paper would fall off by itself, and probably before I was ready for it to, because the stitches would have been very straight and regular).
Anyhow, you can leave the inside paper on the back to write on or remove it in the same way. 
There will be little bits of white paper showing around the edges and I would advise not to try and pull them out, but to do what I did below.
You can see that there are no little white bits showing at the top in this picture.  A permanent marker works wonders and saves weakening the edge by removing the hangers-on.


Friday, March 23, 2012

No Spring Here

I have been playing with making flowers from stiffened satin and silk.
Felt base.  stiffened satin and freehand cut silk shapes stitched down.  French knots, satin, running and blanket stitch.

Inspiration is everywhere!

Thursday, March 22, 2012

A bit of satin

This was a piece of satin I had printed on the computer, which came out too pale.
So I added a bit of stitching to jazz it up and a little baby butterfly in the centre made of stiffened satin, which I cut with a paper punch.
Enjoy.

I found these cool letters here.

Wednesday, March 21, 2012

silk and collage

I love how silk is so shiny and soft
Fabric paper made from magazine scraps on scrim/fine cheesecloth (used back to front), silk fibres trapped under acetate and free machined.

Also, here's a look at a couple of collages I am working on at present.
This first one is up to my fouth layer (ie base then paper, tissue, paint, stencilled paste) and I am cogitating on the next few layers.
This one is only up to the tissue and paint stage - but I like it!  needs a bit of thinking, but since it is raining here, will take a while to dry.  My initial reaction is to continue on the leaf theme and do some autumn type leaves, but we will see.