Today is just a short post, and happy new year to those of you on my side of the international date line.
I will begin posting my ATCs (every day OMG!) starting tomorrow, ie on the first US time, since it is my friend's idea and she is in the US.
Down to business.
I love Kim Thittichai's work and follow her adventures all the time. One of the things she has begun using is newspaper and scrap paper. If you have been reading my blog, you know I have been using newspaper as a great base for my artbook pages.
In December's issue of Workshop on the Web, Kim had a great article on making a collage using newspaper and so I had to have a go.
Here are some pieces of newspaper which I have gessoed, randomly painted and them stamped with my motif of leaves. (The stamp was made from a piece of wood with elastic bands glued with contact adhesive. I often do this with stamps that are composed of only lines)
Here is my collage assembled. The leaf at the bottom left has been free machines and applied. I decided I liked the rough edges, so I free machined the collage to a backing. I have also added a bit of foiling.
The background fabric is only pinned around the stretcher bars, because I intend to do some hand stitching to isolate the leaf and to integrate the collage into the background. I will also tone down some of my over enthusiastic foiling with some gesso and stitching.
OK, time to get some work done!
Showing posts with label Kim Thittichai. Show all posts
Sunday, January 1, 2012
Friday, April 1, 2011
Burned fabrics
I thought I would experiment a little with my heat tool and see what I come up with. There are lots of places to go for information on burning textiles, but my favourites are Kim Thittichai's Hot Textiles and Quilting Arts Magazine.
Here are a selection of synthetic, from lace, to felt, to lame'
Below, I have traced around a motif in some lace with the straight tip on the heat tool. It creates a sealed edge that can be appliqued without fraying.
You can trace/cut around quite complicated motifs this way.
It works extremely well on Lutradur.
This lame' frays very easily, but the shape burned out will not fray.
The same is true for this satin.
You can also use some of the other heads to emboss, or burn patterns into fabric. This works really well on velvet. Above tou can see a flat circular head and a nine patch sort of head. If you want to emboss instead of burn you need to be able to lower the heat on your tool.
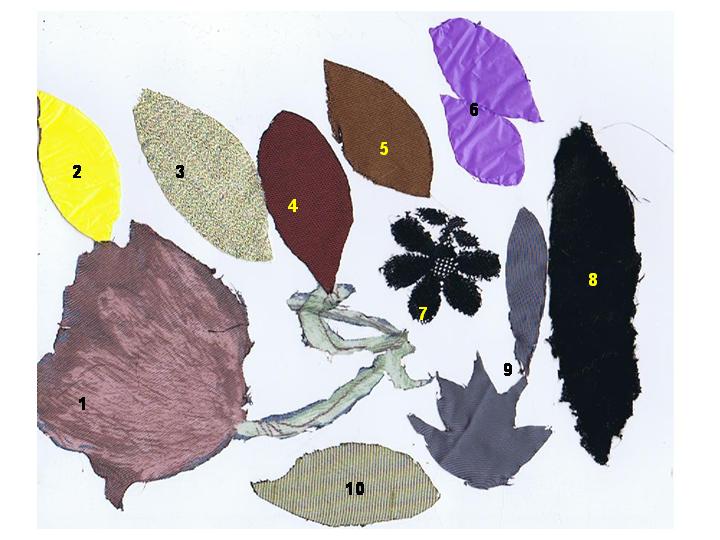
Here are some applique leaves and motifs cut out.

Using the circular head on plastic at a hot heat, then layering two colours
Cutting out bubble wrap then melting the bubbles over a foil base
In these two lutradur samples, I have cut out a design with the straight tool, and burned with the shape tools.
In this satin sample, the melted fabric made strands as I pulled the tool away. I definitely need to repeat this.
In this lutradur sample layered over a purple background, the left circles went totally through, whilst the right citcles only went halfway forming a fine lace. I liked that.
In these to samples I was experimenting with getting the leaf to stitck to the fabric underneath. It wasonly a partial success.
These two are embossed crushed velvet. because the velvet was black, It is very hard to see the embossing here, but it is very visible when looking at it in reality.
Here I have both fully burned and partially burned lame. The sample on the right is burning lame onto felt, which requires a higher heat to melt
If you look carefully, you can see the embossed circle on this shot satin.
Lame and organza on felt.
Here is the large lace motif burned out.
These textured satins were perfect for cutting geometrics out. This would be a great addition to some cut work.
These two examples on black silk (which also needs a higher heat) were some scraps of fused fabrics I had. I was not sure if it was a good idea to use them, but I am glad I did. Since these were sheers, I put a little angelina between the two layers, I wanted to see if I could trap the angelina in between. It worked, but I also discovered something else.
I simply put a piece of fusible larger than the shape (without the paper backing), between the two layers before I burned the line and it worked! So not only does this fuse the fabrics to the background, you don't have to iron any fusing first.
I would not trust this to be permanent, since the fusing is only a fine line, but for me it was a great discovery.
Using this method, you could have beautiful synthetic appliques (which are usually fiddly because the fabric is slippery, and can't be fused because the fabric will melt). The appliques would easily stay in place for stitching, and because the fusible is not ironed in the centre, they would stay soft.
I will have to experiment with washing after stitching to see what happens to the unironed fusible, but my guess is it is so fine, it would not bea problem.
WOW - I feel like shouting Eureka! I am most certainly going to use this in my secret activity that I told you I would tell you about soon.
Did you hear that girls? Here's my first technique.
So excited. No quote today
Oh and I got the book I won from workshop on the web yesterday
I am really enjoying reading it and looking forward to doing the free online tutorials that go with it.
Vicki
Here are a selection of synthetic, from lace, to felt, to lame'
Below, I have traced around a motif in some lace with the straight tip on the heat tool. It creates a sealed edge that can be appliqued without fraying.
You can trace/cut around quite complicated motifs this way.
It works extremely well on Lutradur.
This lame' frays very easily, but the shape burned out will not fray.
The same is true for this satin.
You can also use some of the other heads to emboss, or burn patterns into fabric. This works really well on velvet. Above tou can see a flat circular head and a nine patch sort of head. If you want to emboss instead of burn you need to be able to lower the heat on your tool.
Here are some applique leaves and motifs cut out.
- from very thin chifon/organza
- from plastic garbage bags
- lame
- a shot satin
- silk
- several layers og garbage bag plastic (seals them together)
- Lace
- crushed velvet
- satin
- an embossed satin

Using the circular head on plastic at a hot heat, then layering two colours
Cutting out bubble wrap then melting the bubbles over a foil base
In these two lutradur samples, I have cut out a design with the straight tool, and burned with the shape tools.
In this satin sample, the melted fabric made strands as I pulled the tool away. I definitely need to repeat this.
In this lutradur sample layered over a purple background, the left circles went totally through, whilst the right citcles only went halfway forming a fine lace. I liked that.
In these to samples I was experimenting with getting the leaf to stitck to the fabric underneath. It wasonly a partial success.
These two are embossed crushed velvet. because the velvet was black, It is very hard to see the embossing here, but it is very visible when looking at it in reality.
Here I have both fully burned and partially burned lame. The sample on the right is burning lame onto felt, which requires a higher heat to melt
If you look carefully, you can see the embossed circle on this shot satin.
Lame and organza on felt.
Here is the large lace motif burned out.
These textured satins were perfect for cutting geometrics out. This would be a great addition to some cut work.
These two examples on black silk (which also needs a higher heat) were some scraps of fused fabrics I had. I was not sure if it was a good idea to use them, but I am glad I did. Since these were sheers, I put a little angelina between the two layers, I wanted to see if I could trap the angelina in between. It worked, but I also discovered something else.
If the top fabric has fusible on the back, when you burn around it, you also fuse it to the background (so long as the background has a higher melting point). Wow! I found this such and exciting discovery that I tried a lot of fused fabrics on some brocade (below).
- grey satin
- green garbag plastic
- white metallic organza
- textured satin
- loose weave organza
- velvet ribbon
- lutradur
I simply put a piece of fusible larger than the shape (without the paper backing), between the two layers before I burned the line and it worked! So not only does this fuse the fabrics to the background, you don't have to iron any fusing first.
I would not trust this to be permanent, since the fusing is only a fine line, but for me it was a great discovery.
Using this method, you could have beautiful synthetic appliques (which are usually fiddly because the fabric is slippery, and can't be fused because the fabric will melt). The appliques would easily stay in place for stitching, and because the fusible is not ironed in the centre, they would stay soft.
I will have to experiment with washing after stitching to see what happens to the unironed fusible, but my guess is it is so fine, it would not bea problem.
WOW - I feel like shouting Eureka! I am most certainly going to use this in my secret activity that I told you I would tell you about soon.
Did you hear that girls? Here's my first technique.
So excited. No quote today
Oh and I got the book I won from workshop on the web yesterday
I am really enjoying reading it and looking forward to doing the free online tutorials that go with it.
Vicki
Friday, March 4, 2011
Fantastic Plastic
For Friday Focus this week, I experimented with supermarket rubbish bags. Truly, I did. Ever since i read Kim Thittichai's Hot Textiles, I have been dying to have a go at her techniques. She is an extremely well known textile and surface artist in the UK and has training in sculpture. You can view videos of her here (you will have to log in but it's free) and here. Some of the surfaces she creates and those by others in the book are simply gorgeous. I only played with plastic bags today, but there are all sorts of other synthetics to play with as well. What I experimented with was layering and fusing plastics with the iron.
My technique was pretty simple. I used a large leaflet of parchment paper on my ironing mat, simply put the plastic between and ironed. Because the parchment paper is see through, I could see what was going on. Most effects only needed one or two swipes with a hot iron, then peel off the parchment when cool.
One effect in particular which I really liked was in the encyclopedia of machine embroidery. I have just taken the last hour to try and find it. I thought it was bubble wrap and plastic with threads captured between, however it wasn't although it really looked like it. I tried to get a similar sort of effect.
This is a blue shopping bag and bubble wrap layered together. The white you see is holes (the bubbles burst from the heat)
This is the same but with some blue thread trapped between
I think the first one is closest to what I was after and with some free motion embroidery, would probably be excellent for bubbles under water (I see sea dragons in it's future).
This is some bubble wrap that had a green tinge to it. I liked the way the colour formed around where the bubbles were (how to make coloured bubble wrap).
I trapped some autumn leaves between two bag layers, it worked, but the leaves were very brittle and probably needed to be treated with some glycerine or PVA to stop them breaking otherwise any stitching would shatter them.
This is some of the plastic mesh bag oranges come in trapped between two layers. It was interesting that it shrunk more when it was intact (top) whereas, at the bottom, it was loose and didnt' shrink.
Several layers of two colours layered in sheets
Many many layers of the green created this rocky sort of texture
This was made with lots of scrunched up pieces
This shows what happens with one or two flat layers. The top one shows how the plastic opens up to create and airy texture, while the bottom shows how the plastic laminated with lots of layers.
This sample has many layers of plastic, but they are added one by one and have angelina layered between them. Adding the pieces one by one allows the creation of the holes, which is a great texture, also shown below:
This is one layer of plastic ironed onto a non thermoreactive plastic (thick acetate). I really like the way the bag plastic becomes an open texture like this. If it is heated on it's own between parchment layers, not only does it break up like this it shrinks. It needs a substrate or a foundation under it to do this.
I really like this texture and have many ideas about using it, but I wanted to try one more experiment before the end of the day. I overlapped pieces slightly on a sheet of fusible, then heated. And look what I got!
This sample was the piece d' resistance. All of the sheets have fragmented and the overlaps create wonderful colours. The white flecks you see are holes in the plastic, not reflections. My mind is now spinning with ways to use this new textile. It can be ironed on to just about any surface and I really just want to get embroidering with it. You will see this piece again in another work.
so I have had a very productive day, hope you did too
My technique was pretty simple. I used a large leaflet of parchment paper on my ironing mat, simply put the plastic between and ironed. Because the parchment paper is see through, I could see what was going on. Most effects only needed one or two swipes with a hot iron, then peel off the parchment when cool.
One effect in particular which I really liked was in the encyclopedia of machine embroidery. I have just taken the last hour to try and find it. I thought it was bubble wrap and plastic with threads captured between, however it wasn't although it really looked like it. I tried to get a similar sort of effect.
This is a blue shopping bag and bubble wrap layered together. The white you see is holes (the bubbles burst from the heat)
This is the same but with some blue thread trapped between
I think the first one is closest to what I was after and with some free motion embroidery, would probably be excellent for bubbles under water (I see sea dragons in it's future).
This is some bubble wrap that had a green tinge to it. I liked the way the colour formed around where the bubbles were (how to make coloured bubble wrap).
I trapped some autumn leaves between two bag layers, it worked, but the leaves were very brittle and probably needed to be treated with some glycerine or PVA to stop them breaking otherwise any stitching would shatter them.
This is some of the plastic mesh bag oranges come in trapped between two layers. It was interesting that it shrunk more when it was intact (top) whereas, at the bottom, it was loose and didnt' shrink.
Several layers of two colours layered in sheets
Many many layers of the green created this rocky sort of texture
This was made with lots of scrunched up pieces
This shows what happens with one or two flat layers. The top one shows how the plastic opens up to create and airy texture, while the bottom shows how the plastic laminated with lots of layers.
This sample has many layers of plastic, but they are added one by one and have angelina layered between them. Adding the pieces one by one allows the creation of the holes, which is a great texture, also shown below:
This is one layer of plastic ironed onto a non thermoreactive plastic (thick acetate). I really like the way the bag plastic becomes an open texture like this. If it is heated on it's own between parchment layers, not only does it break up like this it shrinks. It needs a substrate or a foundation under it to do this.
I really like this texture and have many ideas about using it, but I wanted to try one more experiment before the end of the day. I overlapped pieces slightly on a sheet of fusible, then heated. And look what I got!
This sample was the piece d' resistance. All of the sheets have fragmented and the overlaps create wonderful colours. The white flecks you see are holes in the plastic, not reflections. My mind is now spinning with ways to use this new textile. It can be ironed on to just about any surface and I really just want to get embroidering with it. You will see this piece again in another work.
so I have had a very productive day, hope you did too
Subscribe to:
Posts (Atom)