Showing posts with label techniques. Show all posts

Monday, December 12, 2011

Using Prompts

Recently, I read an article by Robin Olsen from the sep/oct 2009 issue of Cloth Paper Scissors  I decided to extend her idea, which was to use prompts to direct the construction of a fibre art piece.
I made up 110 cards for my prompts.  I used a list of techniques from my database, where I keep a record of  my reading and the ideas which come from it.  In the past, I have simply been able to scan through the database until I find something I felt like experimenting with, and do it - but now, with the techniques converted to prompts, it gives me random ideas for a piece.
Today, I decided, it was time to put the cards to the test!  Were there too many?  How flexible could it be? Would it work for me?
Let's find out!
I started with a piece of felt.
The prompt said "Add needle felted fabric" - Now, I have only small scraps of fabric left from other projects, not enough to cover this piece, which was about 14-16 inches square!  So here, the flexibility came in.  I decided to just needlefelt onto the felt.  You can see, I already had the machine out above.
Here I am in the final stages of covering the felt with needle felting.  (As usual, I got too engrossed to take pictures!) I used scraps of Fabric from my scrap box which included cottons, organza, satin, plastic, silk, roving scraps, painted nappy liners and face cloths, dyed batting and felt. Any fabrics which were not felting in well were covered in a fine film of roving scraps and re-needled.
 Above are a few close ups of the surface.
Here is the final foundation layer, with a few bits of scrap yarn added.
A close up of the yarn.
My next card said "Use a monoprint"  I was stumped for a while.
There was nothing for it but to get out the fabric I monoprinted a little while ago.  I looked at it.   I looked at it again.....  Finally I thought of cutting some flowers out of it.
So I got some flowery stencils out and moved them around.  The tulip and sunflower looked interesting, but... then I saw this stencil.
Decision made!
I thought the butterfly might look nice placed like this.  But I wanted to be sure.  So I loaded all my pictures into Photoshop.
First I cropped the background.

Then I got rid of most of the background from the butterfly and flowers (only a rough job, really)
and then I pasted them into place.  The contrast between the background and the elements is not wonderful, more is needed, so...
I drew around the butterfly with black to see what black satin stitch would do for it - and I liked that!
So I cut out my butterfly and put it down on the background.  I was still not sure about the flowers, though and just to make up my mind, I drew another card.
 It said "Attach something that isn't fully anchored down / dimensional" and that made up my mind for me.  I would make some dimensional flowers to add.


So that is where I got to today.  Considering I had no idea where I was going this morning and now I have a piece well on it's way, I'd say this method works.  But I'll have to try it a few more times, just to make sure, lol.
When I first started thinking about doing this, I  thought it might be a little too lacking in creativity, but the way I have put it together allows a bit of freedom in interpreting the prompt and the challenge actually seems to stimulate more creativity.  If I hadn't had to look at my monoprints, I wouldnt have looked at the stencils and I probably would never have  seen the butterfly and thought of using it.
Instead of how I thought it would be, it actually helps my creative impulse to not have to wrack my brain thinking of how to do something and instead simply take a random technique and  make it fit.

Try making a list of the techniques you regularly use and/or want to use.  Make them into cards so you can pick randomly, and have a go.  You might be surprised (like I was) at what you create.

Well, that's my story - and I'm sticking to it

Saturday, September 10, 2011

Leaf WIPs

Today was one of those days, so I will just show you some pages I am working on from a fabric journal on the theme "leaves".
These pages are about four inches square and I am trying to depict leaves in a different way with a different technique on each page.
This first one has had the background changed several times and I still don't like it.  I love the yarn wrapped leaves, but can't seem to find the right background.  I had thought of having the stripes echoed in the background and using more of a red and brown....
This one is in it's infancy and is really about the tree I can see in the dye spots.  The yellow leaf outline is for a needlelace leaf, however, I have now decided to do three of them down the right hand side.  We will see how it goes.
This one is much closer to being finished, it just needs quilting/embellishment in the background.  The ferns were drawn with free motion and filled using colour spotting, which gives them darker speckles, especially at the ends of the fronds where I changed direction.

This last one is basically finished except that I want to change the colour of the satin stitching around the reverse applique, and in any case it needs to be wider, since the black satin came loose in places as I quilted by hand. 
I think that this project is helping me practice looking critically at my work.  Because each piece is small, the changes I might make are small.  It is not intended to be a work of art, more a work of reference for me to refer to and is an easy way to try out all the techniques I am interested in without taking risks on a big piece.

I think I will leaf it at that!

Friday, April 1, 2011

Burned fabrics

I thought I would experiment a little with my heat tool and see what I come up with.  There are lots of places to go for information on burning textiles, but my favourites are Kim Thittichai's Hot Textiles and Quilting Arts Magazine.
Here are a selection of synthetic, from lace, to felt, to lame'
Below, I have traced around a motif in some lace with the straight tip on the heat tool.  It creates a sealed edge that can be appliqued without fraying.

You can trace/cut around quite complicated motifs this way.


It works extremely well on Lutradur.

This lame' frays very easily, but  the shape burned out will not fray.

The same is true for this satin.
You can also use some of the other heads to emboss, or burn patterns into fabric.  This works really well on velvet. Above tou can see a flat circular head and a nine patch sort of head.  If you want to emboss instead of burn you need to be able to lower the heat on your tool.

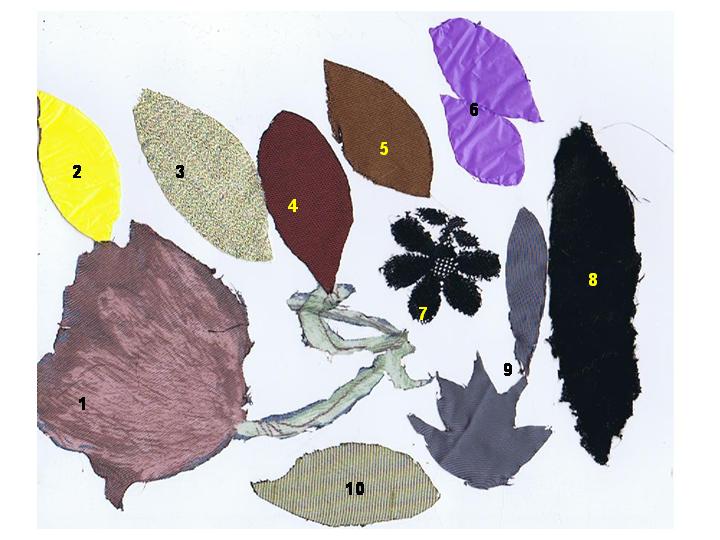
Here are some applique leaves and motifs cut out.
  1. from very thin chifon/organza
  2. from plastic garbage bags
  3. lame
  4. a shot satin
  5. silk
  6. several layers og garbage bag plastic (seals them together)
  7. Lace
  8. crushed velvet
  9. satin
  10. an embossed satin

Using the circular head on plastic at a hot heat, then layering two colours
 Cutting out bubble wrap then melting the bubbles over a foil base


In these two lutradur samples, I have cut out a design with the straight tool, and burned with the shape tools.
In this satin sample, the melted fabric made strands as I pulled the tool away.  I definitely need to repeat this.
In this lutradur sample layered over a purple background, the left circles went totally through, whilst the right citcles only went halfway forming a fine lace.  I liked that.
In these to samples I was experimenting with getting the leaf to stitck to the fabric underneath.  It wasonly a partial success.
These two are embossed crushed velvet.  because the velvet was black, It is very hard to see the embossing here, but it is very visible when looking at it in reality.

Here I have both fully burned and partially burned lame.  The sample on the right is burning lame onto felt, which requires a higher heat to melt

If you look carefully, you can see the embossed circle on this shot satin.

Lame and organza on felt.
Here is the large lace motif burned out.
These textured satins were perfect for cutting geometrics out.  This would be a great addition to some cut work.
These two examples on black silk (which also needs a higher heat) were some scraps of fused fabrics I had.  I was not sure if it was a good idea to use them, but I am glad I did.  Since these were sheers, I put a little angelina between the two layers, I wanted to see if I could trap the angelina in between.  It worked, but I also discovered something else.

If the top fabric has fusible on the back, when you burn around it, you also fuse it to the background (so long as the background has a higher melting point).  Wow!  I found this such and exciting discovery that I tried a lot of fused fabrics on some brocade (below).

  1.  grey satin
  2. green garbag plastic
  3. white metallic organza
  4. textured satin
  5. loose weave organza
  6. velvet ribbon
  7. lutradur
Now let's see who is thinking out there.  There is no way I could have ironed the fusible on to some of these fabrics, so how did I do it?
I simply put a piece of fusible larger than the shape (without the paper backing), between the two layers before I burned the line and it worked! So not only does this fuse the fabrics to the background, you don't have to iron any fusing first.
I would not trust this to be permanent, since the fusing is only a fine line, but for me it was a great discovery.
Using this method, you could have beautiful synthetic appliques (which are usually fiddly because the fabric is slippery, and can't be fused because the fabric will melt).  The appliques would easily stay in place for stitching, and because the fusible is not ironed in the centre, they would stay soft.
I will have to experiment with washing after stitching to see what happens to the unironed fusible, but my guess is it is so fine, it would not bea problem.
WOW - I feel like shouting Eureka!   I am most certainly going to use this in my secret activity that I told you I would tell you about soon.
Did you hear that girls?  Here's my first technique.

So excited.  No quote today
Oh and I got the book I won from workshop on the web yesterday

I am really enjoying reading it and looking forward to doing the free online tutorials that go with it.
Vicki