I have been working on some ipod cases for my gallery, which is open once a month at the moment. This last month, I had some other artist's work in the community, which was really great. DH and I are always trying to think up small things to draw more sales and so this month I am working on ipod or iphone cases.
This one is nearly finished. I am thinking of adding a few beads and of course the clasp. It is made from chiffon needlefelted onto felt.
This one is trimmed ready for embellishing and stitching and is made from slub yarn needle felted onto felt. Obviously, felt is so easy to make these from.
Another one ready for stitching this one is made from felt scraps needlefelted onto a felt backing, then some free motion scribbling with my favourite gold thread (one day it is going to run out and what will I do then?).
I have found that the basic pattern for these cases is to use a half of an A4 (or letter) sized piece of felt or fabric (cut along the length) is perfect for this.
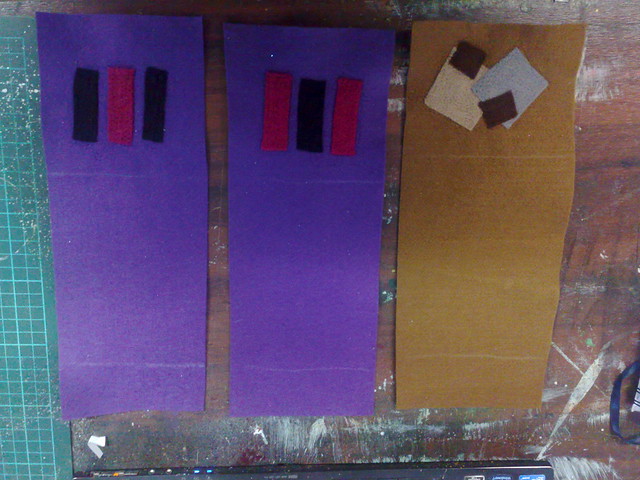
Here are three more with needle felted scraps on the flaps ready for stitching. All I did was cut an A4 piece of felt in half. Once I am happy with the design and stitching etc, I just fold it to the right size and trim about 1/4 to 1/2 inch off the (long) sides and blanket stitch the sides together. It's a quick piece of work, depending on how much hand stitching and embellishing you do.
After reading a friend's blog about treasure bags, I am now thinking about fabric cases using the decorative stitches as she did, since hers are so gorgeous and I have soooo much yummy thread.
Anyway, need to get back to my tangled textiles piece, which is due in a few short days. Tomorrow, I am teaching a beading class and in a few weeks, a painted chiffon scarf workshop, so busy, busy.
Keep creating
Showing posts with label decorative stitches. Show all posts
Showing posts with label decorative stitches. Show all posts
Friday, April 26, 2013
Thursday, January 12, 2012
Remember spring, and altered books
playing card, molding paste through a stencil, gesso, watercolour paint, (very messy) decorative machine stitching, lazy daisy, felt backing.
Another brief glimpse into my artbooks, today.
This is a niche, cut into my insect theme book, using layered tissue paper and a cast tissue dragonfly.
and another, layered tissue page in my techniques book, with some decorative stitching on the side of the page.
I have arranged some distressed leaf samples I did a while ago on some paste paper in my leaf theme book.
Here are two little niches, front and back in my leaf theme book.
hereis the page complete, with a metal leaf and a cast made from it mounted.
and from the back, with the distressed leaves showing through.
this page is created using newspaper, gesso, acrylic and then a watercolour wash with salt.
And I am playing with this acetate overlay, but I think I might make one out of stitching to go on this page.
I am very busy with things I can't show you yet, which is quite frustrating, but hopefully next week the pressure will be off slightly and I will be able to get some playing done!
And don't you forget to play every day!
Don't forget Lisa's ATC
Friday, March 18, 2011
A Landscape of your own - 2b
I have gotten this tutorial together for you. Today we will look at decorative stitch embroidery on our landscape.
So far we have cut some strips and arranged and fused them. It is a simple landscape, but a really easy one to start with and one that can be changed in many, many ways.
For the sky, I used straight stitch and a slight curve. You can see where I turned at the ends, here.
Next the far away hills. I have used straight stich in an up and down motion (I used the reverse button) to cover the whole hillside. I used a grey thread and allowed the purple to show through.
The next hillside was with a matching olive green thread. I used a programmed stipple stitch along the edge of the hill here. I went over it twice to fill.
On the next hill, I again only stitched the top edge. Variety in textures will give depth. The thread was a slightly lighter thread. The stitch here was an angled blanket stitch down the diagonal slope. Again, I went over twice to fill.
In the layer above, I used a bright green with a wide blanket stitch. Starting at the top, I overlapped the blanket stitch rows and offset them.
In this last layer, I actually went over three times. The first time, above is in a dark green with an alternating branch pattern, and in the second one (below left) , I used a variegated thread, and a very narrow satin stitch, spacing them apart and having irregular heights. Finally I used a wide double blanket stitch at the bottom.
Below is my practice fabric. I always have a practice fabric, so that I can test out tensions and patterns on it before I begin on my actual work. When you change colours and bobbins frequently, you need to test everything on a similar piece of work - every time.
Here is the piece in a piece of mount board 3x5 in.
I will show you the embellishment tutorial next week.
vicki
So far we have cut some strips and arranged and fused them. It is a simple landscape, but a really easy one to start with and one that can be changed in many, many ways.
For the sky, I used straight stitch and a slight curve. You can see where I turned at the ends, here.
Next the far away hills. I have used straight stich in an up and down motion (I used the reverse button) to cover the whole hillside. I used a grey thread and allowed the purple to show through.
The next hillside was with a matching olive green thread. I used a programmed stipple stitch along the edge of the hill here. I went over it twice to fill.
On the next hill, I again only stitched the top edge. Variety in textures will give depth. The thread was a slightly lighter thread. The stitch here was an angled blanket stitch down the diagonal slope. Again, I went over twice to fill.
In the layer above, I used a bright green with a wide blanket stitch. Starting at the top, I overlapped the blanket stitch rows and offset them.
In this last layer, I actually went over three times. The first time, above is in a dark green with an alternating branch pattern, and in the second one (below left) , I used a variegated thread, and a very narrow satin stitch, spacing them apart and having irregular heights. Finally I used a wide double blanket stitch at the bottom.
Below is my practice fabric. I always have a practice fabric, so that I can test out tensions and patterns on it before I begin on my actual work. When you change colours and bobbins frequently, you need to test everything on a similar piece of work - every time.
There is no way to ever be the perfect artist, but a million ways to be a good one.
I will show you the embellishment tutorial next week.
vicki
Thursday, February 24, 2011
wallhanging
After an hiatus trying to get my bad back behaving, I have started back working, but of course, it played up pretty soon after. However, I have done a little work on my sample for the wallhanging.
In the sample I tried both free motion and general, feed dogs up couching. Remember the white is water soluble, and will be a lace and fringed bottom. I have put the skeleton in for this but I will do more work when the couching is finished.
in the enlargement above:
Another reason I worked on this sample was to create some couching samples for a Quilt uni course on embellishing with Susan Brittingham as I am very far behind due to my back.
Let's see what creativity tomorrow brings!
In the sample I tried both free motion and general, feed dogs up couching. Remember the white is water soluble, and will be a lace and fringed bottom. I have put the skeleton in for this but I will do more work when the couching is finished.
in the enlargement above:
- the first thread is a black and metallic mix and is obscured by the fluffy red stuff, I will remember not to put it in such a place in the real thing. This is what samples are for, sorting out the problems. This first thread is chain stitch, but as i said you can't see it.
- next is an orange boucle, also obscured,
- then the red eyelash,
- followed by a brown cord.
- On the other side of the curve are four more textured threads.
- All of these were attached free motion using a narrow zigzag.
- the next threads were done using the feed dogs up.
- The gold one used a narrow, long zig zag.
- the next two ribbon like yarns were done using a straight stitch down the centre.
- They are followed by a decorative cross stitch.
- The gold and the red threads next up used a narrow long zig zag in black thread
- and the orange ribbon used zig zag with monofilament.
Another reason I worked on this sample was to create some couching samples for a Quilt uni course on embellishing with Susan Brittingham as I am very far behind due to my back.
Let's see what creativity tomorrow brings!
Subscribe to:
Posts (Atom)


