The little, or not so little magpie, of course is me. anything shiny or metallic gets my attention.
I have been plating with foils and painted fusible lately. It is not something new, I have done tutorials on it in the past, but unfortunately a lot of my old, old posts have lost their photos. Perhaps that should be an aim for this year, to redo those tutorials???
Anyhow, here is my collage a day using these lovely things.
If you are not familiar with these techniques, they both use fusible web, but in different ways. This sample is on velvet, a la Angie hughes, but these techniques can be used on just about any surface that won't melt with an iron such as paper or wood.
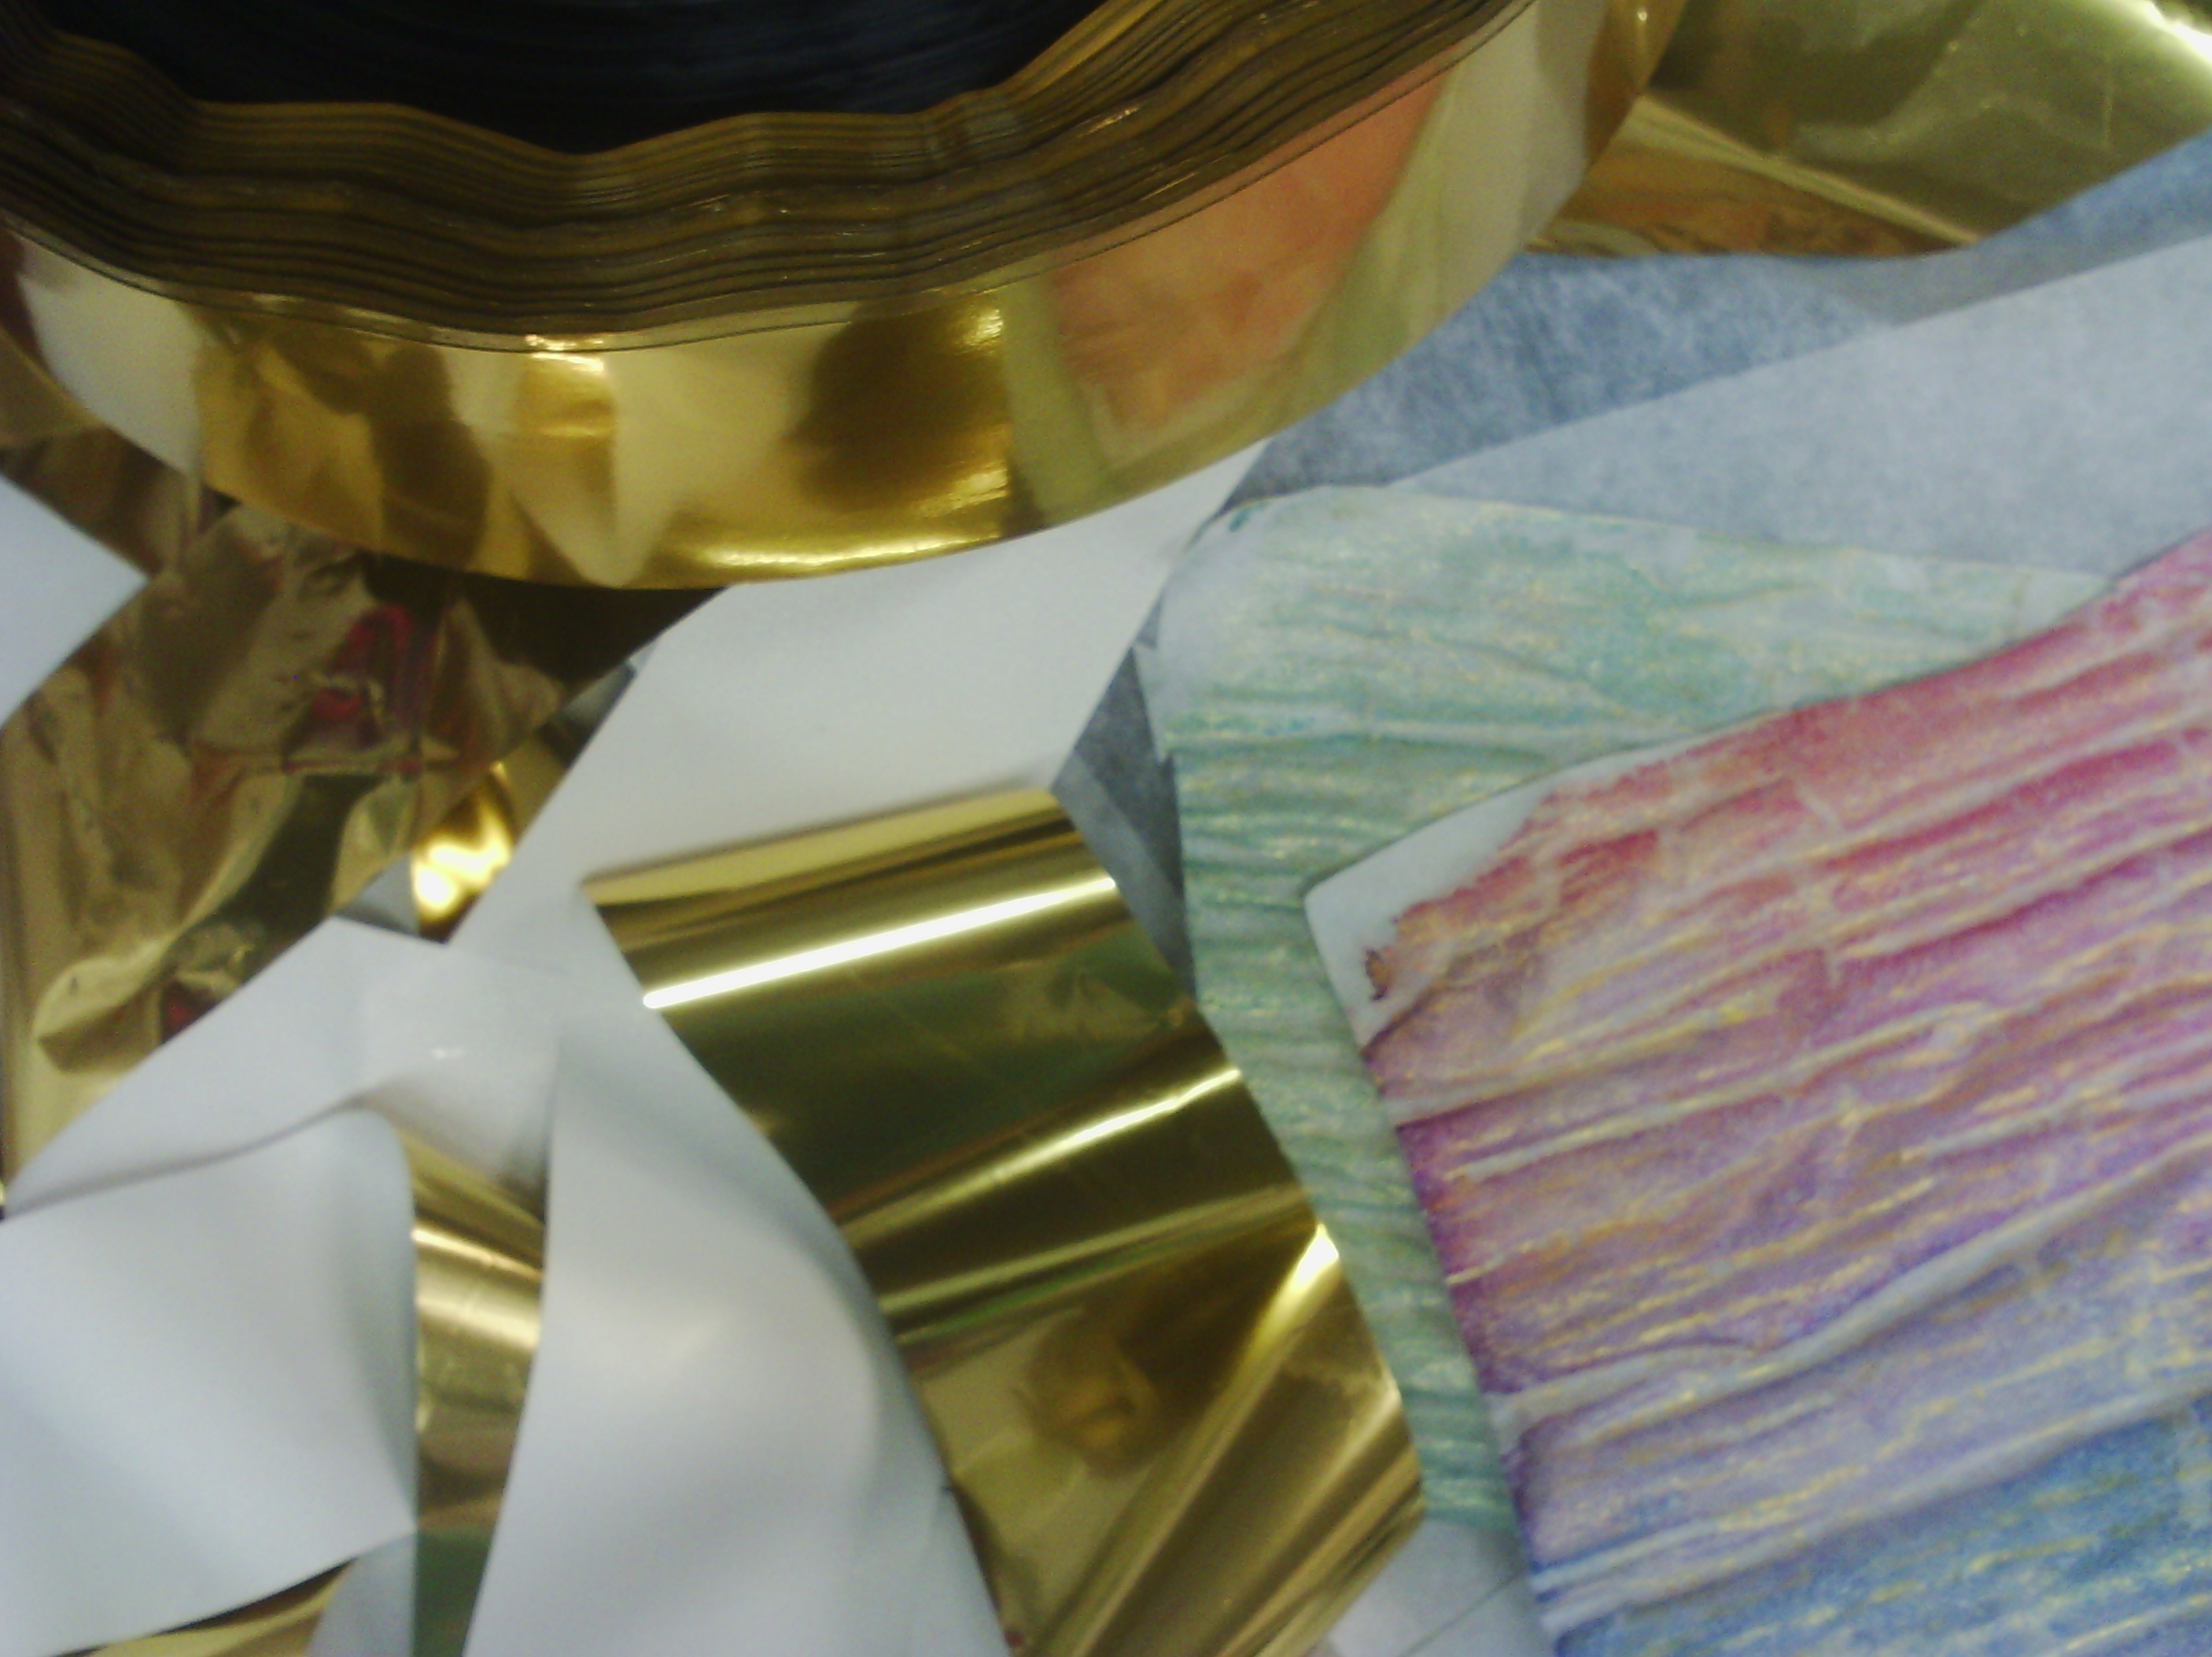
Above are the offending items. The gold strips with the white back are the foil, which I have a lot of as you can see. I have other colours as well. the wrinkly pink and pale green sheets are the painted fusible.
OK, I took some pictures and here is a tutorial
To use the foil, I cut leaf shapes out of fusible (this is a web of glue on a sheet of silicon paper which comes in rolls and sheets).
The fusible web is rough on one side and smooth on the other. The rough side is the glue and the smooth side is the paper.
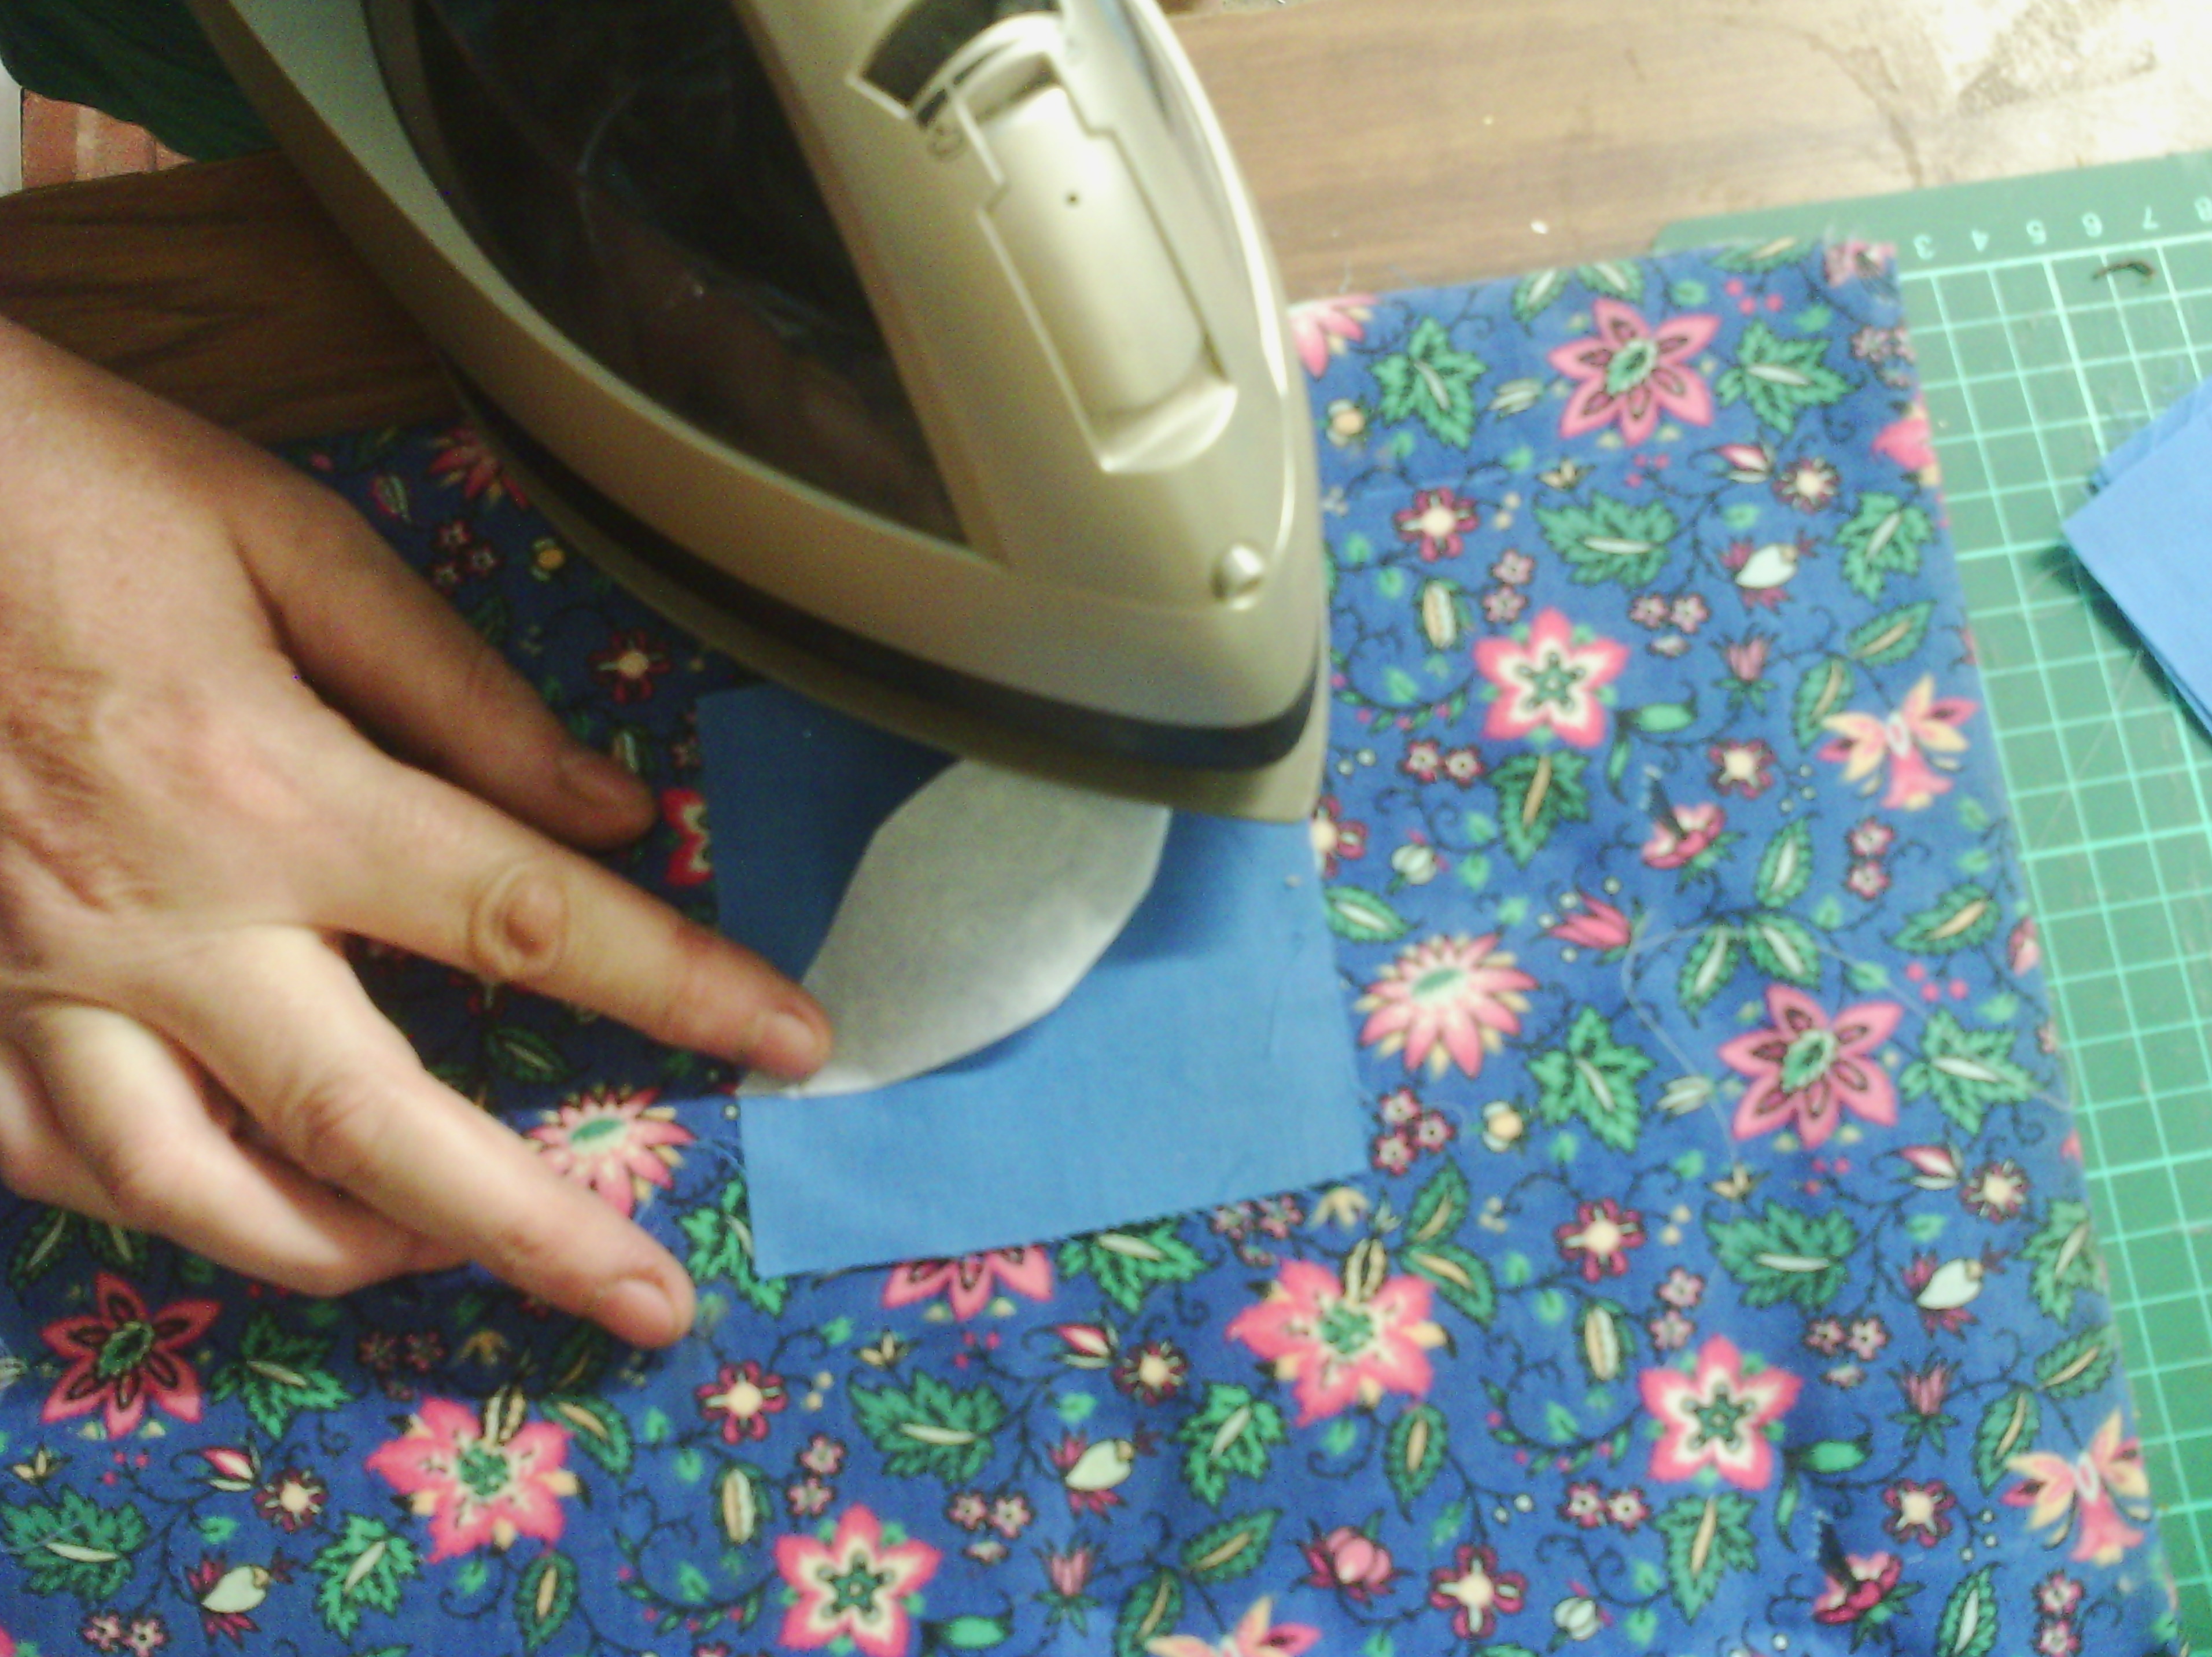
You take the leaf shape and place it fusible (rough) side down and iron it onto the fabric. Use the instructions that come with the fusible to iron it on, but basically I use a heat that the fabric can cope with. I also usually use some baking parchment over the top, but I haven't here so it is easy for you to see.
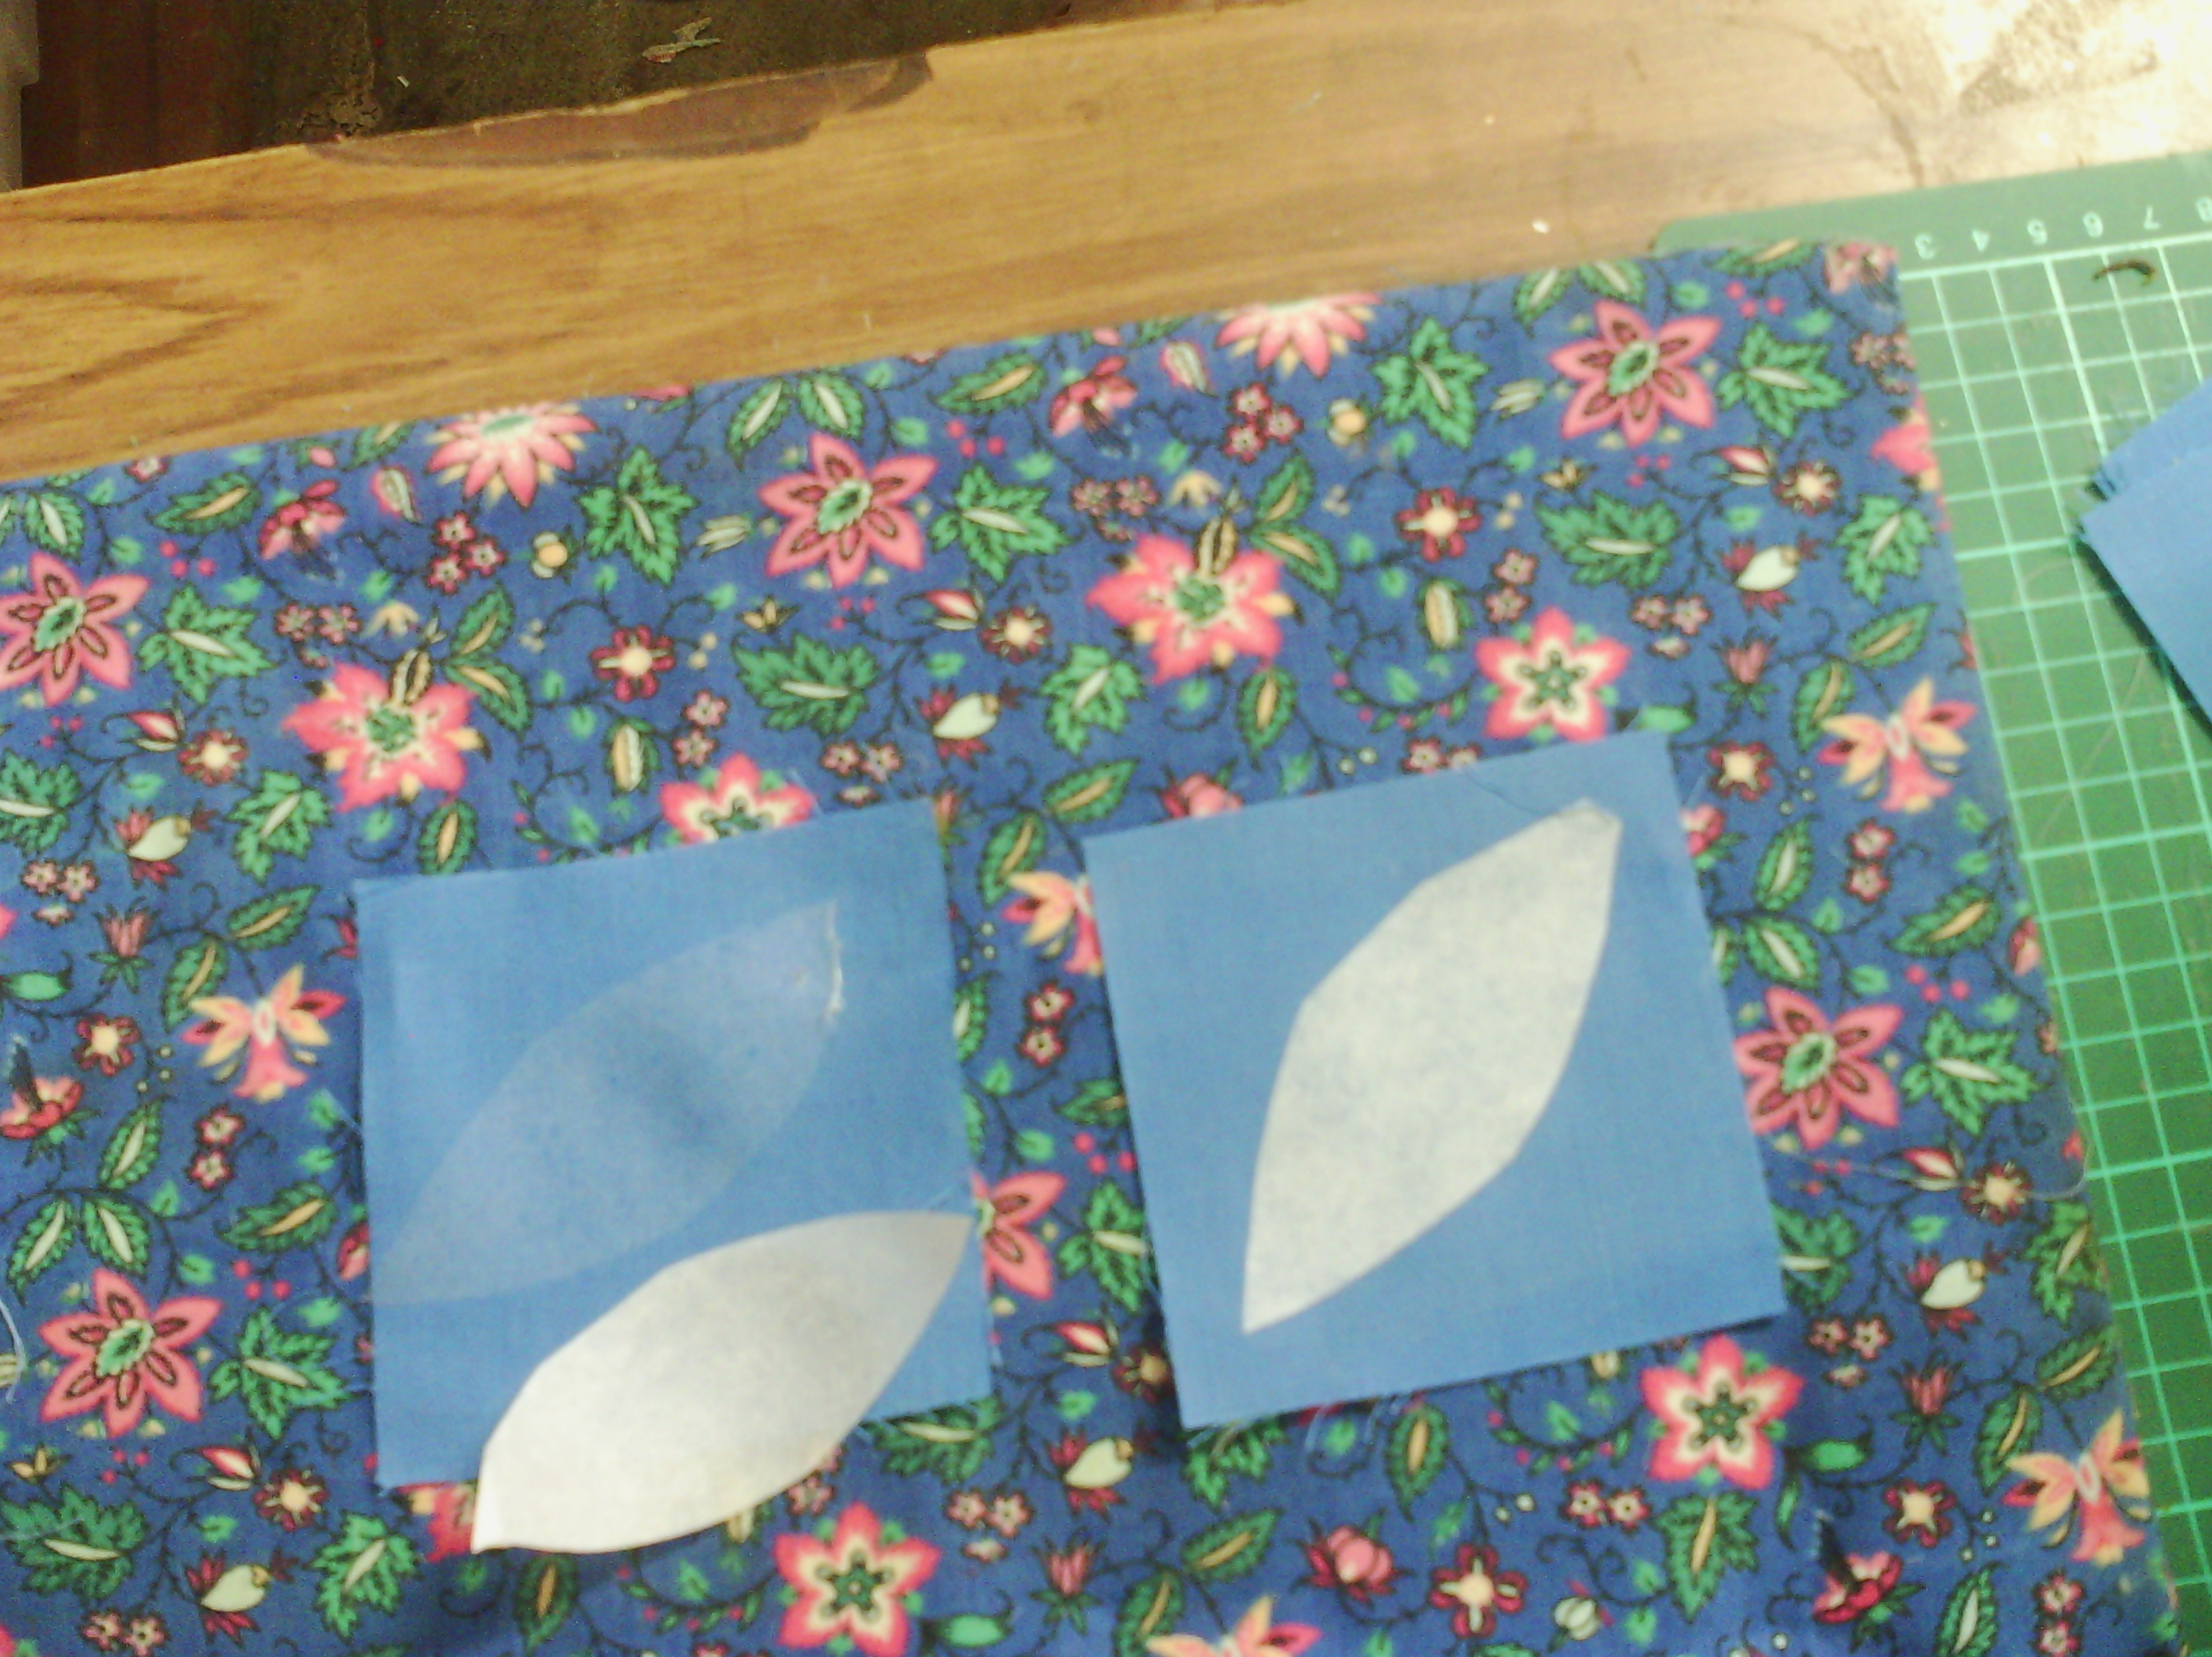
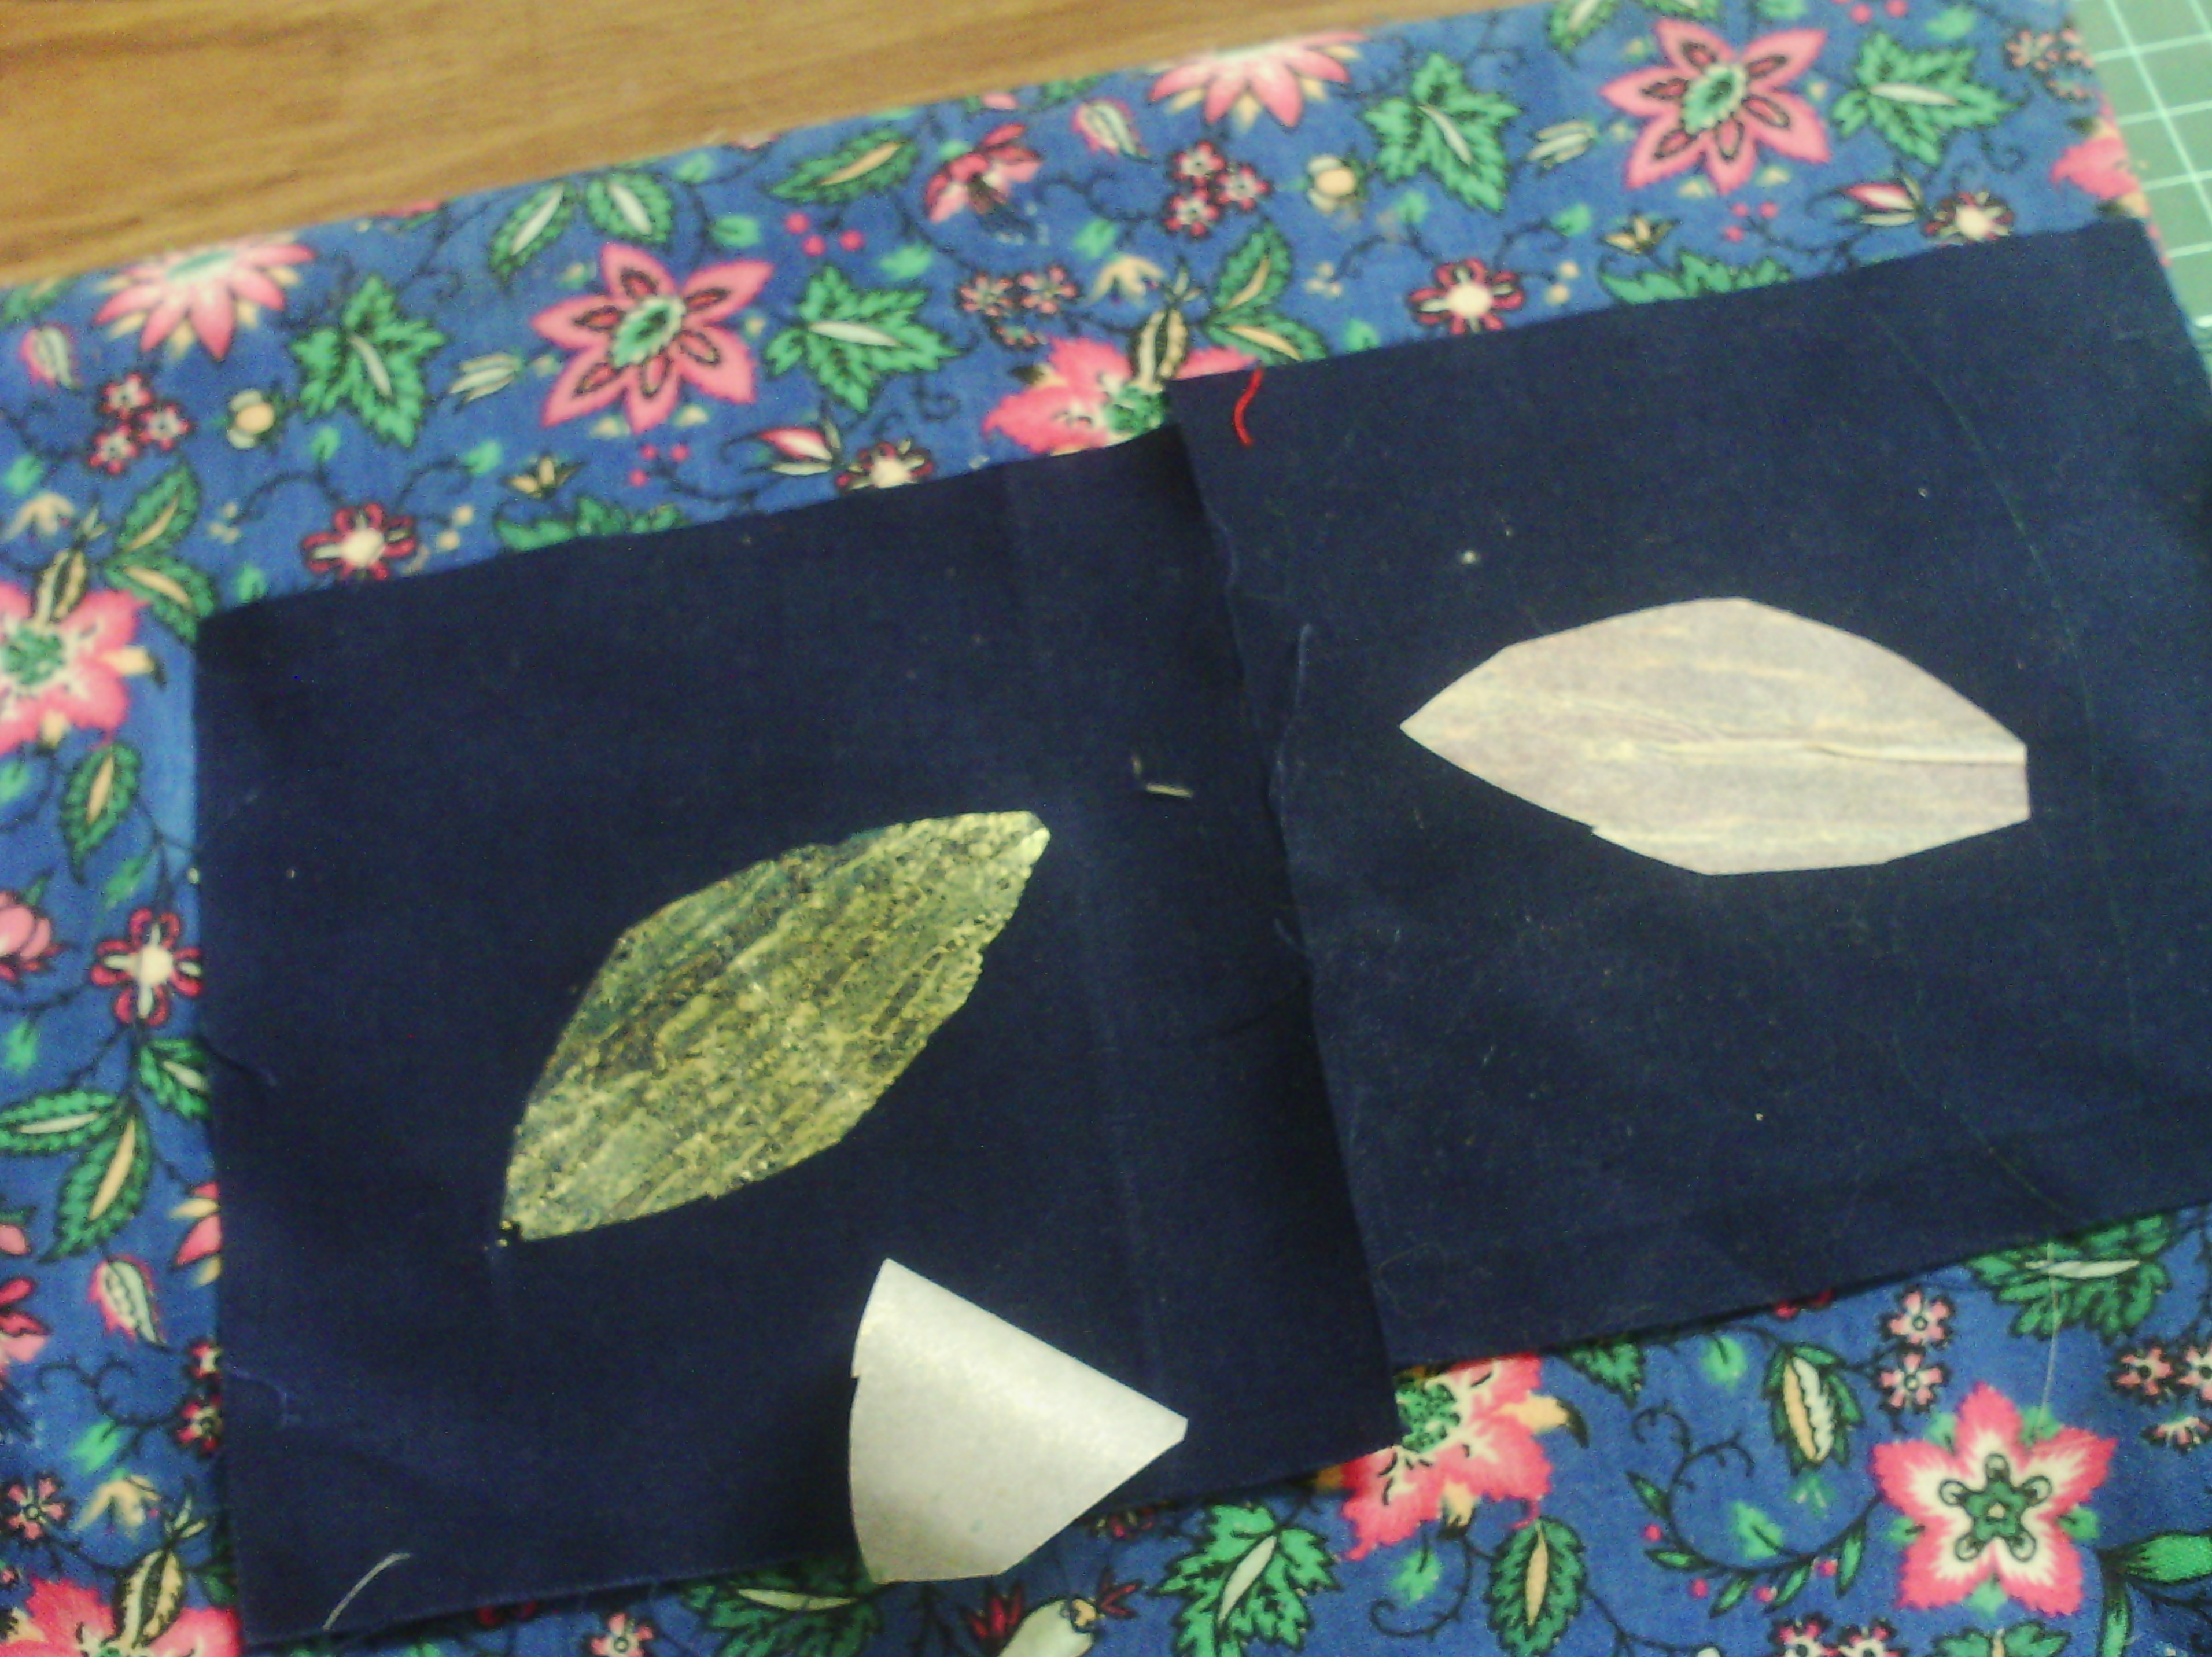
when the ironed on fusible is cool. You peel off the paper. Above you can see on the left, the paper has been peeled off leaving a thin layer of glue on the fabric.
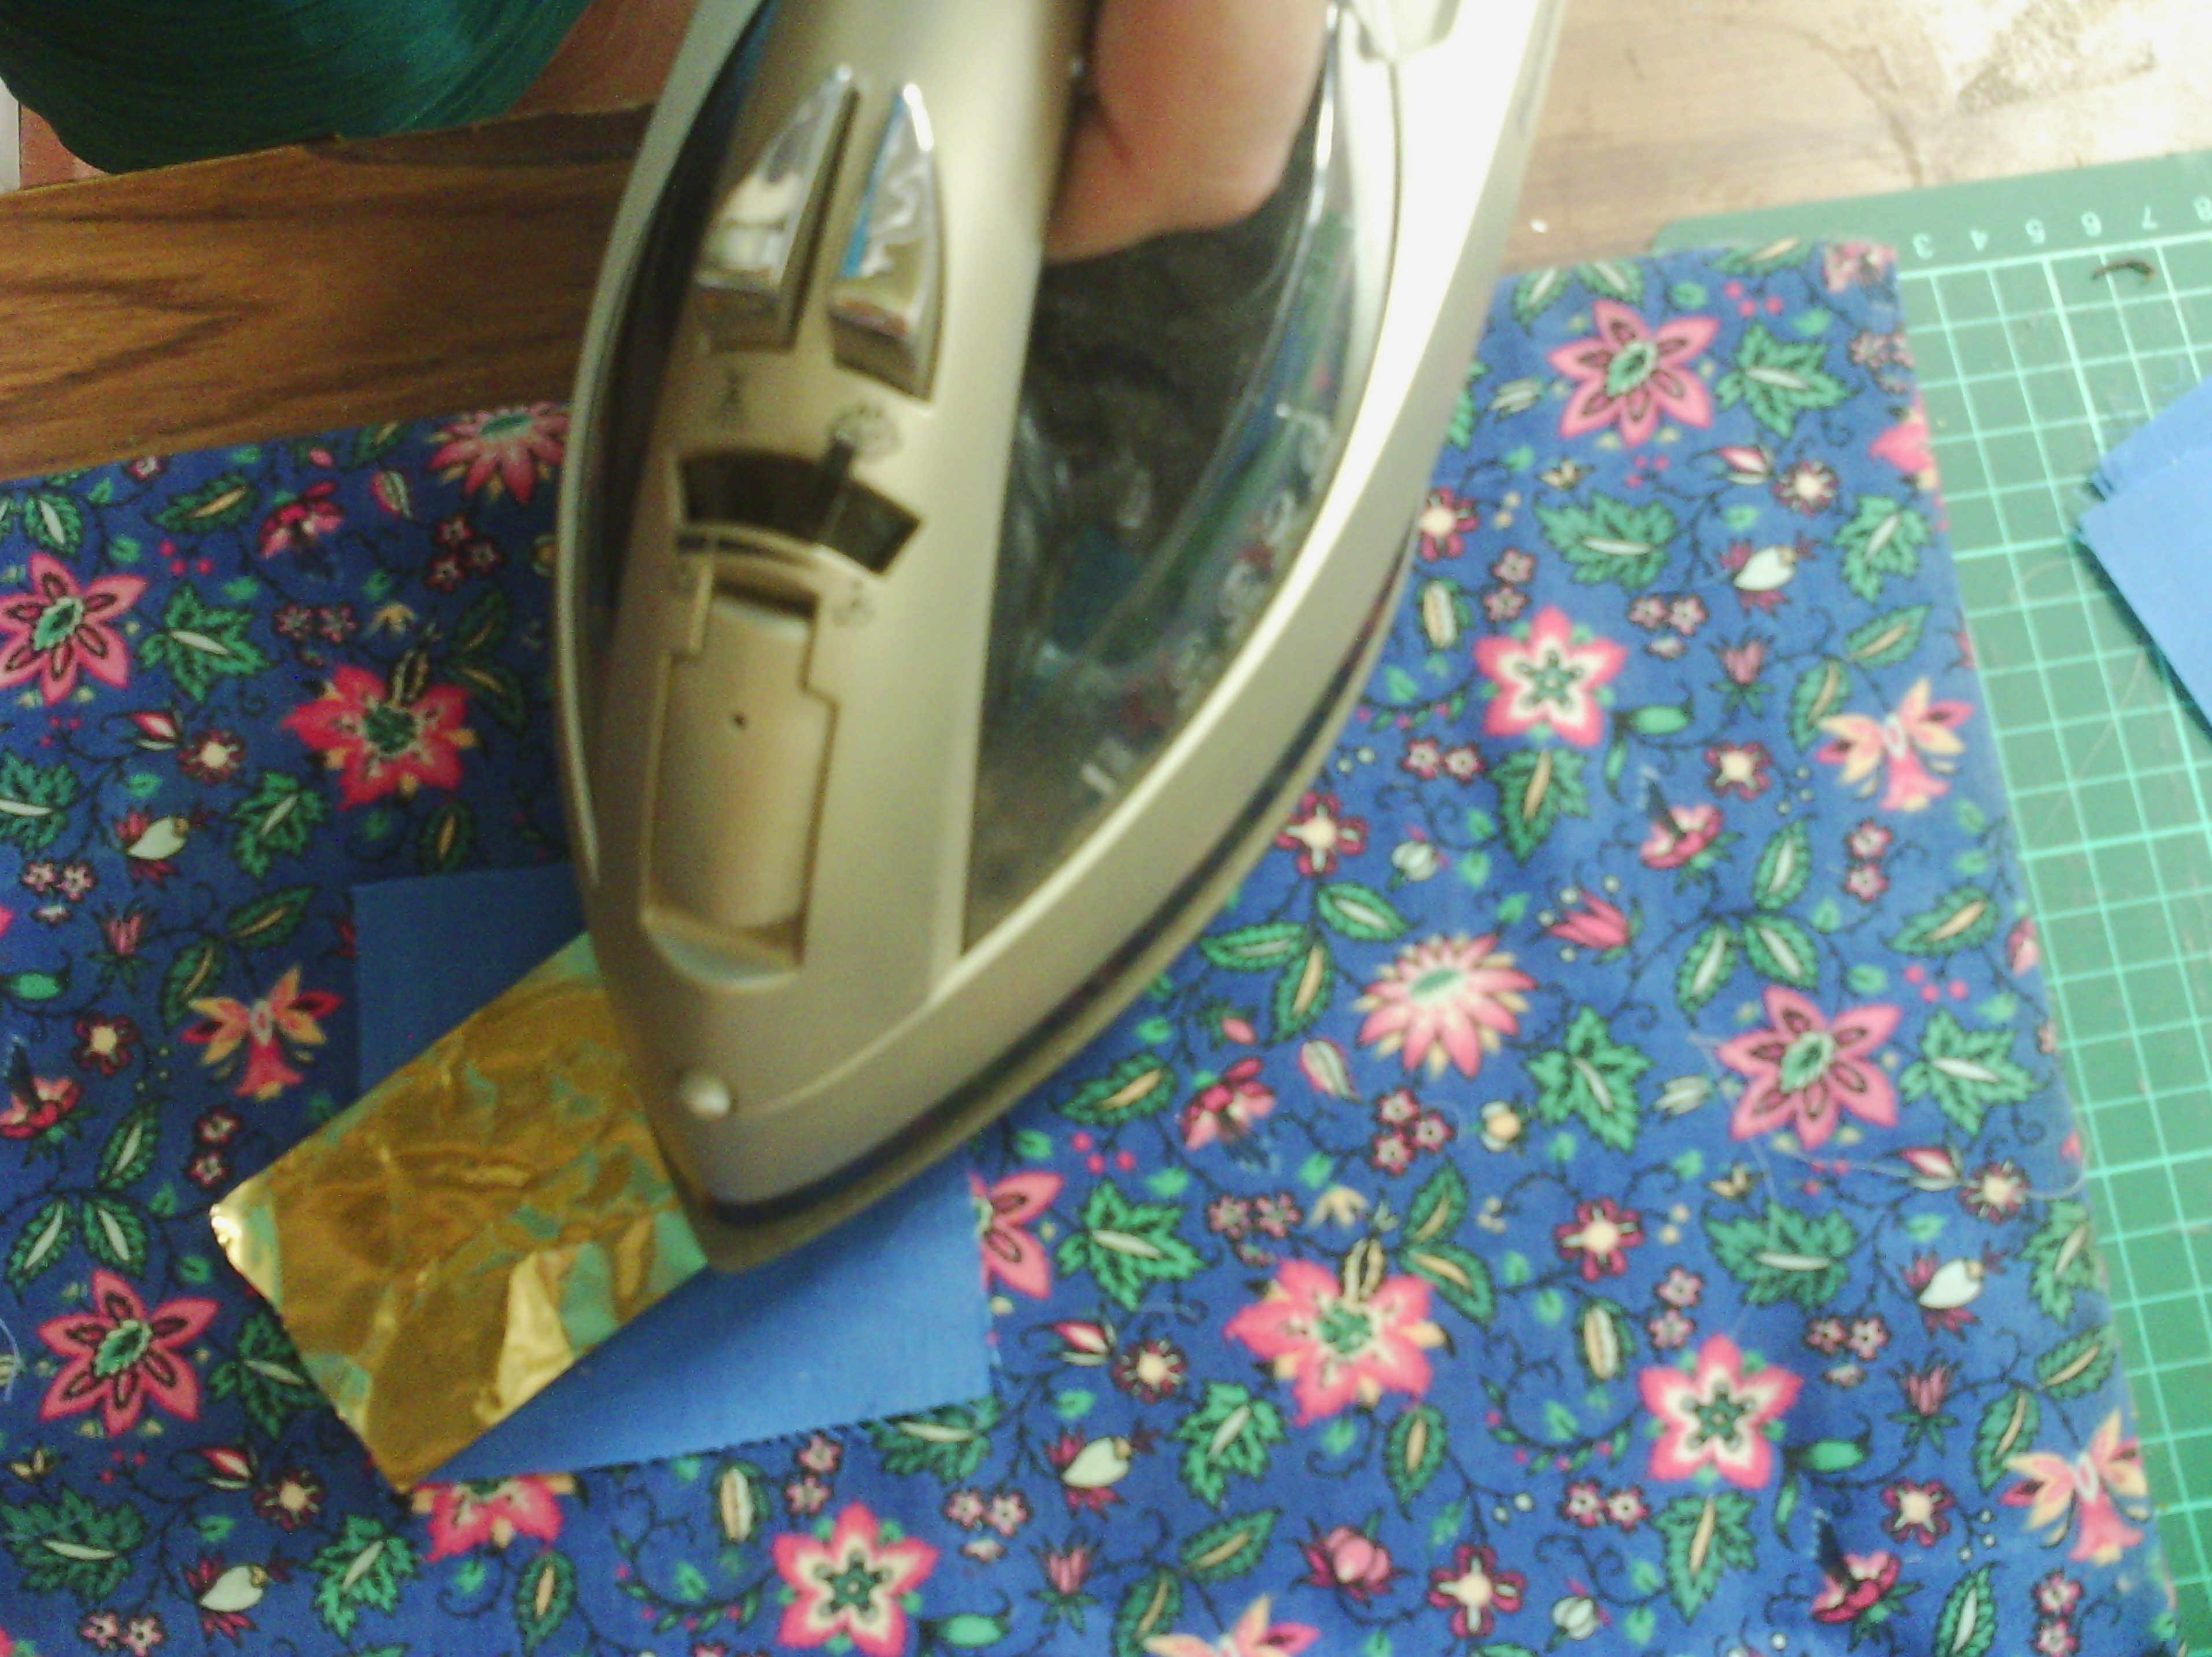
Next you get a piece of foil. This is transfer foil, not metallic wrapping paper, it is a special type of foil used by printers - and textile artists!. You can see the foil is laid coloured side up. This is important, if you use it the wrong way up, it won't work.
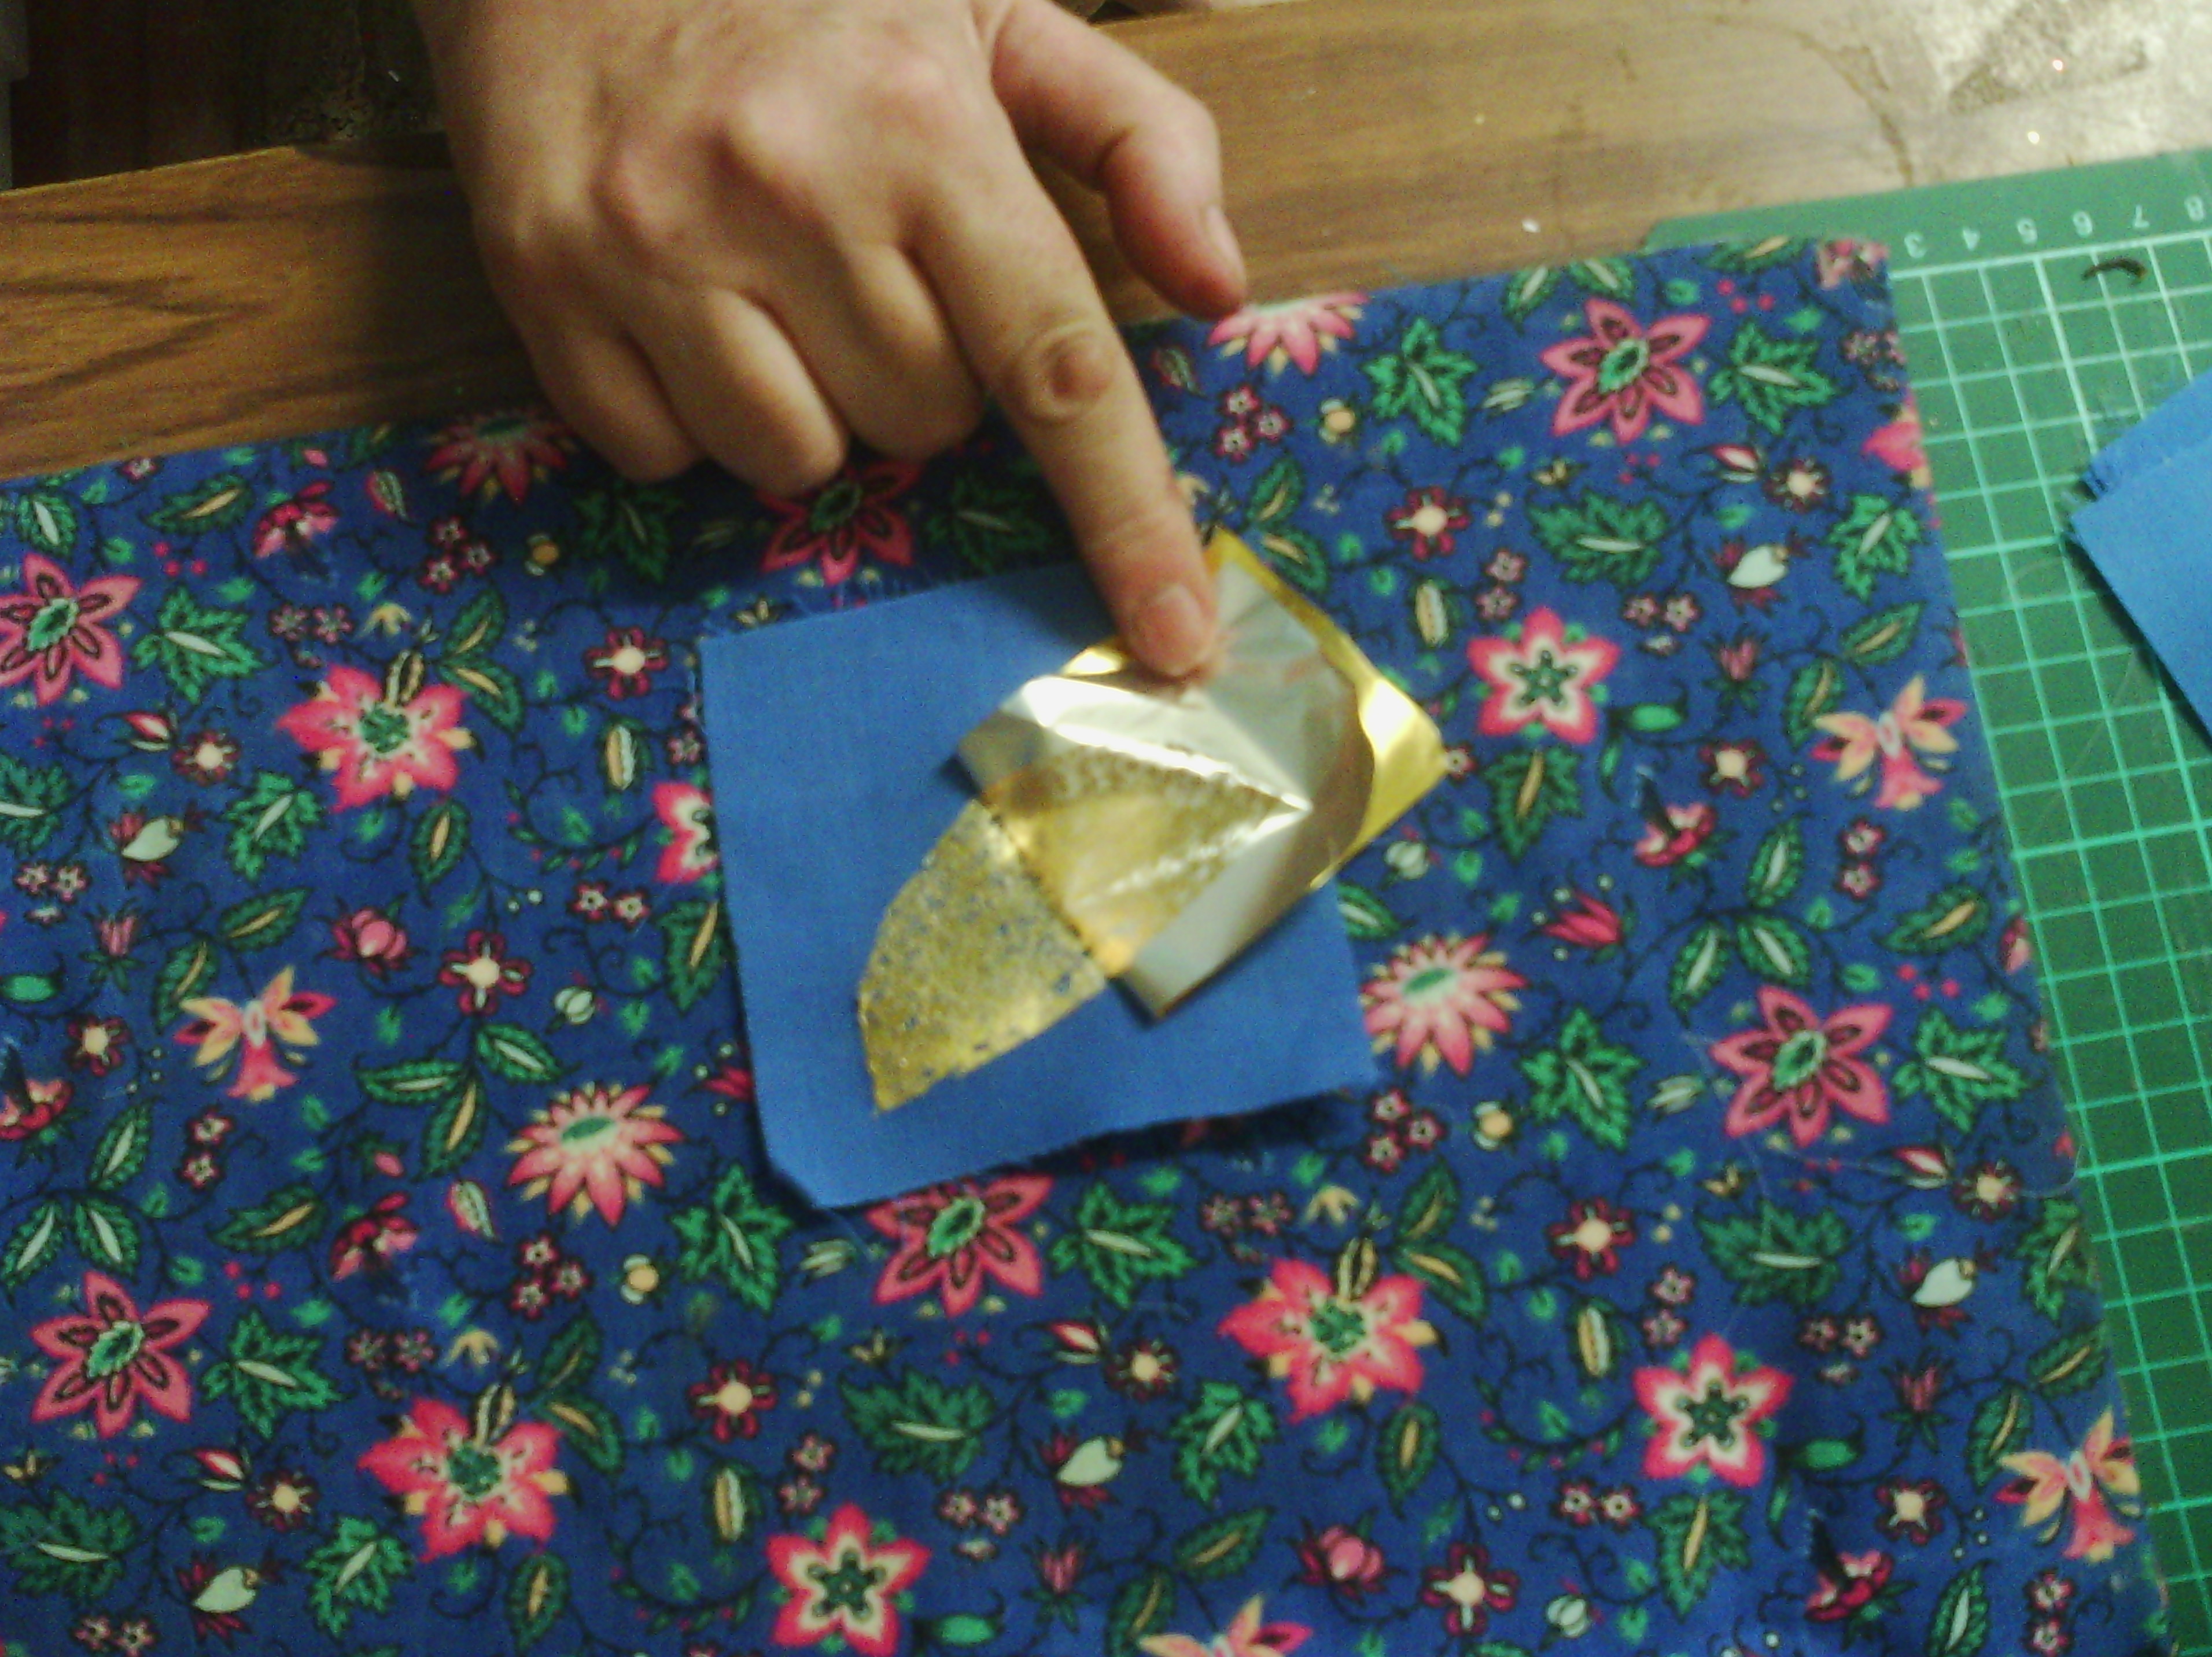
Iron the foil onto the glue layer. Again, it is best to use baking parchment, so your iron does not get messed up.
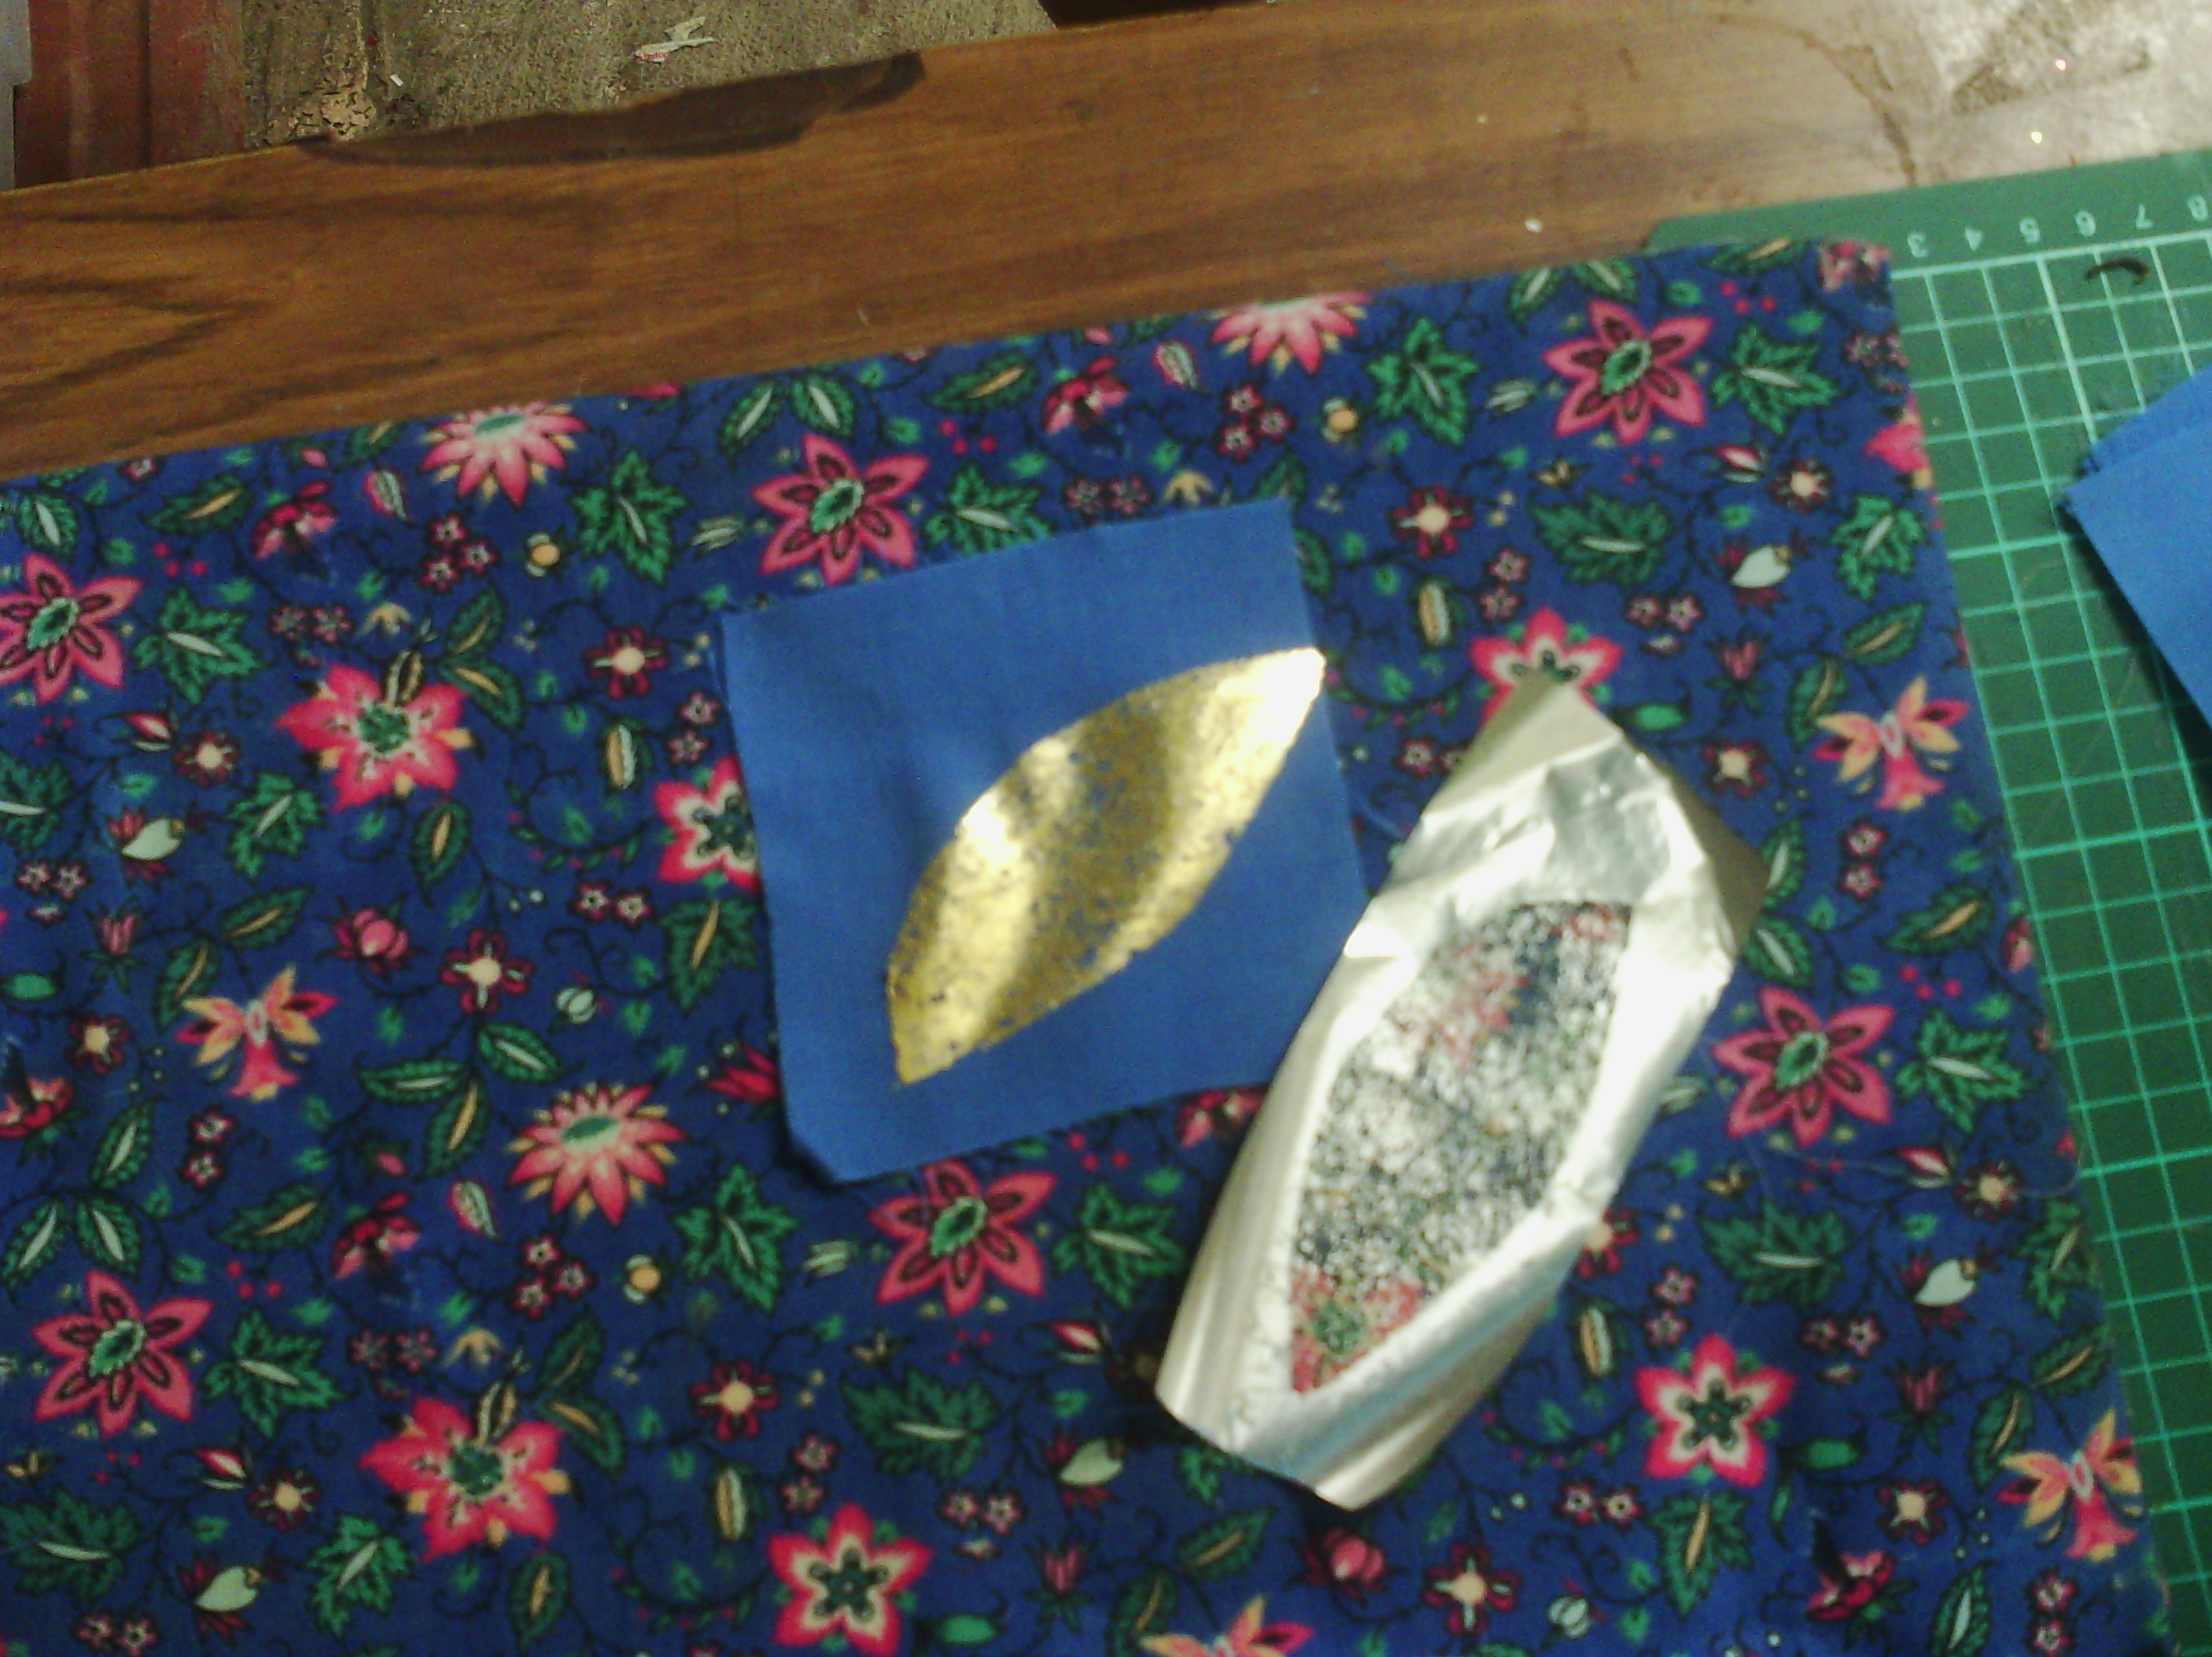
When the fabric is COOL, you can peel off the foil. You can see on the right, above, that where you ironed onto the glue, the gold has come off the foil.
So that is how you use foil. You can wash it (gently), but you must remember that every time you iron it from now on, you need to use baking parchment, or you will get a totally messed iron.
Now for painted fusible.
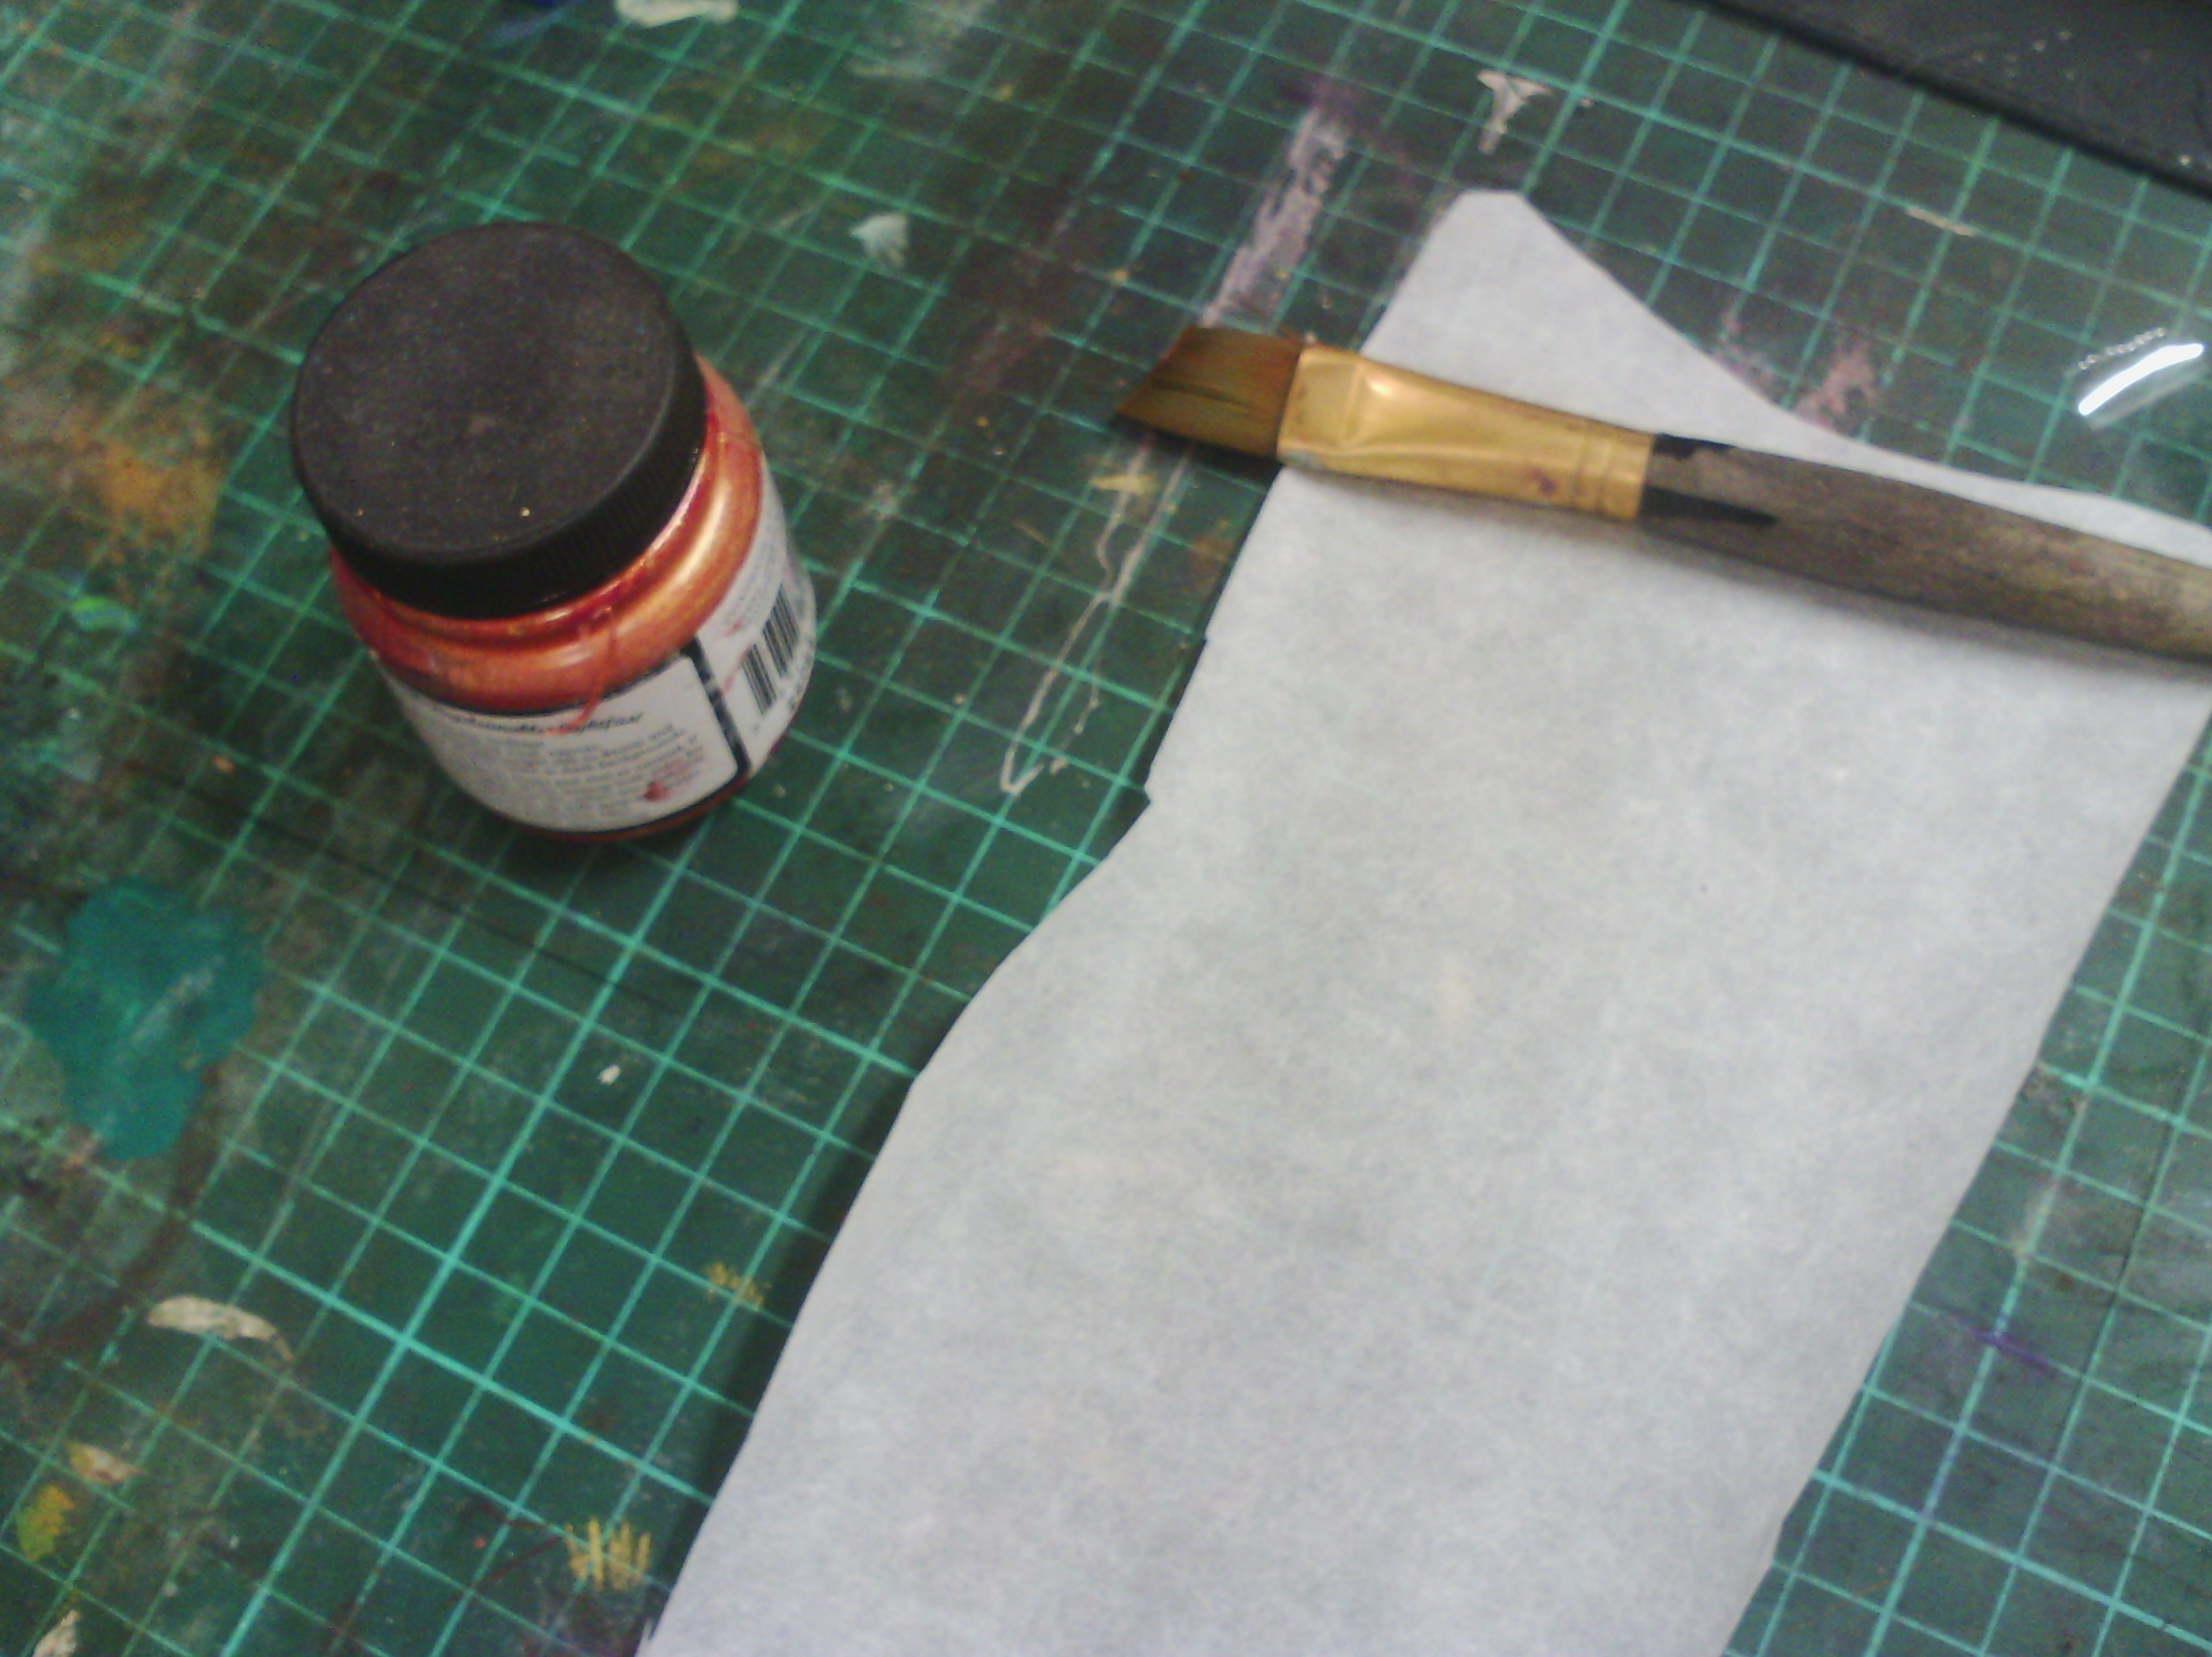
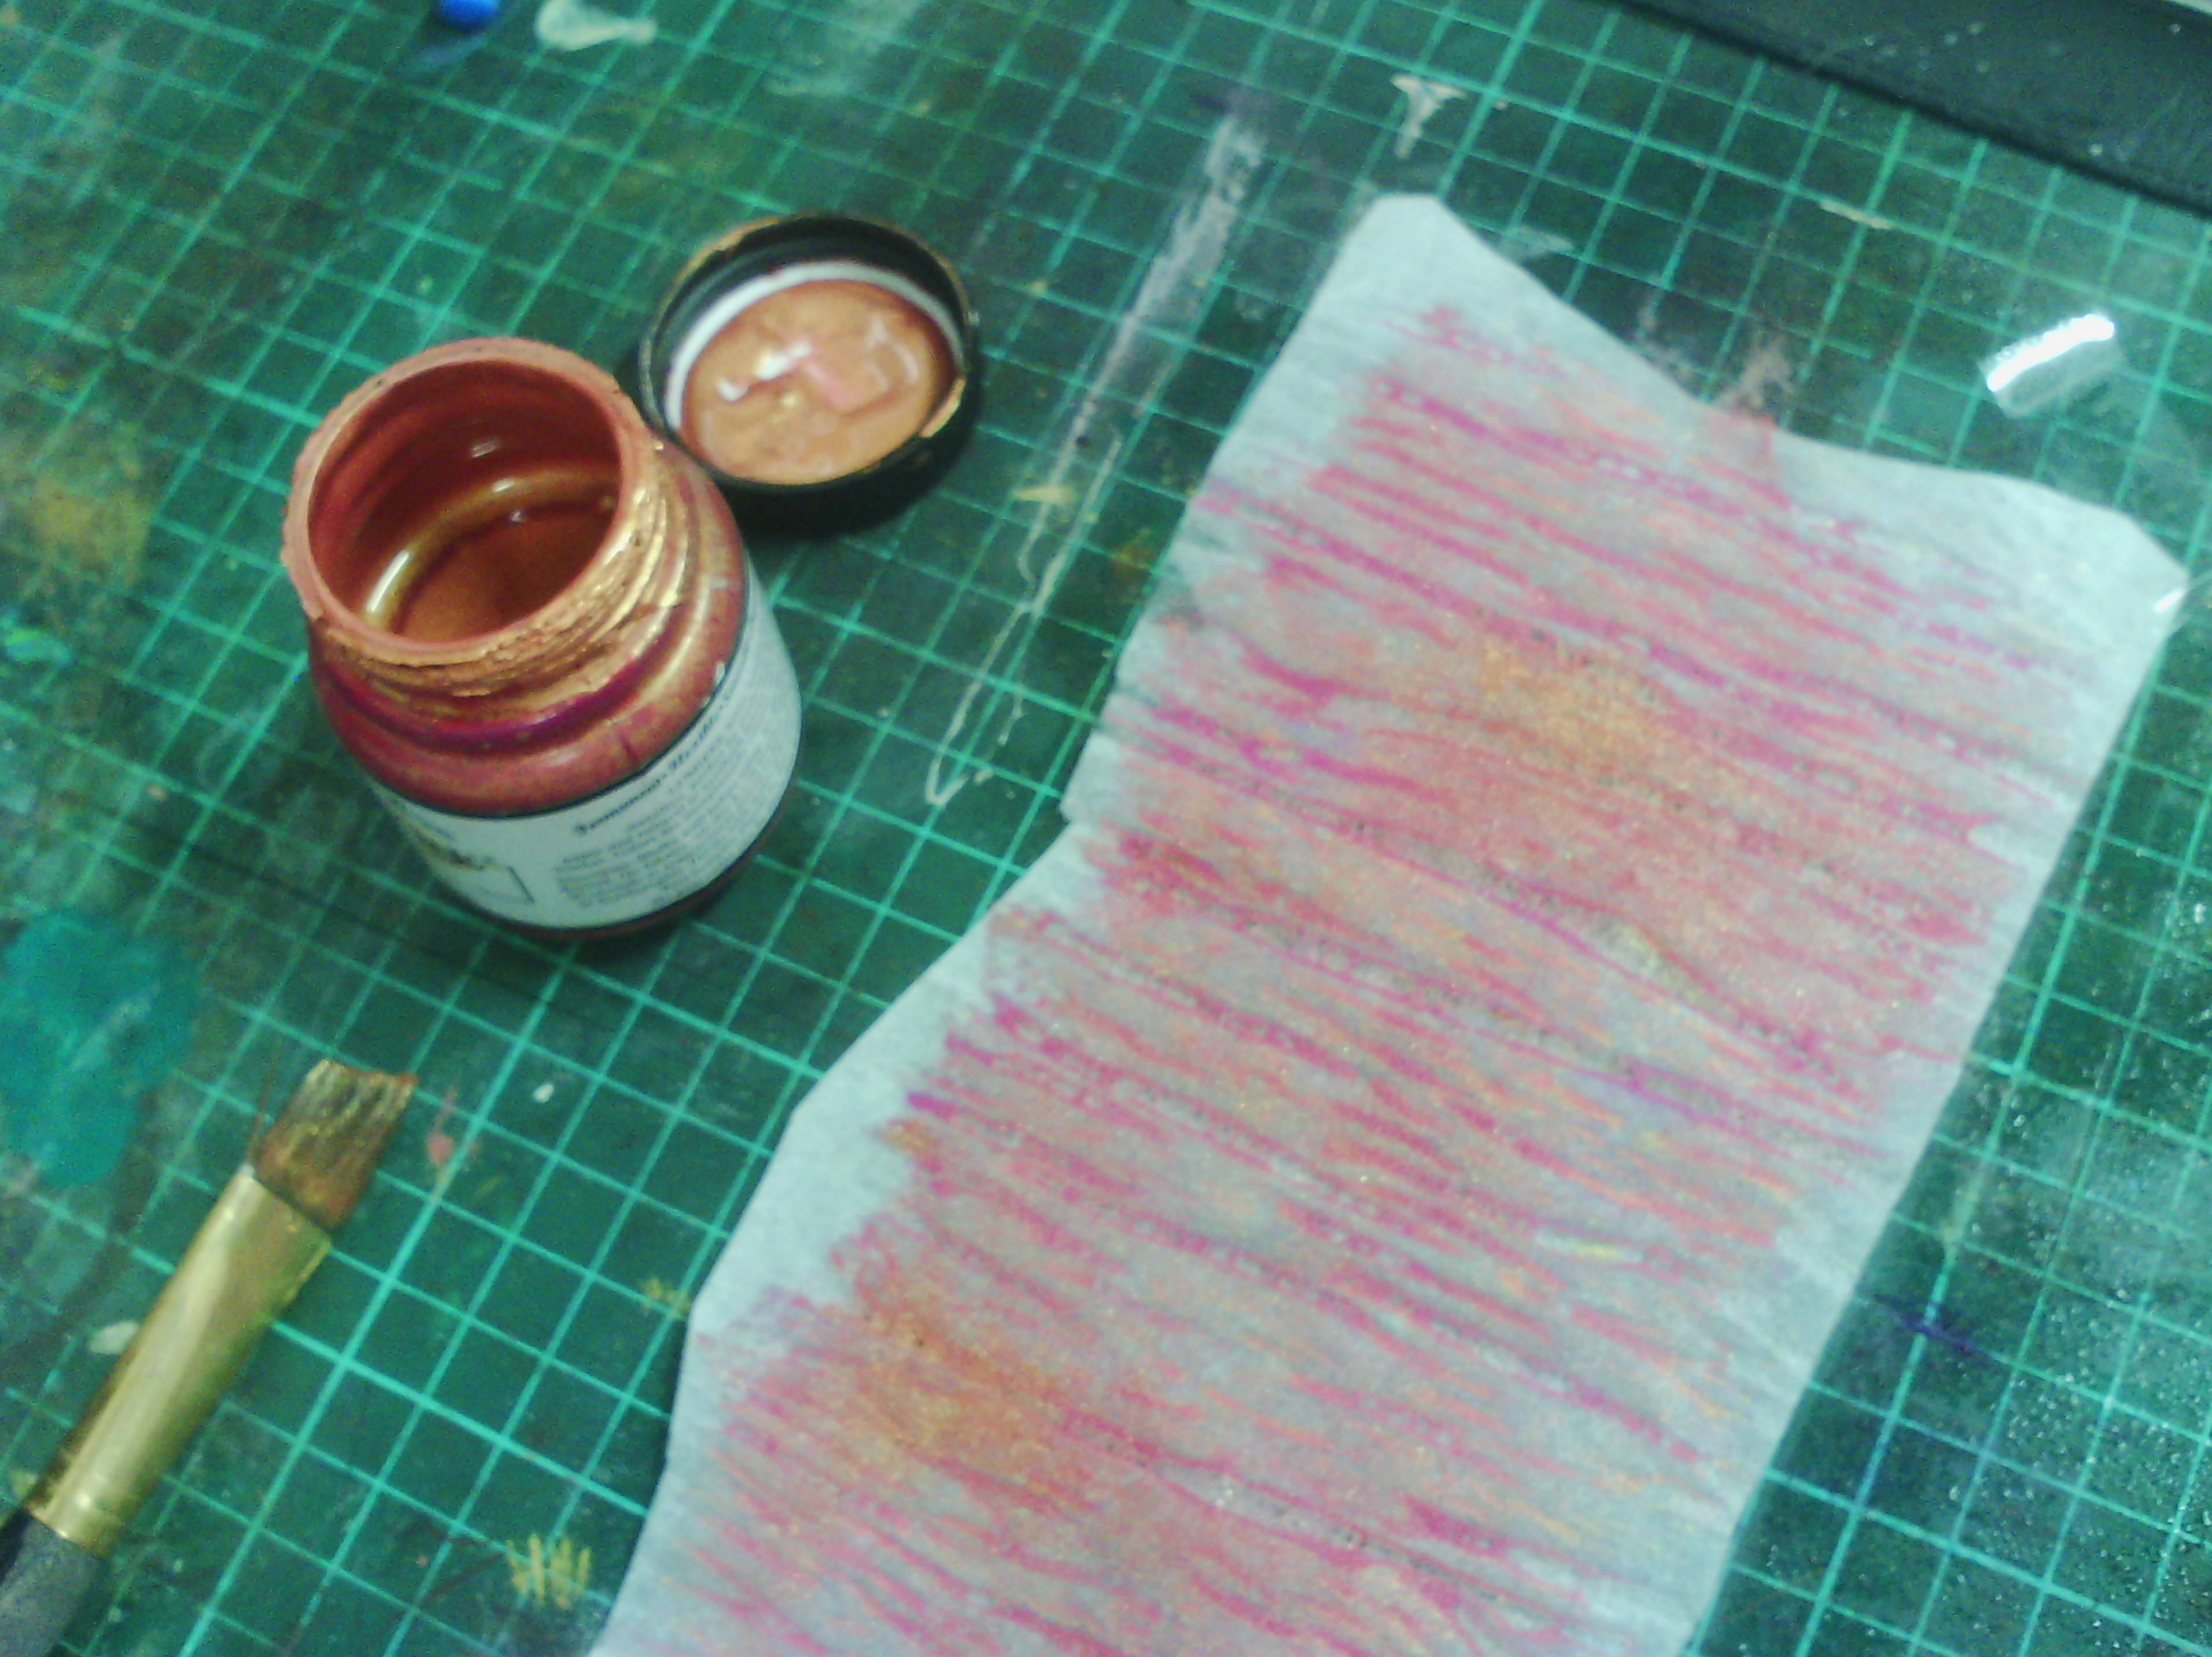
Above, I have taped a piece of fusible glue or rough side up to my painting area ( it tends to roll up). I have some acrylic paint (I like to use lumiere by jacquard as it is lovely and metallic) and a brush.
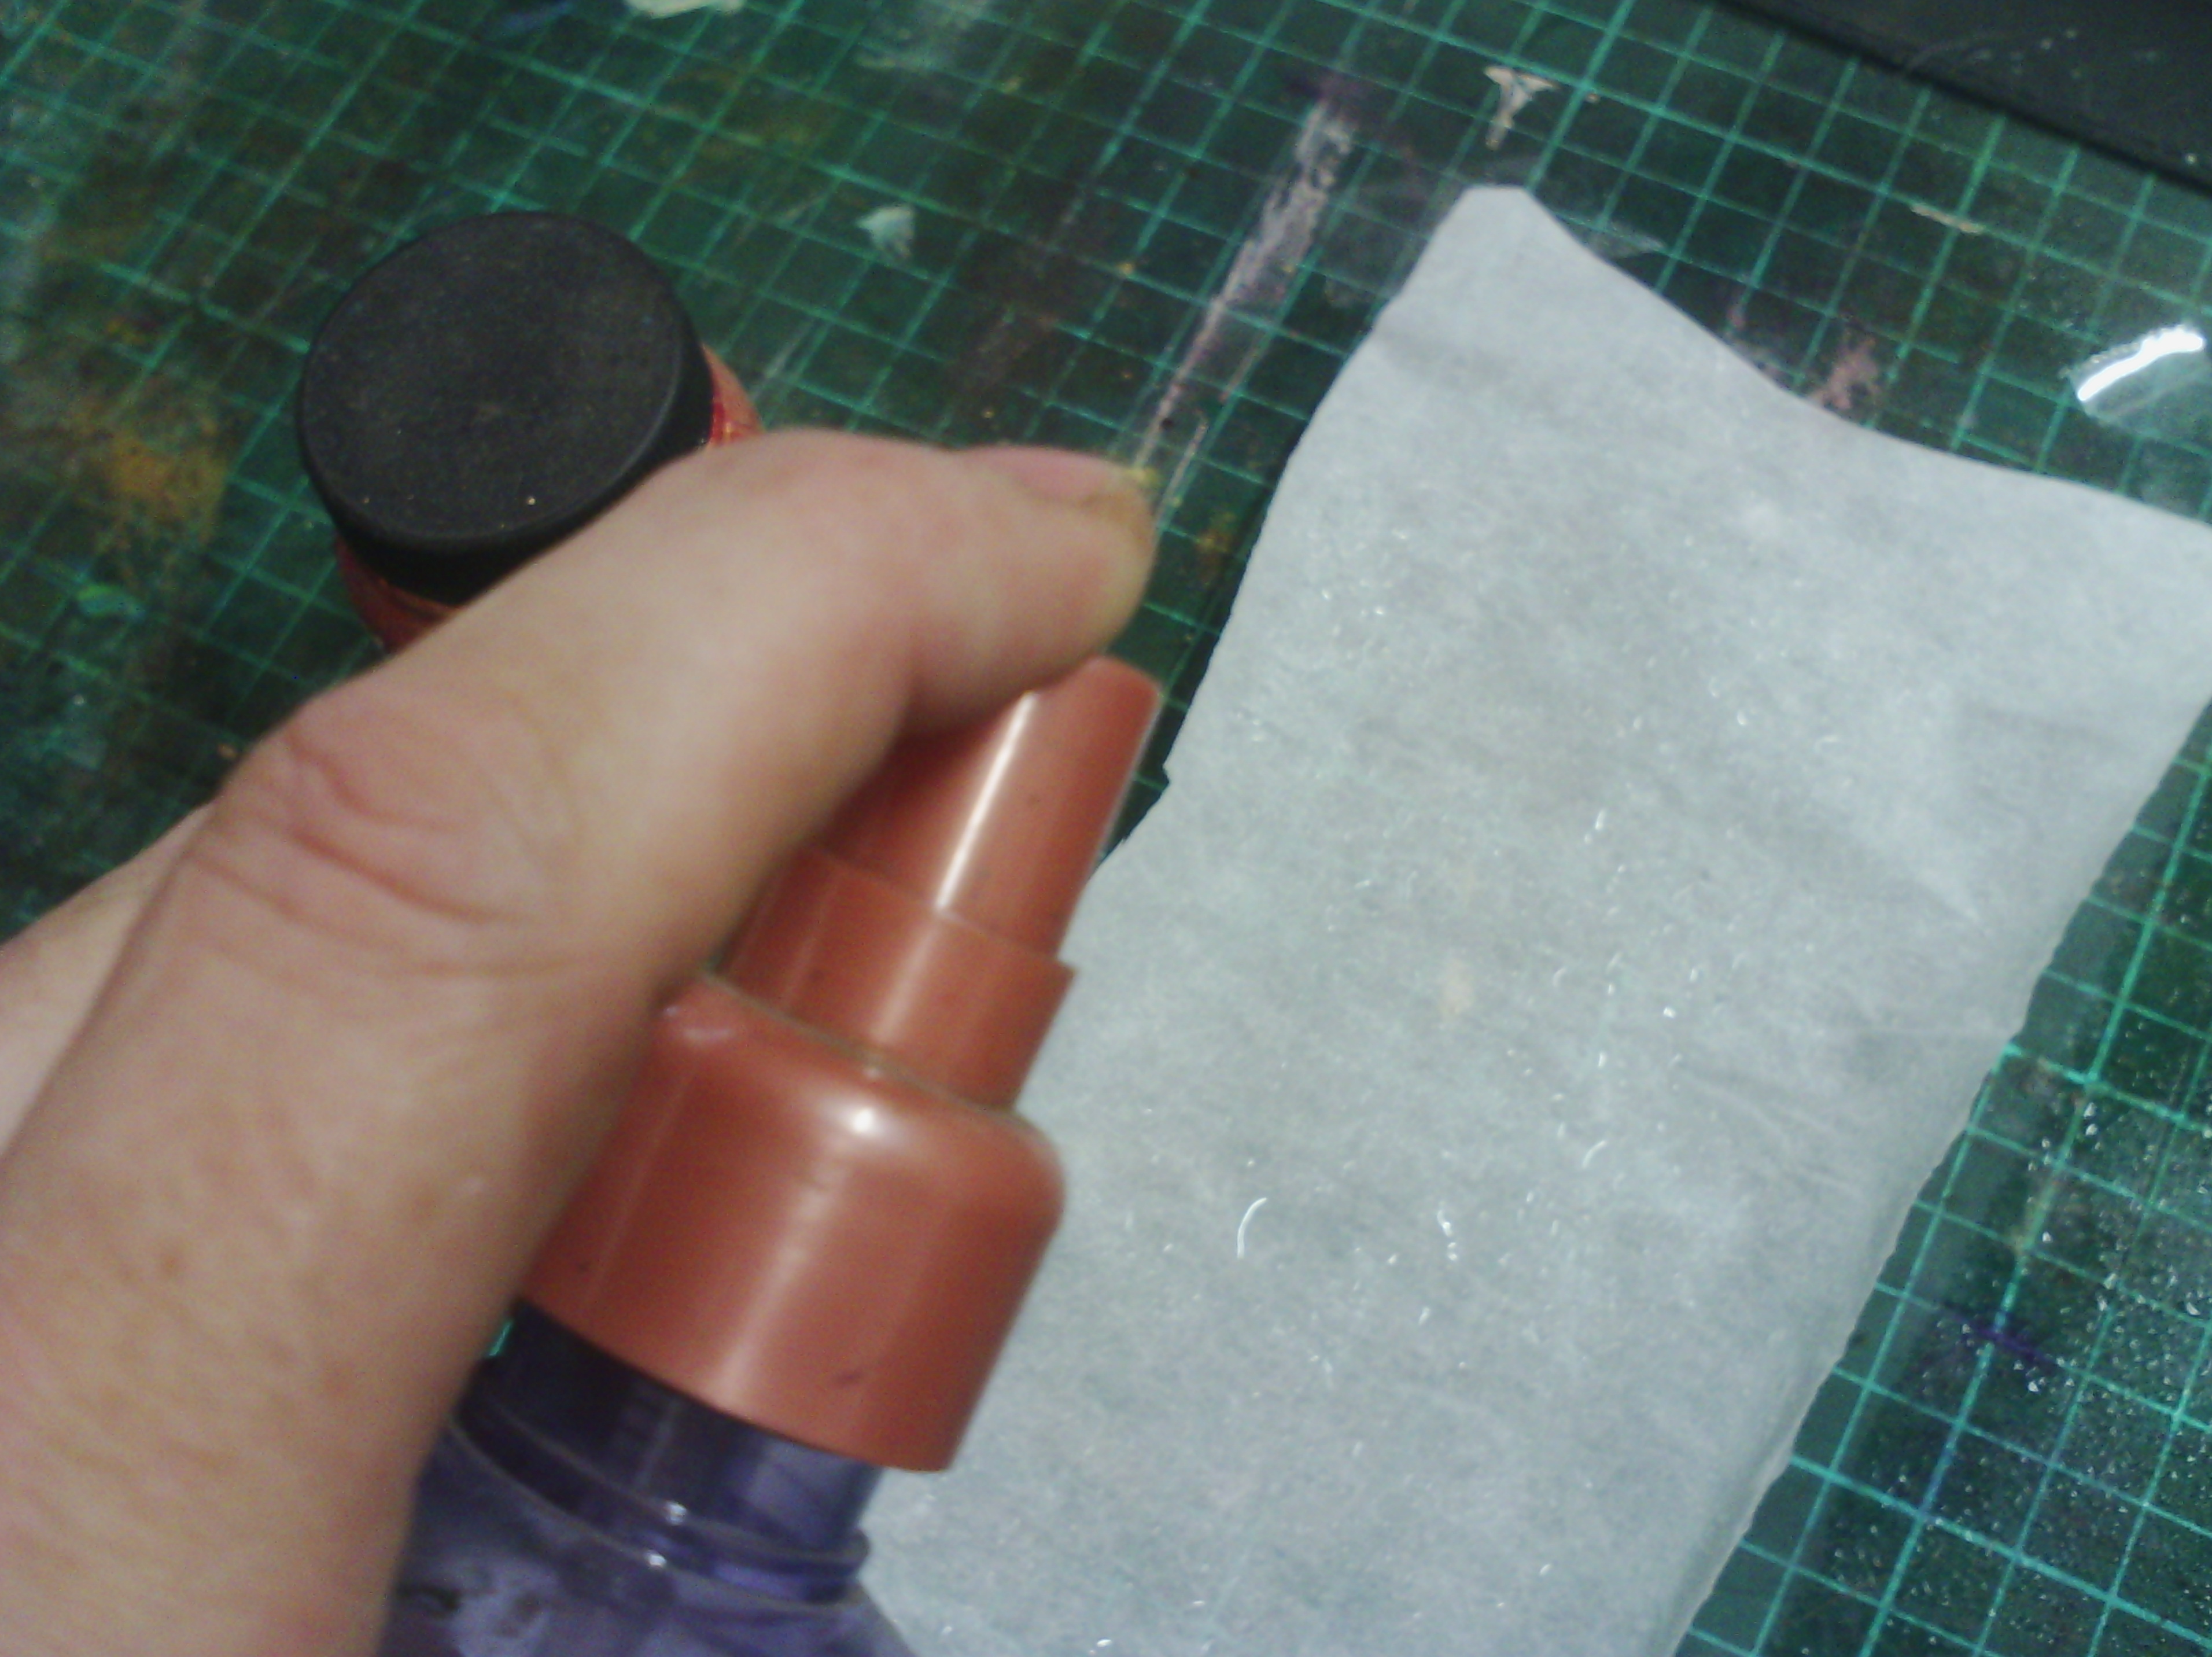
Next, I spray my fusible with water. some people dilute their paint, but i find I get the most texture by spraying with water first.
Here, you can see me painting onto the fusible and you can see how the paper backing is wrinkling up and creating texture.
Here is the fusible painted.
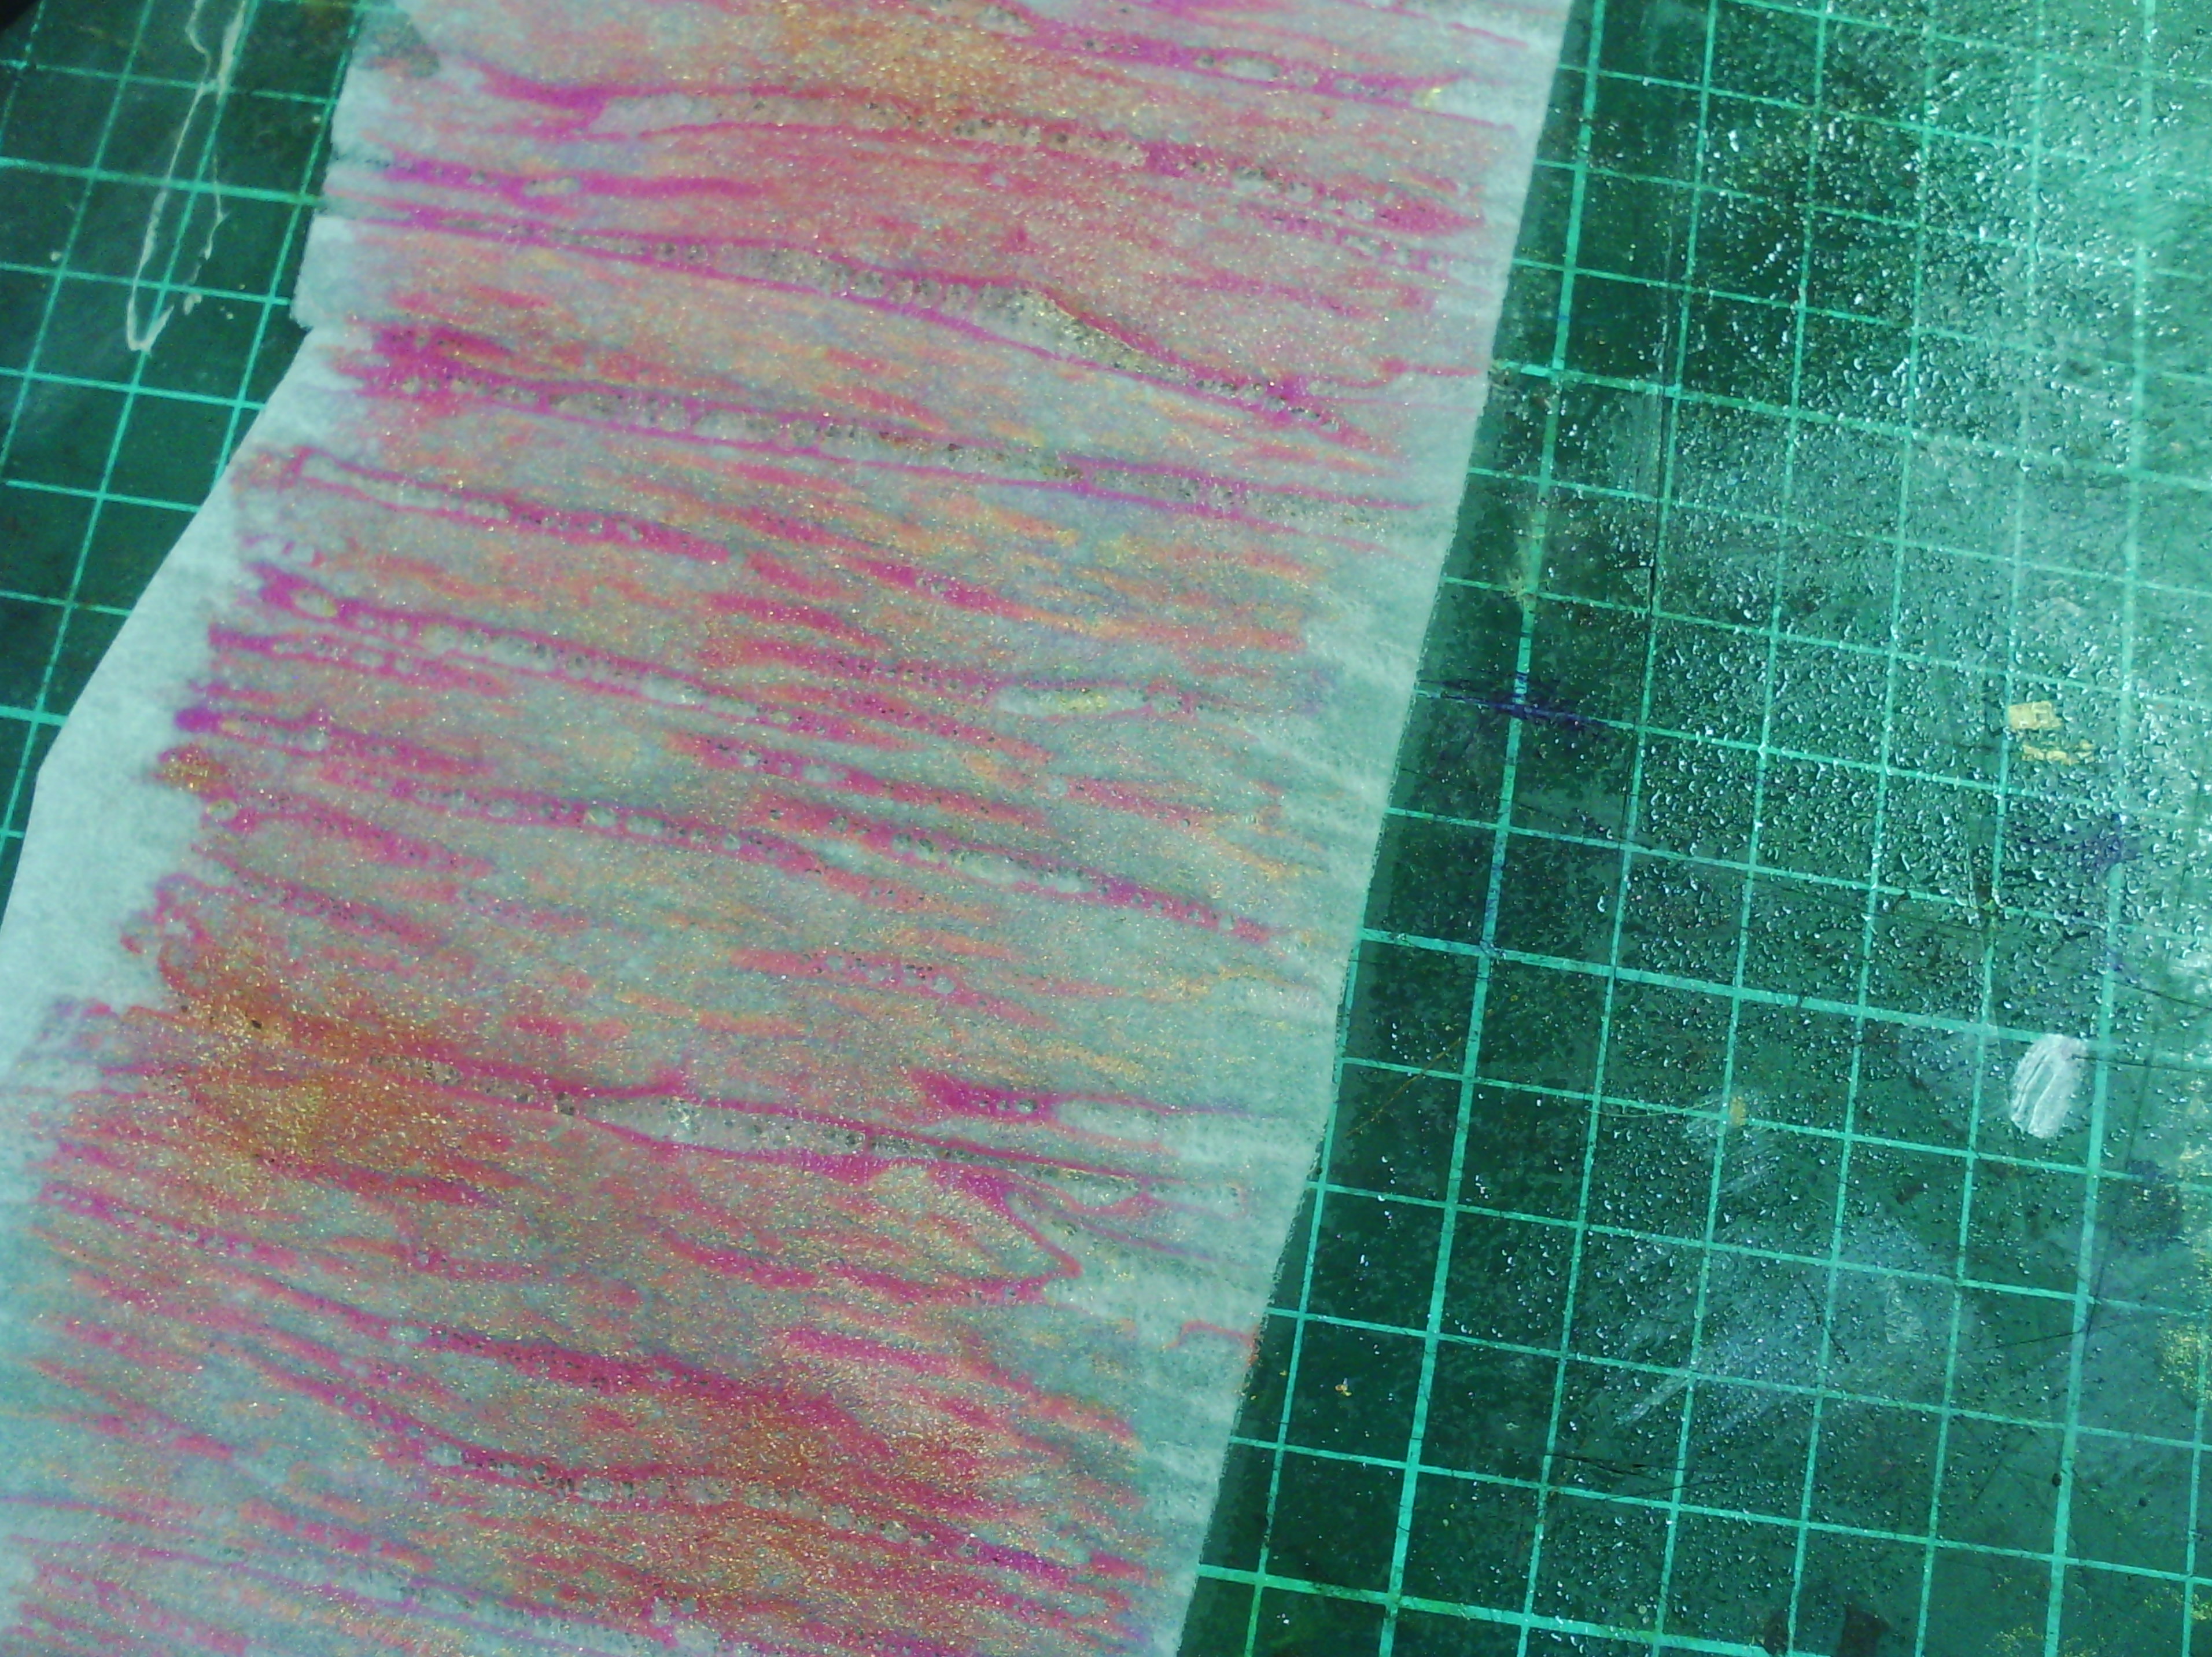
And here is a close up of the gorgeous texture. This needs to totally dry before you use it.
Now for how to use it.
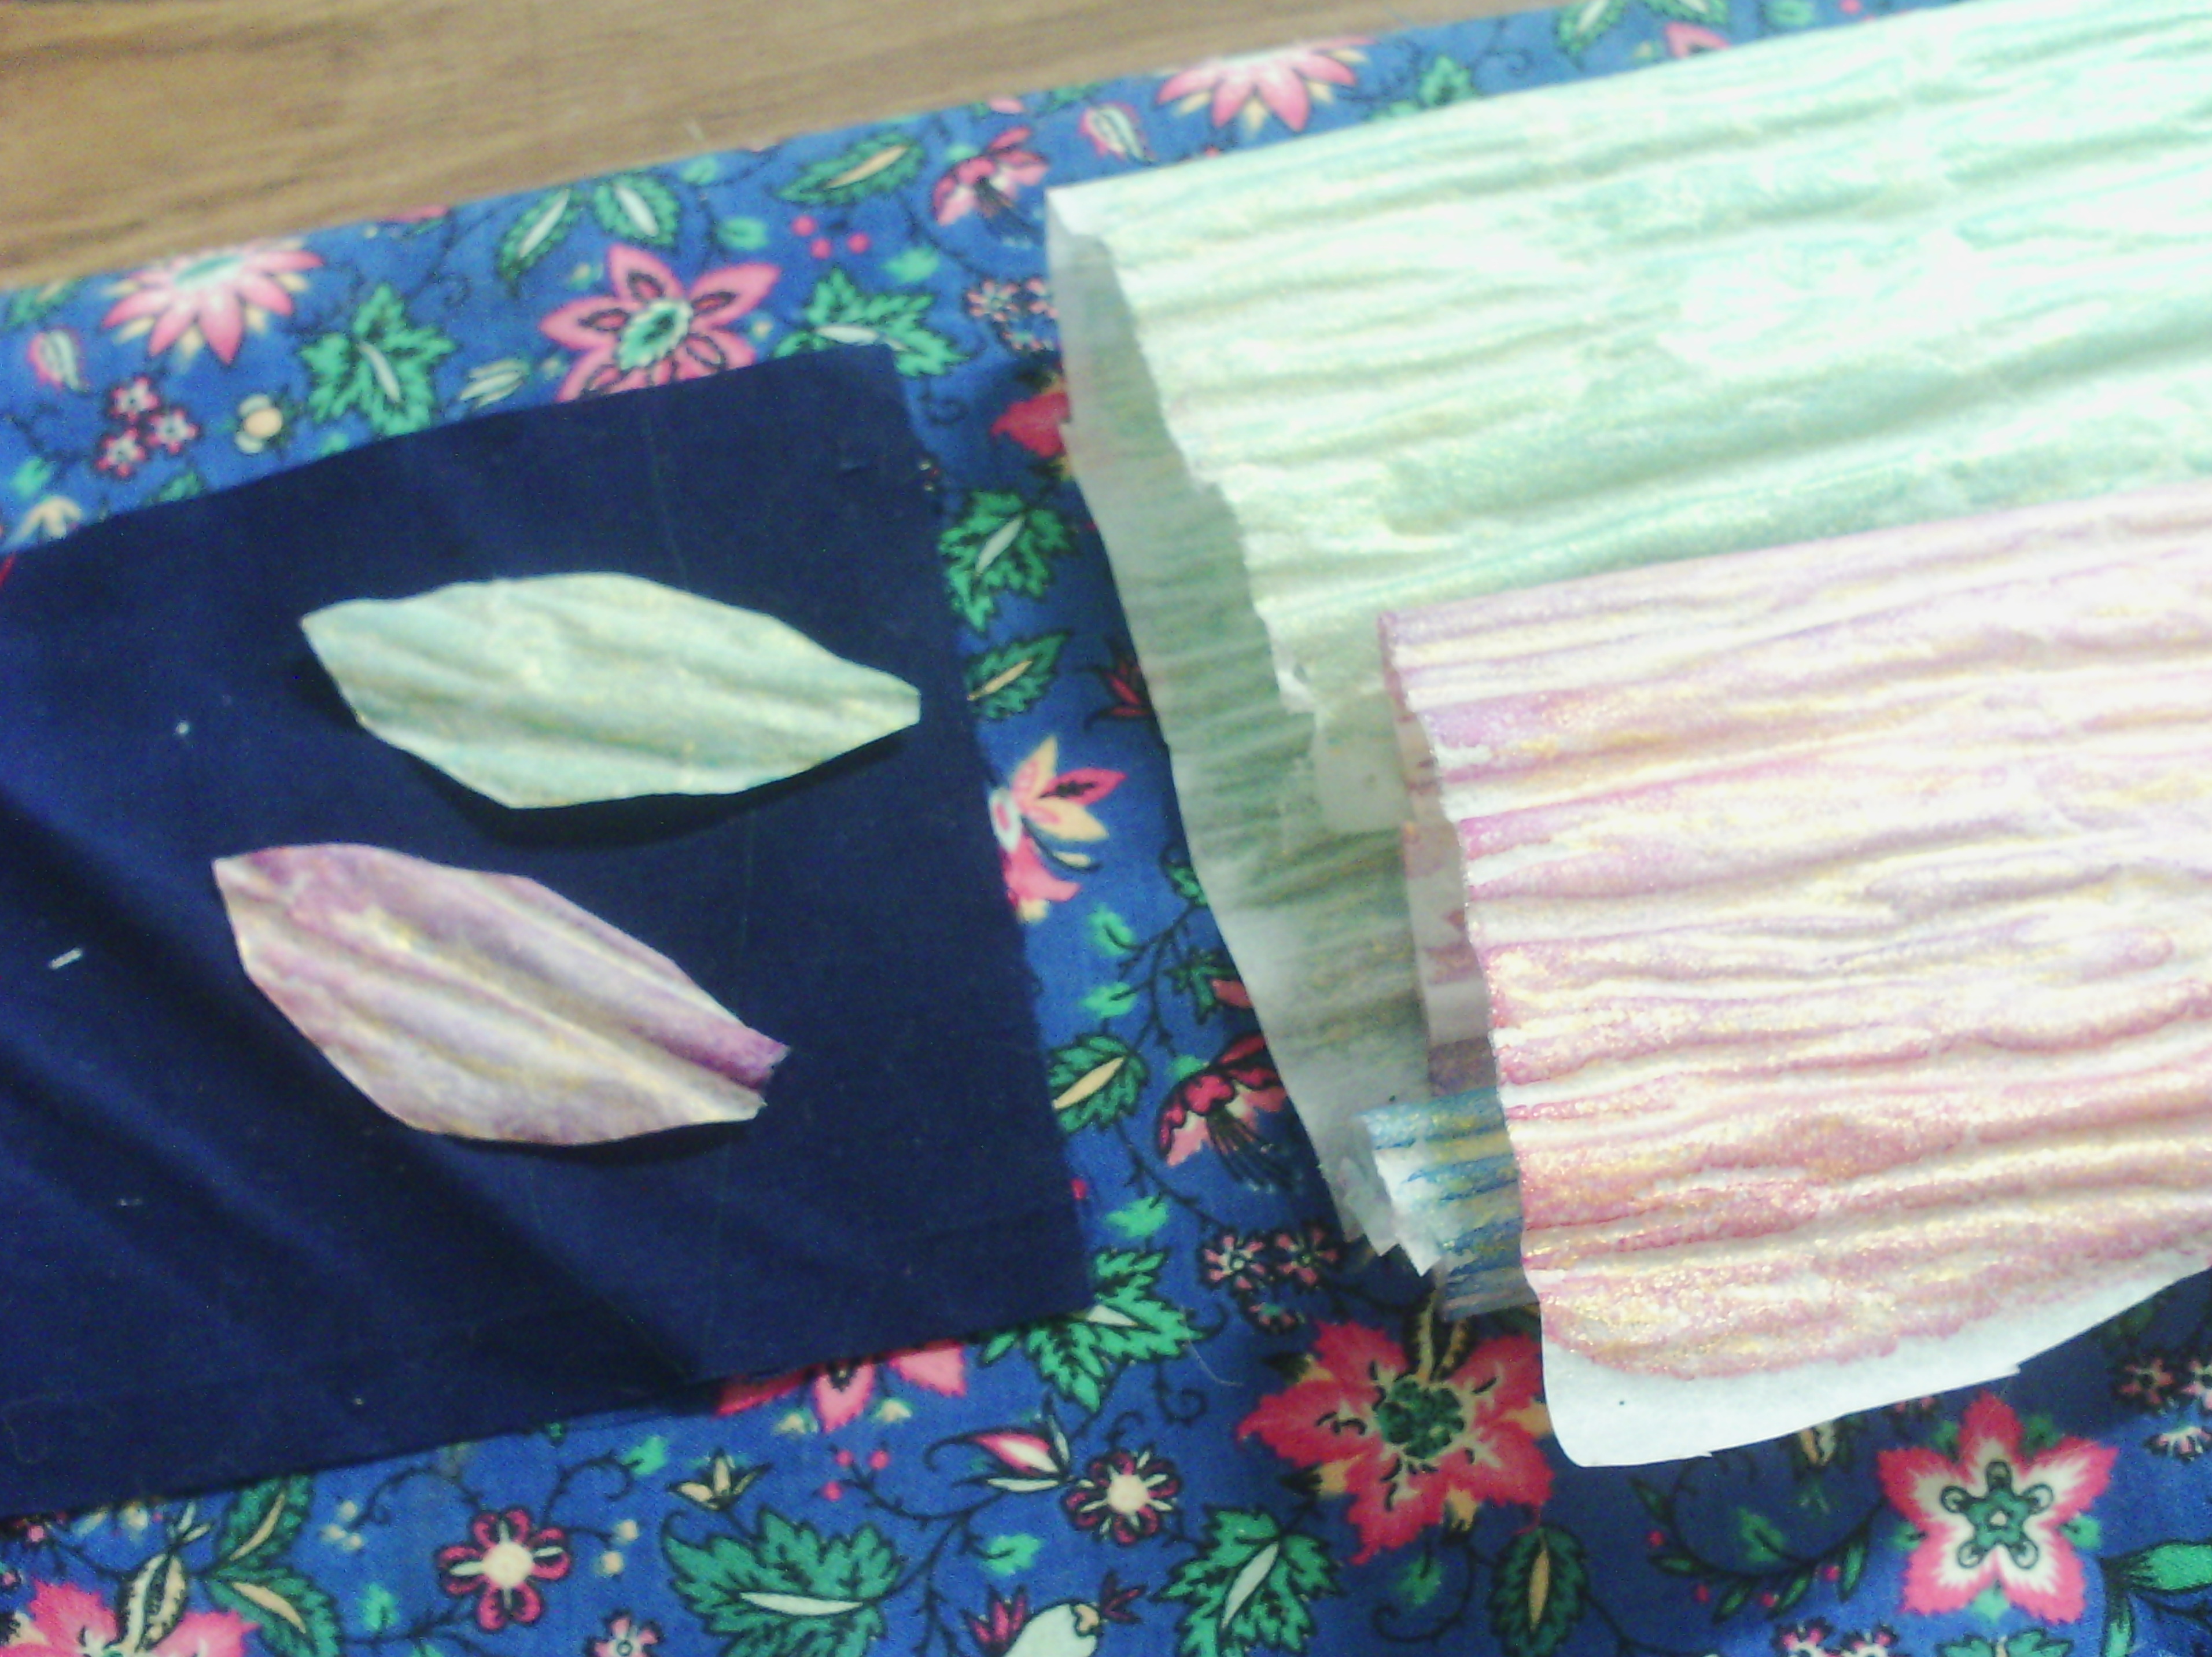
Here is some dry fusible on the right. You can see how wrinkly it gets. this is the way it should be. Some fusibles don't do this and give a very flat textureless colour. On the left you can see I have cut some leaves from the fusible.
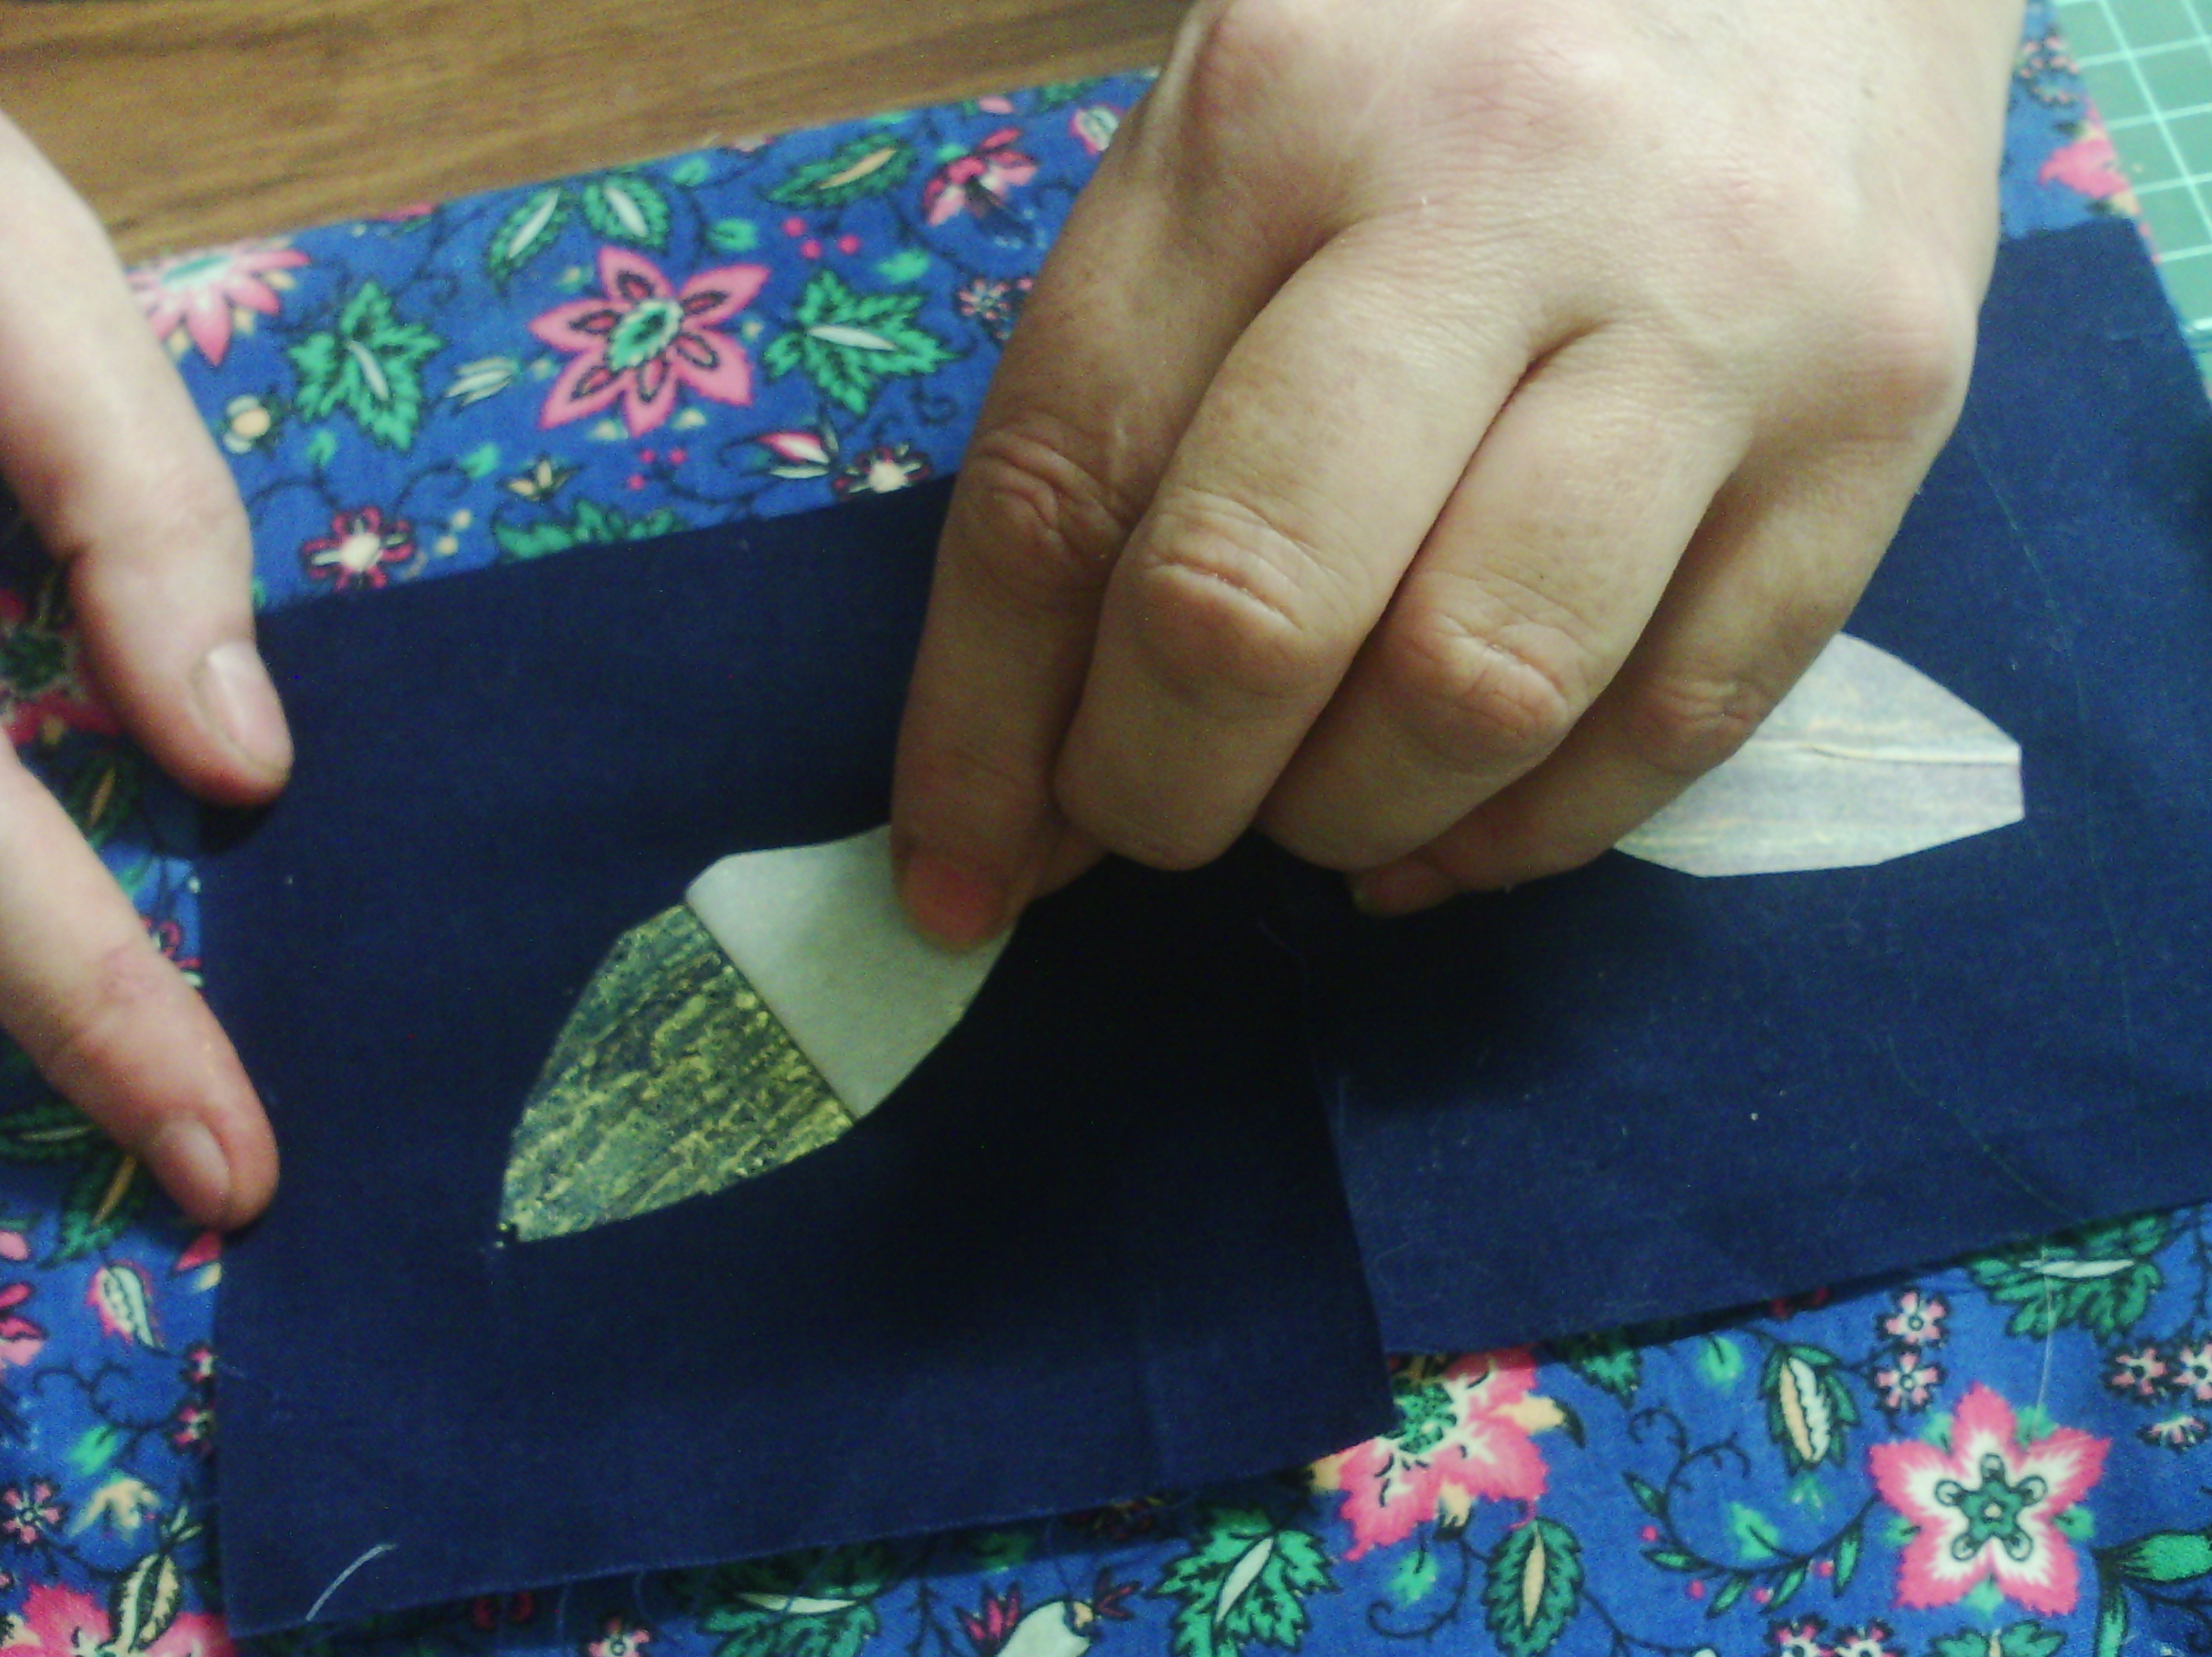
Again, you iron the leaf shapes down. Remember to iron with the paper side up, or you get a gluey mess on your iron, and use baking paper over the top as well. The one on the right has been ironed down already
When the fabric is completely cooled, peel off the paper as above.
and you get a beautiful textured metallic leaf.
This is not the only way to use the fusible. I used some torn strips of fusible on one of my collages
This is a very simple collage. I have used painted fusible as the whole background, but you can also see another feature of the painted fusible, and that is, that because it is fusible, you can still iron more on top (using baking parchment for sure) Here I have ironed on a few bits of wool fluff and a little organza sun, but you can iron sequins, glitter, loose threads and even some foil onto it ( I would be careful with the foil as too much will cover all the lovely painted texture).
I hope you enjoyed this tutorial
Happy creating!
Showing posts with label tutorial. Show all posts
Showing posts with label tutorial. Show all posts
Sunday, January 12, 2014
Thursday, March 31, 2011
Thread painting for spring
I decided that we will continue with these little thread paintings, and cover a few techniques with each one.
I have got a few ideas for different types of landscapes, but since it is spring over in the northern hemisphere, I thought we might begin with a daffodil.
Above is my pattern, which you can find here.The pattern size is 6x4 inches or A6 size.
Obviously, with this pattern, it is important to trace the pattern backwards because when we fuse it it will be a mirror image, This is because the picture is not symmetrical. Above you see my paper backed fused fabrics. What I do is take the paper off, trace the pattern pieces and re-fuse the paper BACKWARDS, in other words I place the pencil next to the fabric.
And here they are cut apart. I remove the papers and rearrange them in the backing. Using my own judgement.
Above, the pieces are arranged in a pleasing way, so
I fuse them down inside the line marked from the pattern.
Here is a close up, showing the colours more clearly. There are two colours for the petals and trumpet. The two back petals and the underneath part of the trumpet are a darket colour.
We will start defining the flower next week, so get your green and yellow threads ready!
Tuesday, March 22, 2011
Pastel painted fabric
As I said in my earlier blog on crayon, I much prefer to use pastel for this sort of work. Probably because I have thousands and am familiar with them from painting.
Below, I have got some fabric laid out on top of parchment. I would not use newspaper for this process, because the process involves wetting and the newsprint might transfer, or even wors, stick to the fabric when drying. (ask me how I know) The box of pastels at the top is a pack of windsor and newton and is there as a reminder to me to explain a few things.
Firstly, the more you pay for the pastels, the better result, or more vibrant colours you will get. This is because dry pastels are made of mostly pure pigment, and a filler or binder, which allows them to be shaped. However, with just chalk, or student grade pastels, the amount of filler is greater and the pigment therefore is less. Student grade will work, but not as well as artist quality from a reputable brand. There is a positive side and that is that dry pastels can be bought individually at most art supply stores (not department stores, real art stores) They will cost 3 to 5 dollars each and for this sort of work will last a reasonable amount of time.
My second point is that I usually add pastels as a powder and because they are mostly pigment, they are very bright even if only a little is added. When colouring fabric, the less you have to add, the less it will alter the hand of the fabric and unless you add a lot of pastel, the hand is pretty much the same.
Above you can see my tools for this project. All that is required is a knife or blade to scrape the side of the pastel and create powder. Even a sharp paring knife will do, so long as it can scrape. You can also use a nail file or sand paper, but it will get clogged with powder and you will end up wasting a fair bit.
Here you can see I have put some powder on the fabric. It doesn't look like much does it?
But when I spray it with water, the colour starts to develop. I actually use a solution of Alum instead of water, and this serves the purpose of fixing the pigment into the fabric (You can get Alum crystals from the pharmacist, you may have to order it because it is not an everyday item) Alum is the mordant used in most printer fabric.
In the above sample I have smudged the pastel with my fingers after letting it soak for a while. You need to make sure all the pastel dust is wet. Any that is not wet will not enter the fabric and will fall off when you are finished. And you definitely do not want this stuff around when you are finished as it will stain.
In this one I used a small paint brush to smudge the pastel a bit.
In this one i used a large flat ended stencil brush and rotated it on the dust to make whorls, or whirpools of colour.
And this one was not altered in any way, the pastel simply soaked in.
I couldn't wait to finish, so I ironed the fabric dry. Because there is little other than pigment, ironing doesn't really alter the effect like it does with some fabric paints.
And here are some high res pictures of the finished fabric.
The sample above was using the smearing technique (Fingerpainting I call it). If you have been following this blog, you would know that I have a fascination with tree bark textures and this was another experiment in creating bark. I simply scraped lines of a handful of browns and ochres, sprayed then smeared. It took all of 30 seconds and I was very pleased with the result.
It really is worth experimenting with this technique. I would love to see some of your results.
Below, I have got some fabric laid out on top of parchment. I would not use newspaper for this process, because the process involves wetting and the newsprint might transfer, or even wors, stick to the fabric when drying. (ask me how I know) The box of pastels at the top is a pack of windsor and newton and is there as a reminder to me to explain a few things.
Firstly, the more you pay for the pastels, the better result, or more vibrant colours you will get. This is because dry pastels are made of mostly pure pigment, and a filler or binder, which allows them to be shaped. However, with just chalk, or student grade pastels, the amount of filler is greater and the pigment therefore is less. Student grade will work, but not as well as artist quality from a reputable brand. There is a positive side and that is that dry pastels can be bought individually at most art supply stores (not department stores, real art stores) They will cost 3 to 5 dollars each and for this sort of work will last a reasonable amount of time.
My second point is that I usually add pastels as a powder and because they are mostly pigment, they are very bright even if only a little is added. When colouring fabric, the less you have to add, the less it will alter the hand of the fabric and unless you add a lot of pastel, the hand is pretty much the same.
Above you can see my tools for this project. All that is required is a knife or blade to scrape the side of the pastel and create powder. Even a sharp paring knife will do, so long as it can scrape. You can also use a nail file or sand paper, but it will get clogged with powder and you will end up wasting a fair bit.
Here you can see I have put some powder on the fabric. It doesn't look like much does it?
But when I spray it with water, the colour starts to develop. I actually use a solution of Alum instead of water, and this serves the purpose of fixing the pigment into the fabric (You can get Alum crystals from the pharmacist, you may have to order it because it is not an everyday item) Alum is the mordant used in most printer fabric.
In the above sample I have smudged the pastel with my fingers after letting it soak for a while. You need to make sure all the pastel dust is wet. Any that is not wet will not enter the fabric and will fall off when you are finished. And you definitely do not want this stuff around when you are finished as it will stain.
In this one I used a small paint brush to smudge the pastel a bit.
In this one i used a large flat ended stencil brush and rotated it on the dust to make whorls, or whirpools of colour.
And this one was not altered in any way, the pastel simply soaked in.
I couldn't wait to finish, so I ironed the fabric dry. Because there is little other than pigment, ironing doesn't really alter the effect like it does with some fabric paints.
And here are some high res pictures of the finished fabric.
No brushing
rotating stencil brush
small strokes with brush
smearing with fingers
As you see it is very easy to get very vibrant colours with this technique. And there are more ways than these to use them.
That is for another lesson.
The fabric above was treated twice, the first layer was pale green and i used the stencil brush, then I put the dark green on top as a sprinkling and allowed it to soak. If you want the pigment to spread more, you need more fluid.The sample above was using the smearing technique (Fingerpainting I call it). If you have been following this blog, you would know that I have a fascination with tree bark textures and this was another experiment in creating bark. I simply scraped lines of a handful of browns and ochres, sprayed then smeared. It took all of 30 seconds and I was very pleased with the result.
It really is worth experimenting with this technique. I would love to see some of your results.
In Art, there is no such thing as a failed experiment, only experiments with interesting results.
Monday, March 21, 2011
Easter basket
WOW! and I really mean WOW or Workshop on the Web. I won! Workshop on the web is a quarterly english online magazine that I joined a while ago. It puts out really professional tutorials by some of the best and well-known fibre artists in the UK and elsewhere - and I have won some yummy goodies and a book and entry to an online group for the book. The book is called Mixed Media: New Studio Techniques by Isobel Hall and Maggie Davies. You can click on their names to see the great work they do and I know you will agree that this win is perfect for me.
With easter looming, I thought a little project for kiddies might be the go.
This is a small easter basket, which can be as simple or as elegant as you like.
Start with the fabric (or paper, or card) you wish to use. I have decided to make mine using the plastic collage of fusible web I did a few weeks ago
You will need a square. I chose nine inches, since it can be divided easily by three. I actually cut my fusible collage a bit bigger to allow for shrinkage during ironing. I ironed it on to an aqua piece of cotton. You will need a reasonably stiff piece of fabric, or one which has been stabilised well
Remember to use parchment paper if you are using webbing as I am.
Once ironed, I trimmed the piece to it's final size
My piece shrank a little more than I wanted, so I am using an old tradesman's trick to easily divide into thirds (leave me a comment if you want to know more)
Mark lines, dividing the fabric into thirds left to right and top to bottom (like a nine-patch)
Sew ribbon, or cording or yarn along the two horizontal lines. I have used a flat knitting tape which was variegated in all the colours on the other side. I attached it with straight stitch.
Do the same along the vertical lines, making a grid. (make sure you leave enough free at each end to tie a bow)
I ran a line of clear nail polish around the edge of the fabric to seal it and stop it fraying. If you wish you could use fray stop, or you could bind the edge, or do satin stitch, or blanket stitch. It is all up to you.
Grab two adjacent ribbons, (if you look at the pic above, I mean the two ribbons that come out on each side of a corner, like the two on which the bottle is sitting) and tie them in a bow.
Fold over the little bunny ear you create after tying to show the inside fabric
Repeat this for all four corners
The finished basket. You might need to tweak the bottom corners a little to make them sit square.
Because you have made a two sided fabric, you can decide which side is out and change it to suit yourself
There are a myriad of options to assemble your box. You can sew ribbons on as I outlined above, you can sew a button and loop on or you can simply sew up the side seams, you can use grommets and ribbon, similar to the cardboard idea below. You can quilt the fabric, you can free machine embroider, add embellishments
As I said, this is a simple little basket, and in fact, with a little assistance, you could have kids making their own out of card. Instead of sewing ribbon on (which you could still do), punch holes in the corners to thread ribbon through.
I know kids would love to make these for their easter eggs, but perhaps not big enough? This can be made as big as you like, I have been thinking of trying a huge one, quilted, to make a picnic basket and as a rug when unfolded, but more thought is needed.
Enjoy your baskets.
Once you open the creative door, ideas are plenty, whilst time is short.
Choose to do what you love and it will shine.
Subscribe to:
Posts (Atom)


