Showing posts with label straight stitch. Show all posts

Monday, July 25, 2011

Water samples using plastic

I have been working on two pieces which have a river or creek in them. 
I got the idea of using recycled plastic bags for this, taking advantage of how the bags break up under heat when there is only one or two layers.
Above shows what happens when you iron one or two bags (top) and several bags (bottom).  When I did these experiments a while ago, I really liked this texture, especially when you ironed only one layer onto fusible.
Above are a black, blue and grey sample of plastic bags layered on fusible.
This sample, with several blue and grey layers, added one by one reminded me of running water, so I made up a sample using a photo to get some colours into it.
 You can't see the colours very clearly in the photo, but I have exaggerated the hints of colour I could see on my original.
This is what I came up with.  In this sample, I added fusible to a piece of blue cotton, then ironed different coloured pieces on top until I got something that looked like water if I squinted.  There was a large problem with this sample - because I didn't use a stabiliser, it puckered as the layers of plastic shrank.  You can see the puckers at the top.
 So I repeated it again with some stabiliser and above are the results.  On the left is the first stage, but I was unhappy with this and added some more white.  I was happier with the one on the right.
Another thing I learnt, is that if plastic is layered over the top of plastic (one by one) as I was doing in the last layers of the first sample, you get more defined holes.  In the second sample, I used pre fused films which I peeled off and added layer by layer, so all the plastic had fusible on it.
I was pretty happy with these samples, but there was still a lot of stitch needed to bring it all together.  I only used a simple free motion straight stitch, and the stitching could probably be done without free motion since I basically sewed back and forth in straight lines.
Above are the finished samples, with quite a bit of stitching, however there is nowhere near as much as it seems, because the plastic colours give the stitching depth.
I will be using this technique for one of my pieces, but will be trying out some painted fusible before deciding on the other piece.

Friday, March 25, 2011

Landscape part 3

Finally, let's pretty up that landscape.
Here is our landscape as we left it, above.  I am going to show you a couple of flower embellishments to put in the foreground at the front. First we are going to do some tall, lavender-like or delphinium stems.  I will show you a few ways to do these first.
Here are two ways to add leaves (above), on the left, a simple fern stitch and on the right, leaf shapes, which you can leave unfilled, or fill in.  You actually need to add the leaves after, but I am showing you the shapes here because they apply to all three flower stitches.  Remember that the picture above is a 10x magnification at least.  At a normal magnification, they will not look as rough.

The first flower stitch can use granite stitch, or circles with straight stitch to make flowers on a long stem (left, above), then put the leaves in (right).
The second way to make these flowers is to use a fern stitch, then add the leaves.  On the left, I have gone over the flowers twice to show you that if you want more colour, you can.
Another way to add more colour, is to make the fern/flowers, using a narrow zig zag.  Above is a sequence diagram showing how these are made.
The left sample uses the leaf shapes, on the right fern leaves.  I will make the first layer using the first two alternatives.
Below shows these two steps on the landscape.  First the flowers, then the leaves.
This layer might seem very pale, however, it is simply a background to the final layer and so I do not want and very vivid colours that will draw the eye.  Also, you can see my travelling stitches between the flower stems.  These will be covered up by the next layer.  If all I was going to put were these flowers, I would make them brighter and I would have gone off the edge with the stems.
For the final layer, I am going to put some organza poppies and above you can see some triangular scraps of green stitched down.  Since these pieces were actually only half a centimetre  in width at the wide part, you can work out that they are fiddly.  Use a bamboo skewer to hold them stable whilst you stitch.  At the top right, you can see my mistake - using too light a thread, and the left top is what happens when you don't hold the fabric down.  At the bottom is a "leaf" secured correctly.  The organza will fray but I like the frayed edge.  If you don't, then you can use felt, or burn the edges which I will show you in a technique lesson soon.  The leaves and the poppies themselves are not accurate.  They do not need to be - They are only an impression.


Above, you can see the green scraps secured randomly over the first layer of flowers.

Above you can see how the poppies are constructed. At the top is a small scrap secured with a granite stitch to represent a bud, and below it a circle of fabric is folded in half and secured to represent a side view.  The bottom two poppies are secured with a granite stitch in black in the centre to represent the stamens. The top flower is one layer, below it is two layers.
Here are the main poppies sprinkled over the foreground.
Next, I added a few side views and buds, then finally a few more leaves over the top.
The foreground gives the landscape a vivid focus and as you can see, the two flowers do not fight for attention.
If you are very observant, you will notice on comparing this final framed version with the one at the beginning of the lesson, I have used a larger mat board, and extended the bottom of the picture by adding more grass and poppy leaves.  I decided that the sky was too limited in the smaller frame, but that I needed a bit more on the bottom to fit in the next frame.

In these lessons we have learned a few basic techniques in thread painting to create a simple landscape.  Make one as a post card for your next swap, or as a gift.  This one is to be a postcard and is going to the USA as a gift in Craft it Forward.  Hope you like it Diana!

My next set of Thread Painting lessons will be a pictorial sampler to accompany the stitch lessons I post each Saturday.


Art begins as an experiment and ends as an experience.


Wednesday, March 23, 2011

Skeleton Leaves

I decided to do something for myself today.  It is Autumn here, and the leaves in the towns are turning.  A week or so ago, I found a skeletonised gum leaf, and the other day another, deciduous leaf.
 This is the gum leaf, unfortunately, I can't find the other leaf.
So I thought, well, let's try and make one with free motion lace  - so I did.
 I used two layers of water soluble stabiliser.  This is a Floriani one.
 I drew the leaf and veins on the stabiliser, but you can trace.  If you type in leaf in google and select images then line art from the side bar, you will probably find lots to suit you, like these.
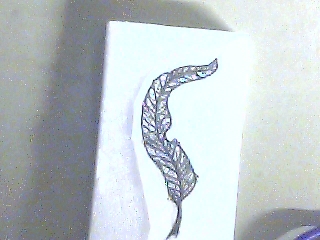
 However, there is a problem with these.  The veins do not reach the edges.  You will have to extend the lines so that they reach the edges, otherwise, your leaf will fall apart.  Lines of stitching need to cross to hold the lace together.

 Here, I have used straight stitch to go around all the lines, retracing my route when neccesary, especially in the central part, to build up the stitches.
 I also went around the whole leaf margin and the stem with a very thin zig zag when all the inner lines were done to make a stable edge.
 When I was finished, I roughly cut out the leaves,

And pinned them to some foam, then rinsed off the stabiliser under running water.  I blot them with kitchen paper to remove a lot of water.  It is best to allow them to dry before removing the pins, and you can test them for remaining stabiliser as they dry.  They will be sticky.  Run the under the tap again if they are.
 Here are the two finished leaves.  And below, framed.
  I am pleased with the results, but would use a much thinner and lighter thread next time.


The creation of something new is not accomplished by the intellect but by the play instinct acting from inner necessity. The creative mind plays with the objects it loves.
Carl Jung (1875 - 1961)

Saturday, March 19, 2011

Free Motion Zig Zag - 1

For those people who visited as soon as I uploaded,  I have reloaded the video, sorry for the mistake,
Vicki
This is a short lesson, however I just want to show you my organisational diagram for these lessons.
It is a bit hard to read here but you can download a copy here.
What this basically says is that I have divided free motion into two halves, straight and zig zag. Each of these is divided again into the four different directions, straight lines, circles, weave and multidirectional.  Fuether out are more stitches and the final two rings refer to tension techniques, which can apply to some or all of the stitches in the green and orange areas.  As you can see it is quite complicated but don't let it worry you, I have only included it for those who want it, and I am sure I will add to it, but as we move through the lessons, I will guide you through it.
Below, the first diagram shows where we are now, if you have looked at the first two lessons (here and here )
 and this diagram below shows there area we are going to cover today circled in red.


So let's get on with it
Zig Zag Stitching with Free Motion
These three types of  stitching with zig zag don't have specific names like the straight stitches; Granite, Multidirectional and Weave.  And there are really only slight differences between them, but there are some.  I will discuss them as we go along, and I have also made a short video of all three for you.

Circular Zig Zag Stitching 
Below, is a picture of this stitching. and next to it I have drawn the motion with red.

 As you will see in the video, it is best to use a fast speed on the machine and an even, moderate to slow motion for this stitch.  It is very useful for filling up large areas fast.  I like to use it with variegated thread as in this example.
 This sort of background in a piece of work gives depth, but does not draw the eye.  I often use many hues in a background, even in my paintings.
This stitch is als very good for melding different colours and shading with different colours, especially when you do not want a directional shading like with garnet and weave stitch. 
Weave Zig Zag Stitching  
 There are two ways to do this motion in zig zag, as you will see from the video and the pictures below.
 In the top area, I did not rotate between the vertical and horizontal stitching (for description of this see lesson 2) You can see that the horizontal zig zags are zig zags, but the vertical stitches are not. They are stem stitch, which we will cover in the next lesson.  In the top sample all stitches lie in the same direction.
In the bottom sample, both horizontal and vertical stitches are true zig zag stitches.  This is because I rotated 90 degrees (a right angle) between. You will see me do this in the video.  So in the bottom sample the stitches are not lying in the same direction.
This difference is important when considering the style of your thread painting.  Some artists have every stitch in the same direction, giving a very tapestry like look to their work.
Other artists like to vary the direction of their stitches either all over, or in certain parts.
When stitches all lie in the same direction, they tend to shine and reflect light more, whilst when the stitches are in different directions, the light tends to be absorbed and the effect is duller (I do not mean boring, some parts of you work need this)
Obviously, the top sample of zig zag weave is more useful in areas where you want to define direction, like the lines in a tree trunk, whilst the second stitch is more useful in areas like backgrounds in a similar way to the circular stitch above.
Multidirectional Zig Zag Stitching
Multi directional zig zag is shown below.


In many ways this stitch resembles it's straight stitch cousin closely.  The main difference is that it fills more quickly and so is useful for large areas.
It can be combined with true multidirectional straight stitch quite easily, the straight stitch being used near the edges of an area where more prescision is needed.
As with the rotated zig zag weave (above), it is useful in backgrounds and far away areas in a piece of work, where the non reflection means it does not draw the eye and compete with the focus of the work .
 Zig Zag Stitching Video


Even though this was a short lesson,  It was covering a fair amount of ground.  Remember, the most important thing is to practice and to play.

Almost everyone learns to play, but a creative person plays to learn.