If you have been waiting for some work this week, I am very sorry, but it has been a very sad one for me and I have not felt up to doing anything.
My beloved cat, Bebe was ill earlier in the week and passed away on thursday morning, when I was at AQC.
He was my constant companion, from birth
I remember him as a kitten, playing with Rubin, our dog, who believed he was his mother
And always with me, constantly talking to me in his little voice and loving me as much as I loved him.
Rest in peace my beautiful, gentle, loving companion. I will miss you so much.
Saturday, April 16, 2011
Monday, April 11, 2011
Back on board - Just
I am back blogging, but only just. Before I get back into the tutorials, I have three swaps - yes three swaps that need to be posted by the last week of April. So this week, I will be posting a little eye candy for you.
The swaps are not large - an ATC, and two postcards, and if you are my partner in any of these swaps, hope you are not disappointed with my choices.
In my misguided efforts to get my google reader under control I found a few great posts.
I want to refer you to some lovely work by Judy Cooper, a textile artist from Canada. Her landscape work is just beautiful.
Take a look at this page! These fabric jewels are gorgeous and made by Artist Meg Hannan. I realised something like this would be a perfect technique to put in my first Tangled Textiles challenge. Maybe they look like something.....? but you'll have to wait to see the whole thing on June 15.
and last, Have a look at this great tutorial from Jane LaFazio on painting flowers.
Also this week I am starting an online class with Susan Sorrell on organic designs for embroidery, so there is more eye candy!
And I got a lovely pack of supplies from Workshop on the web as part of a prize I won, which also includes tutorials. It also contained a piece of work from Maggie Grey - wow! So I am inspired to get on with those tutes, now, so I need to pick up some silk roving at AQC on thursday.
Unfortunately, although I am starting back working (or else go mad without my sewing machines), I am not posting any pictures of my studio until it is totally finished. The move has been partly accomplished, but there is the matter of paint and flooring and design walls before I can post anything.
On that note,
The swaps are not large - an ATC, and two postcards, and if you are my partner in any of these swaps, hope you are not disappointed with my choices.
In my misguided efforts to get my google reader under control I found a few great posts.
I want to refer you to some lovely work by Judy Cooper, a textile artist from Canada. Her landscape work is just beautiful.
Take a look at this page! These fabric jewels are gorgeous and made by Artist Meg Hannan. I realised something like this would be a perfect technique to put in my first Tangled Textiles challenge. Maybe they look like something.....? but you'll have to wait to see the whole thing on June 15.
and last, Have a look at this great tutorial from Jane LaFazio on painting flowers.
Also this week I am starting an online class with Susan Sorrell on organic designs for embroidery, so there is more eye candy!
And I got a lovely pack of supplies from Workshop on the web as part of a prize I won, which also includes tutorials. It also contained a piece of work from Maggie Grey - wow! So I am inspired to get on with those tutes, now, so I need to pick up some silk roving at AQC on thursday.
Unfortunately, although I am starting back working (or else go mad without my sewing machines), I am not posting any pictures of my studio until it is totally finished. The move has been partly accomplished, but there is the matter of paint and flooring and design walls before I can post anything.
On that note,
All growth depends upon activity. There is no development physically or intellectually without effort, and effort means work.
Calvin Coolidge
Calvin Coolidge
Sunday, April 3, 2011
The DH made me do it
Unfortunately for you, but very fortunate for me, my partner woke me up this morning and told me we were going to move my old studio into the new studio.
This has been on the cards for a while. I hurt my back a few months back when I started doing it.
So, I am putting the blog on hold for a week. I will be back, so no deserting me, now.
I have also joined an international challenge group, and will be posting there. Our first challenge starts on Monday (Tuesday in the southern hemisphere), so that will be exciting.
Have a great week and I'll see you next week
Vicki
This has been on the cards for a while. I hurt my back a few months back when I started doing it.
So, I am putting the blog on hold for a week. I will be back, so no deserting me, now.
I have also joined an international challenge group, and will be posting there. Our first challenge starts on Monday (Tuesday in the southern hemisphere), so that will be exciting.
Have a great week and I'll see you next week
Vicki
Saturday, April 2, 2011
Time out
Tonight's blog is short.
I have been at quilt group all day and been making charity quilts. Autumn has finally arrived here and it is very cold today.
It has been a very busy week and very eventful, and today's tutorial is not ready, but I will post it in the next few days.
I have two swaps starting on Monday, so I will post my progress on those, as soon as I get going. One is a free machine embroidery ATC and the other is a machine felted postcard or ATC.
As Well, I have joined an international fiber art challenge which will be up and running very soon.
I have a course with Susan Sorrell in a week or two and am reading my first lesson for maggie grey's online class for mixed media new studio techniques
Tonight, I am going to read two new books I got down in Melbourne, a few days ago
Dimensional Delights by Liz Aneloski
Embellished Applique, by Patricia Converse
Also, I need to reorganise my Google reader and get myself up to date.
Tonight is also the end of daylight saving here, so I'll need to reorganise all my times for online shows like
cool to craft

Artistically speaking
C&T Digital Lounge
Creative edventures
Robi@nite
Create mixed media
Etsy labs
So as you can see, a creative life is very full, and that's the way I like it.
I have been at quilt group all day and been making charity quilts. Autumn has finally arrived here and it is very cold today.
It has been a very busy week and very eventful, and today's tutorial is not ready, but I will post it in the next few days.
I have two swaps starting on Monday, so I will post my progress on those, as soon as I get going. One is a free machine embroidery ATC and the other is a machine felted postcard or ATC.
As Well, I have joined an international fiber art challenge which will be up and running very soon.
I have a course with Susan Sorrell in a week or two and am reading my first lesson for maggie grey's online class for mixed media new studio techniques
Tonight, I am going to read two new books I got down in Melbourne, a few days ago
Dimensional Delights by Liz Aneloski
Embellished Applique, by Patricia Converse
Also, I need to reorganise my Google reader and get myself up to date.
Tonight is also the end of daylight saving here, so I'll need to reorganise all my times for online shows like
cool to craft

Artistically speaking
C&T Digital LoungeCreative edventures
Robi@nite
Create mixed media
Etsy labs
So as you can see, a creative life is very full, and that's the way I like it.
- We make a living by what we get, we make a life by what we give.
- Sir Winston Churchill (1874 - 1965)
Labels:
books,
online shows
Friday, April 1, 2011
Burned fabrics
I thought I would experiment a little with my heat tool and see what I come up with. There are lots of places to go for information on burning textiles, but my favourites are Kim Thittichai's Hot Textiles and Quilting Arts Magazine.
Here are a selection of synthetic, from lace, to felt, to lame'
Below, I have traced around a motif in some lace with the straight tip on the heat tool. It creates a sealed edge that can be appliqued without fraying.
You can trace/cut around quite complicated motifs this way.
It works extremely well on Lutradur.
This lame' frays very easily, but the shape burned out will not fray.
The same is true for this satin.
You can also use some of the other heads to emboss, or burn patterns into fabric. This works really well on velvet. Above tou can see a flat circular head and a nine patch sort of head. If you want to emboss instead of burn you need to be able to lower the heat on your tool.
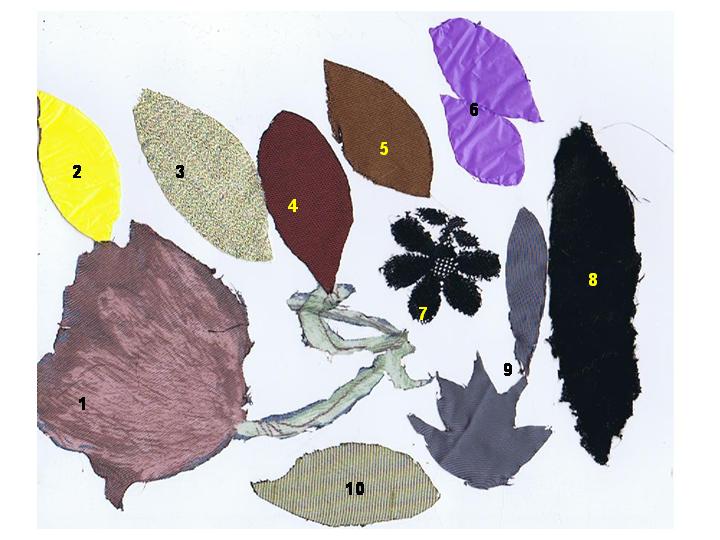
Here are some applique leaves and motifs cut out.

Using the circular head on plastic at a hot heat, then layering two colours
Cutting out bubble wrap then melting the bubbles over a foil base
In these two lutradur samples, I have cut out a design with the straight tool, and burned with the shape tools.
In this satin sample, the melted fabric made strands as I pulled the tool away. I definitely need to repeat this.
In this lutradur sample layered over a purple background, the left circles went totally through, whilst the right citcles only went halfway forming a fine lace. I liked that.
In these to samples I was experimenting with getting the leaf to stitck to the fabric underneath. It wasonly a partial success.
These two are embossed crushed velvet. because the velvet was black, It is very hard to see the embossing here, but it is very visible when looking at it in reality.
Here I have both fully burned and partially burned lame. The sample on the right is burning lame onto felt, which requires a higher heat to melt
If you look carefully, you can see the embossed circle on this shot satin.
Lame and organza on felt.
Here is the large lace motif burned out.
These textured satins were perfect for cutting geometrics out. This would be a great addition to some cut work.
These two examples on black silk (which also needs a higher heat) were some scraps of fused fabrics I had. I was not sure if it was a good idea to use them, but I am glad I did. Since these were sheers, I put a little angelina between the two layers, I wanted to see if I could trap the angelina in between. It worked, but I also discovered something else.
I simply put a piece of fusible larger than the shape (without the paper backing), between the two layers before I burned the line and it worked! So not only does this fuse the fabrics to the background, you don't have to iron any fusing first.
I would not trust this to be permanent, since the fusing is only a fine line, but for me it was a great discovery.
Using this method, you could have beautiful synthetic appliques (which are usually fiddly because the fabric is slippery, and can't be fused because the fabric will melt). The appliques would easily stay in place for stitching, and because the fusible is not ironed in the centre, they would stay soft.
I will have to experiment with washing after stitching to see what happens to the unironed fusible, but my guess is it is so fine, it would not bea problem.
WOW - I feel like shouting Eureka! I am most certainly going to use this in my secret activity that I told you I would tell you about soon.
Did you hear that girls? Here's my first technique.
So excited. No quote today
Oh and I got the book I won from workshop on the web yesterday
I am really enjoying reading it and looking forward to doing the free online tutorials that go with it.
Vicki
Here are a selection of synthetic, from lace, to felt, to lame'
Below, I have traced around a motif in some lace with the straight tip on the heat tool. It creates a sealed edge that can be appliqued without fraying.
You can trace/cut around quite complicated motifs this way.
It works extremely well on Lutradur.
This lame' frays very easily, but the shape burned out will not fray.
The same is true for this satin.
You can also use some of the other heads to emboss, or burn patterns into fabric. This works really well on velvet. Above tou can see a flat circular head and a nine patch sort of head. If you want to emboss instead of burn you need to be able to lower the heat on your tool.
Here are some applique leaves and motifs cut out.
- from very thin chifon/organza
- from plastic garbage bags
- lame
- a shot satin
- silk
- several layers og garbage bag plastic (seals them together)
- Lace
- crushed velvet
- satin
- an embossed satin

Using the circular head on plastic at a hot heat, then layering two colours
Cutting out bubble wrap then melting the bubbles over a foil base
In these two lutradur samples, I have cut out a design with the straight tool, and burned with the shape tools.
In this satin sample, the melted fabric made strands as I pulled the tool away. I definitely need to repeat this.
In this lutradur sample layered over a purple background, the left circles went totally through, whilst the right citcles only went halfway forming a fine lace. I liked that.
In these to samples I was experimenting with getting the leaf to stitck to the fabric underneath. It wasonly a partial success.
These two are embossed crushed velvet. because the velvet was black, It is very hard to see the embossing here, but it is very visible when looking at it in reality.
Here I have both fully burned and partially burned lame. The sample on the right is burning lame onto felt, which requires a higher heat to melt
If you look carefully, you can see the embossed circle on this shot satin.
Lame and organza on felt.
Here is the large lace motif burned out.
These textured satins were perfect for cutting geometrics out. This would be a great addition to some cut work.
These two examples on black silk (which also needs a higher heat) were some scraps of fused fabrics I had. I was not sure if it was a good idea to use them, but I am glad I did. Since these were sheers, I put a little angelina between the two layers, I wanted to see if I could trap the angelina in between. It worked, but I also discovered something else.
If the top fabric has fusible on the back, when you burn around it, you also fuse it to the background (so long as the background has a higher melting point). Wow! I found this such and exciting discovery that I tried a lot of fused fabrics on some brocade (below).
- grey satin
- green garbag plastic
- white metallic organza
- textured satin
- loose weave organza
- velvet ribbon
- lutradur
I simply put a piece of fusible larger than the shape (without the paper backing), between the two layers before I burned the line and it worked! So not only does this fuse the fabrics to the background, you don't have to iron any fusing first.
I would not trust this to be permanent, since the fusing is only a fine line, but for me it was a great discovery.
Using this method, you could have beautiful synthetic appliques (which are usually fiddly because the fabric is slippery, and can't be fused because the fabric will melt). The appliques would easily stay in place for stitching, and because the fusible is not ironed in the centre, they would stay soft.
I will have to experiment with washing after stitching to see what happens to the unironed fusible, but my guess is it is so fine, it would not bea problem.
WOW - I feel like shouting Eureka! I am most certainly going to use this in my secret activity that I told you I would tell you about soon.
Did you hear that girls? Here's my first technique.
So excited. No quote today
Oh and I got the book I won from workshop on the web yesterday
I am really enjoying reading it and looking forward to doing the free online tutorials that go with it.
Vicki
Subscribe to:
Posts (Atom)